Supplies Needed
1 tube of choice – I
used the beautiful artwork of Cris DeLara which can be purchased from Up Your Art. You must have a license to use.
Font of choice – I
used Effloresce here
Becky Mask 22 here
Divine Intentionz template 378 here
"Blue Fairy Sibylle" is a tagger size scrap kit created by Cindy of Cindy's Creative Designs and can be purchased from Heartbeatz Creationz. You can visit her blog here. Thank you Cindy for a beautiful kit.
~♥~ Let’s get started ~♥~
Open up the template.
Shift + D.
Close out the original.
Delete the top 4 layers.
Image/Canvas Size:
700 x 600
OK
Highlight and open the Background layer.
Flood fill white.
Highlight Square 4 layer.
Click on it with your Magic Wand.
New Raster layer.
Copy and paste Paper 1 Into Selection.
Deselect.
Delete the template layer.
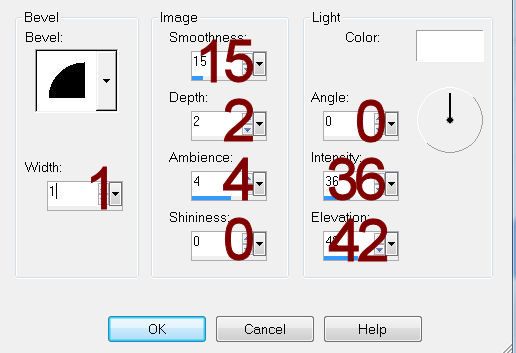
Give the paper layer a slight Inner Bevel:

Highlight Square 5 layer.
Repeat the above step.
Highlight thin Rectangle.
Click on it with your Magic Wand.
New Raster layer.
Copy and paste Paper 16 Into Selection.
Deselect.
Delete the template layer.
Give the paper layer a slight Inner Bevel.
Highlight Square 1 layer.
Click on it with your Magic Wand.
New Raster layer.
Copy and paste Paper 3 Into Selection.
Copy and paste Grass 2 as a new layer over the paper layer.
Move into position.
Selections/Invert
Tap the delete key.
Deselect.
Delete the template layer.
Give the paper the same slight Inner Bevel.
Highlight Square 2 layer.
Click on it with your Magic Wand.
New Raster layer.
Copy and paste Paper 3 Into Selection.
Copy and paste Cloud 1 as a new layer.
Resize 25%/Duplicate
Move both cloud layers into a position over the paper you like.
Deselect for now.
Copy and paste Leaves 1 as a new layer.
Resize 47%
Free rotate Left 15 degrees.
Move into position - see my tag for reference.
Highlight Square 2 template layer.
Click anywhere outside of it with your Magic wand.
Highlight each cloud layer that overhangs the paper layer and tap the delete key.
Deselect.
Delete the template layer.
Highlight the paper layer and give with the same slight Inner Bevel.
Highlight Circle 1 layer.
Click on it with your Magic Wand.
New Raster layer.
Copy and paste Wagon Wheel 1 Into Selection.
Deselect.
Delete the template layer.
Highlight Circle 2 layer.
Repeat the above step.
Highlight Square 3 layer.
Click on it with your Magic Wand.
New Raster layer.
Copy and paste Paper 16 Into Selection.
Deselect for now.
Add the following elements over the paper layer. Don't worry about what overhangs the paper. We'll clean that up in a bit. See my tag for reference of placement:
Castle 1: Resize 60%
Tree 3
Tree 2: Resize 40%/Mirror
Ground 1: REsize 50%/Duplicate 3x's (move 2 of them behind the castle but move up a little)
Highlight the paper layer.
Click anywhere outside of it with your Magic Wand.
Highlight each element layer that overhangs the paper and tap the delete key, but NOT the castle.
Delete the template layer.
Color Pallet:
Foreground: #ffffff
Background: #000000
Highlight Dotted Square layer.
Make your Color Replacer Tool active and double right click on the dotted squares.
It should turn black.
Copy and paste your tube as a new layer.
Add your elements. I used:
Wreath 1: Resize 70%/Duplicate
Balloons 1: Resize 50%
Deco 2: Resize 40%/Mirror
Butterflies 1: Resize 50%
Butterflies 2: Resize 15%/Duplicate/Mirror/Resize 70%
Image/Canvas Size:
700 x 600
OK
Highlight and open the Background layer.
Flood fill white.
Highlight Square 4 layer.
Click on it with your Magic Wand.
New Raster layer.
Copy and paste Paper 1 Into Selection.
Deselect.
Delete the template layer.
Give the paper layer a slight Inner Bevel:

Highlight Square 5 layer.
Repeat the above step.
Highlight thin Rectangle.
Click on it with your Magic Wand.
New Raster layer.
Copy and paste Paper 16 Into Selection.
Deselect.
Delete the template layer.
Give the paper layer a slight Inner Bevel.
Highlight Square 1 layer.
Click on it with your Magic Wand.
New Raster layer.
Copy and paste Paper 3 Into Selection.
Copy and paste Grass 2 as a new layer over the paper layer.
Move into position.
Selections/Invert
Tap the delete key.
Deselect.
Delete the template layer.
Give the paper the same slight Inner Bevel.
Highlight Square 2 layer.
Click on it with your Magic Wand.
New Raster layer.
Copy and paste Paper 3 Into Selection.
Copy and paste Cloud 1 as a new layer.
Resize 25%/Duplicate
Move both cloud layers into a position over the paper you like.
Deselect for now.
Copy and paste Leaves 1 as a new layer.
Resize 47%
Free rotate Left 15 degrees.
Move into position - see my tag for reference.
Highlight Square 2 template layer.
Click anywhere outside of it with your Magic wand.
Highlight each cloud layer that overhangs the paper layer and tap the delete key.
Deselect.
Delete the template layer.
Highlight the paper layer and give with the same slight Inner Bevel.
Highlight Circle 1 layer.
Click on it with your Magic Wand.
New Raster layer.
Copy and paste Wagon Wheel 1 Into Selection.
Deselect.
Delete the template layer.
Highlight Circle 2 layer.
Repeat the above step.
Highlight Square 3 layer.
Click on it with your Magic Wand.
New Raster layer.
Copy and paste Paper 16 Into Selection.
Deselect for now.
Add the following elements over the paper layer. Don't worry about what overhangs the paper. We'll clean that up in a bit. See my tag for reference of placement:
Castle 1: Resize 60%
Tree 3
Tree 2: Resize 40%/Mirror
Ground 1: REsize 50%/Duplicate 3x's (move 2 of them behind the castle but move up a little)
Highlight the paper layer.
Click anywhere outside of it with your Magic Wand.
Highlight each element layer that overhangs the paper and tap the delete key, but NOT the castle.
Delete the template layer.
Color Pallet:
Foreground: #ffffff
Background: #000000
Highlight Dotted Square layer.
Make your Color Replacer Tool active and double right click on the dotted squares.
It should turn black.
Copy and paste your tube as a new layer.
Add your elements. I used:
Wreath 1: Resize 70%/Duplicate
Balloons 1: Resize 50%
Deco 2: Resize 40%/Mirror
Butterflies 1: Resize 50%
Butterflies 2: Resize 15%/Duplicate/Mirror/Resize 70%
Highlight the background layer.
Select All.
New Raster layer.
Copy and paste Paper 16 Into Selection.
Apply the mask.
Make your Pick Tool active and pull all 4 sides out slightly.
Merge Group.
Add your copyright.
Add your name:
Foreground and Background: #000000
Type your name.
Convert to Raster layer.
Select All/Float/Defloat
Selections/Modify/Expand by 2.
New Raster layer below the name layer.
Flood fill with #d6e8f2
Deselect.
Merge Visible both name layers.
Resize all layers 80%.
I’d love to see your results.
Hugs,
Bev


No comments:
Post a Comment