
Supplies Needed
1 tube of choice – I
used the beautiful artwork of Sue Miller which can be purchased from Up Your Art. You must have a license to use.
Font of choice – I
used Aquarelle here
Monti Circular Mask here
Vickie's template 33 here
Papers which I created and supplied here.
These papers are for personal use and only to be used in this tutorial.
All other elements in this tutorial are on separate layers that are included with the tube from UYA.
Plug Ins used:
Eyecandy 3.1 - Glow
Mura's Meister - Copies
Xero - Porcelain
This tutorial was
written assuming you have working knowledge of PSP.
~♥~ Let’s get started ~♥~
Open up the template.
Shift + D.
Close out the original.
Delete the credit layer.
Copy and paste the pink flower from the elements layer of the tube (NOT the flower with the stem and leaves) as a new layer on your working canvas.
Apply Mura's Meister - Copies:
Choose Encircle and match your settings to mine:

Duplicate the flower ring.
Resize 45%
In your layers pallet position the large flower ring behind Circle 1.
In your layers pallet position the small flower ring behind Circle 2.
Highlight Circle 2 layer.
Click on it with your Magic Wand.
New Raster layer.
Copy and paste Paper 4 Into Selection.
Copy and paste your tube as a new layer.
Resize 60%
Change the Properties to Soft Light.
Paste the tube again.
Resize 40%
Move both swan tubes into position over the small circle paper - see my tag for reference.
Highlight the paper layer.
Click anywhere outside of it with your Magic Wand.
Highlight each swan layer and tap the delete key.
Deselect.
Highlight the paper layer.
Apply Eyecandy 3.1 - Glow:
Width: 5
Opacity: 100
Opacity Drop Off: Fat
Color: #ffffff
OK
Delete the template layer.
Merge Visible the two swan layers and the small circle paper layer.
Apply Xero - Porcelain:
Use Default Settings
Copy and paste the (top) Purple flower from the elements layer of the tube.
Resize 70%
Duplicate
Resize 70%
Duplicate
You should now have 3 flowers - 1 big, 2 smaller.
Move the three flowers into position over the merged layer - see my tag for reference.
Duplicate all 3 flowers and move these 3 flowers into position at the opposite side of the merged layer.
Merge Visible all flower layers, the merged layer, and the small ring of flowers.
Highlight Raster 1 layer.
Make your Target Tool active and change the color of the template layer to #2796d2.Highlight Circle 1 layer.
Click on it with your Magic Wand.
New Raster layer.
Copy and paste Paper 1 Into Selection.
Deselect.
Apply Eyecandy 3.1 - Glow:
Use same settings.
Delete the template layer.
Highlight Rec 1 layer.
Click on it with your Magic Wand.
New Raster layer.
Copy and paste Paper 4 Into Selection.
Deselect.
Delete the template layer.
Give the paper a slight Inner Bevel:

Highlight Rec 2 layer.
Click on it with your Magic Wand.
New Raster layer.
Copy and paste Paper 3 Into Selection.
Deselect.
Give it the same slight Inner Bevel.
Delete the template layer.
Highlight Rec 3 layer.
Click on it with your Magic Wand.
New Raster layer.
Copy and paste Paper 2 layer Into Selection.
Copy and paste your tube as a new layer.
Resize 80%
Change the Opacity to about 12.
Paste the tube again as a new layer.
Resize 70%
Move both tubes into position - see my tag for reference.
Selections/Invert
Highlight each tube layer and tap the delete key.
Deselect.
Copy and paste the little blue flower from the element layer of the tube as a new layer.
Apply Mura's Meister - Copies:
Choose: Line
Change Number to 25.
OK
Free rotate Right 5 degrees
Resize 70%
Move into position at the top of the Blue paper.
Duplicate - move to the bottom of paper.
Duplicate the original flower line.
Mirror
Make your Target Tool active and change the color to #ed0747.
Duplicate
Move both flower lines into position over the Lavender colored paper.
Add the elements of your choice from the element layer of the tube.
I Duplicated/Resized 70%/Fliped/Mirrored the butterflies and dragonflies
Merge Visible the already merged layer (the small circle with swan) and the two stemmed flowers at the bottom right corner of the swan rectangle.
Highlight the background layer.
Select All.
New Raster layer.
Copy and paste Paper 2 Into Selection.
Apply the mask.
Merge Group.
Add your copyright.
Add your name:
Foreground: Null
Background: #000000
Type your name.
Convert to Raster layer.
Apply the same glow effect.
Time to add the water effect.
Close out the small circle merged layer.
Merge Visible.
Save as a Jpeg.
Open up the Sqirlz Water Reflection program.
Click on File and find the jpeg you just saved and open it up in the program.
Click on the Red Oval (Outline Tool) at the right side of the program:

Take your time and trace around the area where you want the water reflection - see my tag for reference. When you've come full circle and reached your starting point, double right click your mouse (to deactivate the outline tool)
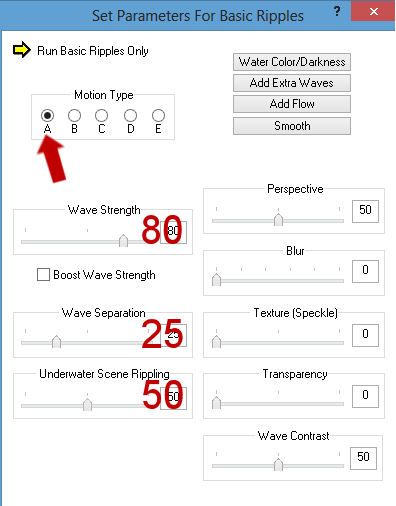
Click on "Customise Basic Ripples" icon:

Set Perimeters for Basic Ripples box will appear.
Match your settings to mine and then click on the red x in the upper right corner:
Click on Run Animation icon:
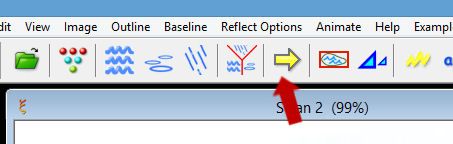
Basic Ripples Only should be already checked.
OK
Click on the gif button:
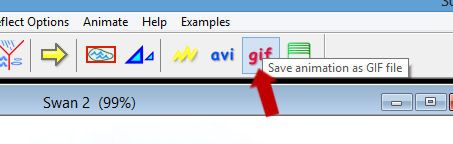
The Basic Ripples Only box will appear again'.
Click OK and save -
Give it a name.
Click Save and then OK.
~Time to Animate ~
Open up Animation Shop.
Open up your water animation you just made.
Go back into PSP.
Click on all the eyes of every single layer - you are closing all opened layers and opening all closed layers.
Copy Merge.
Carry into AS.
Back in AS -
Edit/Paste/As new Animation.
Edit/Copy
Highlight your water animation.
Ctrl + A to highlight all frames.
Click on Propogate Paste icon at the top - it looks like 3 papers with the corners bent down.
Ctrl + E and position the rest of your tag over the water animation and click your mouse once it's in position.
Animation/Resize Animation:
Click Pixel Size
Type 500 in the width box.
OK
Save your animation.
I’d love to see your results.
Hugs,
Bev
No comments:
Post a Comment