

Supplies Needed
1 tube of choice – I used the adorable artwork of Sally Gilroy which can be purchased from PSP Tube Stop. You must have a license to use.
Font of choice – I
used LD Youngster - a pay font
Weescotlass Mask 84 here
Melissaz Creationz template 1 here
Plug Ins used:
Brush Strokes - Crosshatch
DSB Flux - Bright Noise
Plug Ins used:
Brush Strokes - Crosshatch
DSB Flux - Bright Noise
"Colors of Summer Fun" is a tagger size scrap kit created by me, Bev of HorsePlay's Pasture Designs and is sold exclusively at PSP Tube Stop. Inspired by the adorable artwork of Sally Gilroy, it can be purchased with or without the tube. Check out my other exclusive kits while there. You can visit my designing blog here.
~♥~ Let’s get started ~♥~
Open up the template.
Shift + D.
Close out the original.
Delete Raster 1 layer.
Resize all layers 110%
Image/Canvas Size:
700 x 600
OK
Highlight and open the Background layer.
Flood fill white.
Highlight Rectangle Frames layer.
Click on both rectangles with your Magic Wand.
New Raster layer.
Copy and paste Paper 16 Into Selection.
Deselect.
Delete the template layer.
Give the paper layer a slight Inner Bevel:
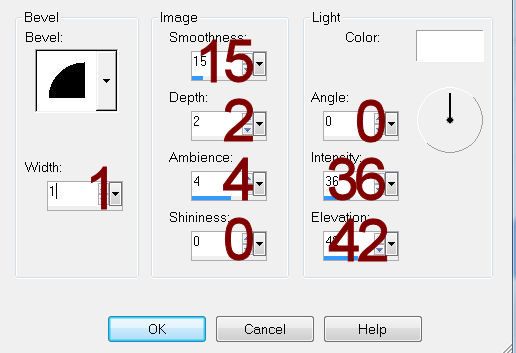
Apply DSB Flux - Bright Noise:
Intensity 37
Mix checked
OK
Highlight Rectangles layer.
Click on both rectangles with your Magic Wand.
New Raster layer.
Copy and paste Paper 15 Into Selection.
Deselect.
Delete the template layer.
Give the paper layer the same slight Inner Bevel and move it down and to the right just a little.
Highlight Small Circle layer.
Copy and paste EL47 as a new layer.
Resize 60%
Move into position over the template layer.
Delete Small Circle layer and Small Circle Frame layer.
Click inside the element frame with your Magic Wand.
Selections/Modify/Expand by 4.
New Raster layer below the frame.
Copy and paste Paper 4 Into Selection.
Apply Brush Strokes - Cross Hatch:
Stroke length: 41
Sharpness: 5
Strength: 2
OK
Deselect.
Highlight Large Circle layer.
Copy and paste EL47 as a new layer.
Resize 80%
Move into position over the template layer.
Delete Large Circle layer and Large Circle Frame layer.
Click inside the element frame with your Magic Wand.
Selections/Modify/Expand by 4.
New Raster layer below the frame..
Copy and paste Paper 4 Into Selection.
Apply the same Brush Strokes - Crosshatch effect.
Deselect.
Highlight Large Square Frame layer.
Click on it with your Magic Wand.
New Raster layer.
Flood fill with #b5586b.Apply DSB Flux - Bright Noise:
Use same settings.
Deselect.
Delete the template layer.
Repeat the above step with:
Medium Square Frame layer and Small Square Frame layer.
Highlight Medium Square layer.
Click on it with your Magic Wand.
New Raster layer.
Copy and paste Paper 14 Into Selection.
Deselect.
Delete the template layer.
Repeat the above step with Small Square layer.
Highlight Large Square layer.
Click on it with your Magic Wand.
New Raster layer.
Copy and paste Paper 13 Into Selection.
Deselect for now.
Add the following elements over the paper layer. Don't worry about what overhangs the edges of the paper. We'll clean that up in a bit.
EL 14: Resize 70%
El 28: Resize 30%/Duplicate/Match fence elements up to create one long fence
EL 37
Highlight the paper layer.
Click anywhere outside of it with your Magic Wand.
Highlight the grass and fence layers and tap the delete key.
Use your Eraser Tool to erase the trunk of the tree that overhangs the paper.
Copy and paste your tube as a new layer.
Add your elements. I used:
El 34: Resize 50%/Free rotate Right 15 degrees
EL 40: Resize 60%/Free rotate Right 90 degrees/Duplicate
EL 71: Resize 70%
EL 50: Resize 35%
EL 19: Resize 80%
EL 14: Resize 60%
EL 15: Resize 60%/Mirror
EL 1: Resize 15%
El 16: Resize 35%
EL 44: Resize 60%
Highlight the background layer.
Select All.
New Raster layer.
Copy and paste Paper 16 Into Selection.
Apply the mask.
Resize 110%
Merge Group.
Add your copyright.
Add your name:
Foreground and Background: #a04858
Type your name.
Resize all layers 80%.
I’d love to see your results.
Email me!
Hugs,
Bev
No comments:
Post a Comment