

Supplies Needed
1 tube of choice – I
used the wonderful artwork of Helena Reis which can now be purchased from PSPTube Stop.
You must have a license to use.
My template 141 here
“A Mad Tea Party” is a
tagger size scrap kit created by Crys of Creative Scraps by Crys and can be purchased
from TKO Scraps. You can visit her blog here.
This tutorial was
written assuming you have working knowledge of PSP.
~♥~ Let’s get started ~♥~
Open up the template.
Shift + D.
Close out the original.
Image/Canvas Size
700 x 700
OK
Highlight the background layer.
Flood fill white.
Delete the following layers:
The top 3 layers, Dotted Line 1, and
Strip 1
Highlight Rectangle 1 layer.
Click on it with your Magic Wand.
New Raster layer.
Copy and paste Paper 11 Into
Selection.
Deselect.
Delete the template layer.
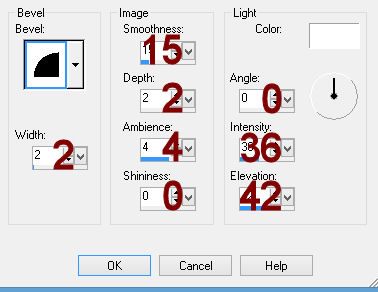
Give the paper a slight Inner Bevel:
Highlight Rectangle 2 layer.
Repeat the above step.
Highlight Circle 1 layer.
Click on it with your Magic Wand.
New Raster layer.
Copy and paste Paper 6 Into Selection.
New Raster layer.
Copy and paste Element 66 Into
Selection.
Deselect.
Delete the template layer.
Highlight Circle 2 layer.
Click on it with your Magic Wand.
New Raster layer.
Copy and paste Paper 13 Into
Selection.
Deselect.
Delete the template layer.
Highlight Dotted Circle layer.
Click anywhere outside of it with your
Magic Wand.
Selections/Invert
New Raster layer.
Copy and paste Paper 10 Into
Selection.
Deselect.
Delete the template layer.
Give the layer a slight Inner Bevel:


Copy and paste your tube as a new
layer.
If you’re using the same tube as I
did, Resize 80%
Add your elements. I used:
Element 46: Resize 25%/Duplicate
Element 9: Resize 65%
Element 1: Resize 40%
Element 26: Duplicate/Mirror
Element 7: Resize 25%
Element 21: Resize 70%/Mirror
Element 33: Resize 80%
Frame 1: Resize 75%/Duplicate (delete the glitter
circle template layers)
Element 23: Resize 50%
Element 68: Resize 45%/Mirror
Element 3: Resize 45%
Element 16: Resize 60%/Duplicate/Merge Down
Highlight your white background.
New Raster layer.
Select All.
Copy and paste Paper 10 Into
Selection.
Deselect.
Apply the mask.
Resize 110%
Merge Group.
Add your copyrights.
Add your name.
Color Pallet:
Foreground: #1a1a19
Background: #8e3737
Stroke: 1.0
Type your name.
Give it the same slight Inner Bevel
you gave to the circle of diamonds.
Resize all layers 85%.
I’d love to see your results.
Hugs,
Bev
Wow this is adorable! I love it Bev!
ReplyDeleteThanks Crys!
ReplyDelete