
Supplies Needed
1 tube of choice – I
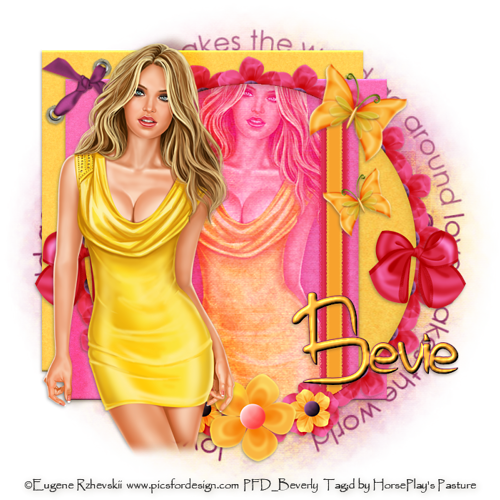
used the wonderful artwork of Eugene Rzhevskii which can now be purchased from PicsFor Design. You must have a license
to use.
PlugIns used:
Mura’s Meister - Copies
“Ooo-la-la” is a tagger size scrap kit created
by Tammy of Tlp Designs and can be purchased from TKO Scraps. You can visit her blog here. Thanks so much Tammy for an awesome kit.
This tutorial was
written assuming you have working knowledge of PSP.
~♥~ Let’s get started ~♥~
Open up a 700 x 700 blank canvas.
Flood fill white.
Open up Paper 5.
In your Color Pallet close out the
foreground. In your background set it to
Pattern and look for Paper 5.
Angle: 0
Scale: 100
OK
Make your working canvas active.
Make your Ellipse Tool active set on
Circle and create a circle approximately 450 pixels.
Object/Align/Center in Canvas
Right Click on it in your layers
pallet and choose Convert to Raster layer.
Open up Paper 11.
In your Color Pallet, still set on
the background, set on Pattern, look for Paper 11.
Keep the settings the same.
Make your working canvas active.
Make your Rectangle Tool active set
on Rectangle and create a rectangle approximately 300 pixels wide. Make the length of it longer that the circle.
Object/Align/Center on Canvas.
Right Click on it in your layers
pallet and choose Convert to Raster layer.
Highlight the circle layer.
Click anywhere outside of it with
your Magic Wand.
Highlight the rectangle layer.
Tap the delete key.
Deselect.
Copy and paste Ribbon 11 as a new
layer.
Free rotate Left 90 degrees
Tap the letter K on your keyboard to
make the Pick Tool active.
Pull the side in to make the ribbon
very thin – see my tag for reference.
Copy and paste Ribbon 26 as a new
layer.
Free rotate Left 90 degrees.
Tap the letter K on your keyboard.
Pull the side in to make this ribbon
slightly thinner than the other ribbon – see my tag for reference.
Move it into position over the other
ribbon.
Merge Down.
Both ribbons should now be on the
same layer.
Duplicate
Move both ribbon layers into
position – see my tag for reference.
Highlight the circle layer.
Click anywhere outside of it with
your Magic Wand.
Highlight each ribbon layer and tap
the delete key.
Deselect.
Copy and paste Flower 3 as a new
layer.
Resize 35%
Apply Mura’s Mesiter – Copies:

Move the flower ring into position
below the circle paper – see my tag for reference.
Copy and paste your tube as a new
layer.
If you’re using the same tube as I
did, Resize 40%
Duplicate the tube layer.
Move to the right slightly. In your layers pallet move it just above the
rectangle layer.
Highlight the Circle paper layer.
Click anywhere outside of it with
your Magic Wand.
Highlight the tube layer just above
the rectangle layer.
Tap the delete key.
Deselect.
Change the Properties of the tube
layer to Overlay.
Copy and paste Paper 5 as a new
layer just above your white canvas.
Resize 50%
Give it a slight Inner Bevel:

Copy and paste Paper 11 as a new
layer.
Repeat the above step.
Add your elements. I used:
Eyelet 1: Resize 50%/Free rotate Left 45 degrees
Flower 17: Resize 20%
Flower 21: Resize 20%/Duplicate
Bow 2: Resize 30%/Duplicate/Mirror
Butterfly 1: Resize 20%/Free rotate Right 25
degrees/Duplicate/Mirror/Resize 70%
Highlight your white background.
New Raster layer.
Select All.
Copy and paste Paper 14 Into
Selection.
Deselect.
Apply Vix mask 348.
Merge Group.
Duplicate
Merge Down.
Highlight your white background.
New Raster layer.
Select All.
Copy and paste Paper 10 Into
Selection.
Deselect.
Apply Weescotlass Mask 208.
Resize 110%
Merge Group.
Add your copyrights.
Add your name.
Color Pallet:
Foreground: #843164
Background: #f8a32e
Stroke: 2.0
Type your name.
Give it a slight Inner Bevel:

Resize all layers 85%.
I’d love to see your results.
Hugs,
Bev
No comments:
Post a Comment