Supplies Needed
2 tubes of choice – I
used the wonderful artwork of Carol Moore which can be purchased from PSPTube Stop. You must have a license to use.
Font of choice – I
used Milestone Script here
Plug Ins used:
Greg’s Factory Output
Vol. II – Pool Shadow
Brush Strokes –
Sprayed Strokes
“The Punishment Sampler” is free to use tagger
size scrap kit created by Jessica of Gothic Inspirations and can be downloaded
from her blog here. Don’t forget to leave Jess a thank you. They’re always very much appreciated.
This tutorial was
written assuming you have working knowledge of PSP.
~♥~ Let’s get started ~♥~
Open up a 700 x 700 blank canvas.
Flood fill white.
Copy and paste Frame 3 as a new
layer.
Resize 30%
Free rotate Left 10 degrees
Paste Frame 3 again.
Resize 30%
Move into position at the left side
of the first frame. In your layers
pallet move below the rotated frame.
Duplicate/Mirror/Move into better
position at the right side of the rotated frame.
To each frame:
Click inside of it with your Magic Wand.
Selections/Modify/Expand by 4.
New Raster layer below the frame.
Copy and paste Paper 4 Into
Selection.
Apply Brush Strokes – Sprayed Strokes:
Stroke Length: 12
Spray Radius: 11
Right Diag
OK
Deselect.
Highlight the paper that belongs to
the center frame.
Copy and paste your tube as a new
layer.
Highlight the paper layer.
Click anywhere outside of it with
your Magic Wand.
Highlight the tube layer.
Tap the delete key.
Deselect.
Highlight the paper that belongs to
the right frame.
Copy and paste your 2nd
tube choice as a new layer just below the frame.
Change the Properties to Luminance
Legacy.
Duplicate/Mirror/Move into position
below the left frame.
Highlight the paper layer.
Click anywhere outside of it with
your Magic Wand.
Highlight the tube layer just above
the paper layer.
Tap the delete key.
Deselect.
Repeat the above step with the other
tube layer.
Copy and paste Frame 5 as a new
layer just above your white canvas.
Resize 55%
Click inside of it with your Magic
Wand.
Selections/Modify/Expand by 4.
New Raster layer below the frame.
Copy and paste Paper 2 Into
Selection.
Apply Greg’s Factory Output Vol. II –
Pool Shadow:
Use Default settings accept change
the Intensity bar to 243
Apply the Pool Shadow effect again.
New Raster layer.
Copy and paste Wire Into Selection.
Change the Properties to Hard Light.
Lower the Opacity to about 31
Deselect.
Add your elements. I used:
Frame 1: Resize 40%/Duplicate 3x’s
Chandelier: Use your Selection Tool set on Rectangle and
section off just the chain portion of the element/Copy/Paste as a new layer/Resize
65%/Duplicate/Mirror
Key:
Resize 35%/Mirror/Free Rotate Right 10 degrees
Pentagram: Resize 55%/Duplicate
Leaves
Charm: Resize 30%/Duplicate 2x’s/Use Pick Tool to
turn this way and that
Heart Border: Resize 75%
Ribbon 1: Resize 40%/Flip
Word Art: Resize 50%
Raven 1: Resize 40%
Add your copyrights.
Add your name.
Color Pallet:
Foreground: #000000
Background: ##3f3b33
Stroke: 1.5
Type your name.
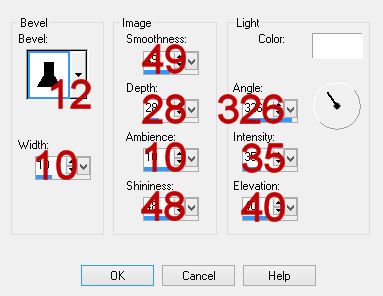
Give it a slight Inner Bevel:
Give your name a drop shadow on its
own layer.
Use your Pick Tool to flatten it.
Resize all layers 80%.
I’d love to see your results.
Hugs,
Bev


Beautiful hun! Thank you so very much.
ReplyDelete