Supplies Needed
1 tube of choice – I
used the wonderful artwork of Deanna Bach Talsma which can be purchased from PSP Tube Stop. You must have a license to use.
Font of choice – I
used Inspiration
Template 6 by Carol of
Hugahav’s Haven here
Thank you Carol!!
“Down by the Sea” is a tagger size scrap kit
created by Vickie of Vickie’s Scraps and can be purchased here. Thank you Vickie for a fantastic kit!
This tutorial was
written assuming you have working knowledge of PSP.
~♥~ Let’s get started ~♥~
Open up the template.
Shift + D.
Close out the original.
Delete the top 2 layers.
Highlight Small Rectangle layer.
Click anywhere outside of it with
your Magic Wand.
Selections/Invert
New Raster layer.
Copy and paste Paper 14 Into Selection.
Deselect.
Delete the template layer.
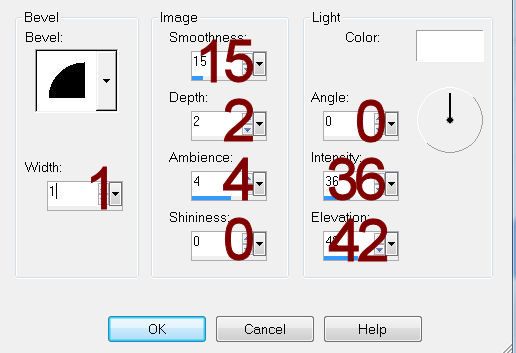
Give the paper layer a slight Inner
Bevel:
Highlight Top Circle layer.
Click on it with your Magic Wand.
New Raster layer.
Copy and paste Paper 6 Into Selection.
Deselect.
Delete the template layer.
Repeat the above step with Middle
and Bottom Circle layers.
Highlight Lrg Circle layer.
Click anywhere outside of it with your
Magic Wand.
Selections/Invert
New Raster layer.
Copy and paste Paper 1 Into Selection.
Effects/Illumination
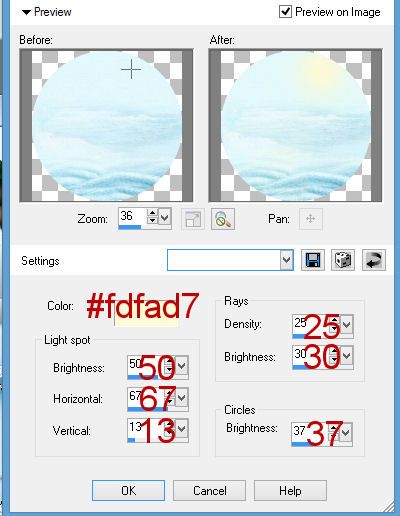
Effects/Sunburst:
Match your settings to mine-
Do Not Deselect yet.
Copy and paste your tube as a new
layer just above the paper layer.
If you’re using the same tube as I
did, you want to copy and paste “Kindred’s Dolphin” layer. Move it into a position that looks good over
the bottom little circle as well.
Right Click on the tube layer in
your layers pallet and choose “Promote Section to Layer”
Copy and paste Element 61 as a new
layer behind the tube layer.
Resize 40% - move into position –
see my tag for reference.
Tap the delete key.
Deselect.
In your layers pallet move the
original tube layer just above the bottom little circle paper layer.
Highlight the bottom little circle
paper layer.
Click anywhere outside of it with
your Magic Wand.
Highlight the tube layer just above
it.
Tap the delete key.
Deselect.
Copy and paste the tube layer named “Dolphin”
as a new layer at the top of your layers pallet. Move it so that it matches exactly over the
dolphin in the tube layer you just pasted in the large circle – see my tag for
reference.
Copy and paste “Dolphin and Girl”
layer from your tube layers.
Resize 30%
See my tag for placement.
Add your elements. I used:
111:
Resize 80%
113
29: Section out the top flower.
Resize 80%/Duplicate/Flip/Duplicate/Resize 80%/Duplicate/Mirror/Resize 70%
106: Resize 40%
108: Resize 40%/Free rotate Left 20
degrees
10:
Resize 70%/Duplicate/Resize 50%/Duplicate/Resize 70%
115:
Resize 25%
Highlight the Effect layer.
Use your Target Tool and change the
color to #73abba.
Add your copyrights.
Add your name.
Color Pallet:
Foreground: #544124
Background: #2e722c
Stroke: 1.5
Type your name.
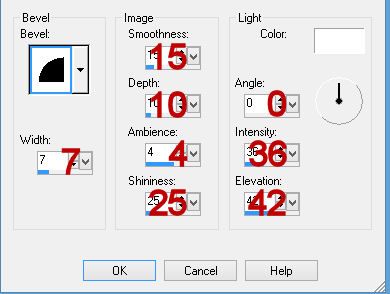
Give it a slight Inner Bevel:
Copy and paste 82 as a new layer
below your name.
Make your Pick Tool active and
flatten the element. Pull the sides out
if needed so that it’s the same length as the name.
Resize all layers 80%.
I’d love to see your results.
Hugs,
Bev


No comments:
Post a Comment