Supplies
1 tube of choice – I used the amazing artwork of Henning Ludvigsen which
can be purchased from Up Your Art. You must have
a license to use.
Can be found under February 5, 2013 –
Use Hearts on Ice Template 3 for this tutorial.
Plug Ins used:
Brush Strokes - Crosshatch
“Steampunk Illusion” is a full
size scrap kit created by Heppy of H.F. Projekte and can be purchased from his
store Inspirations of ScrapFriends. You can visit
his blog here. Thank you Heppy for another
fantastic Steampunk kit!
~♥~ Let’s get started ~♥~
Open up the template.
Shift + D.
Close out the original.
Resize all layers 85%
Image/Canvas size:
700 x 500
OK
Open up Raster 1 layer.
Flood fill white.
Delete the top 8 layers, Raster 9, and Copy of Raster 9 layer.
Highlight Raster 7 layer.
Click on it with your Magic Wand.
New Raster layer.
Copy and paste Paper 10 Into Selection.
Delete the template layer.
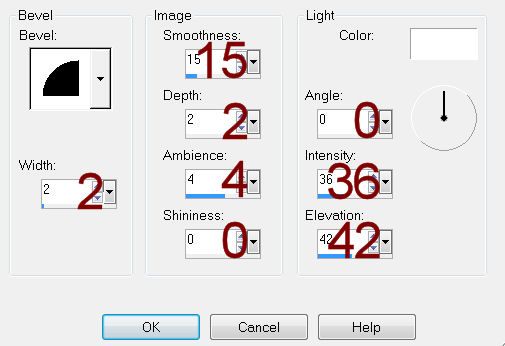
Give it a slight Inner Bevel:

Highlight Raster 8 layer.
Repeat the above step.
Highlight Raster 2 layer.
Click on it with your Magic Wand.
New Raster layer.
Copy and paste Paper 5 Into Selection.
Apply Brush Strokes – Crosshatch:
Stroke length: 37
Sharpness: 6
Strength: 1
OK
Copy and paste your tube as a new layer.
Move into position over the paper – see my tag for reference.
Selections/Invert
Tap the delete key.
Deselect.
Delete the template layer.
Highlight Raster 12 layer.
Select All/Float/Defloat.
New Raster layer.
Copy and paste Paper 10 Into Selection.
Adjust/Add Remove Noise/Add Noise:
Uniform and Monochrome checked
Noise: 75%
OK
Deselect.
Delete the template layer.
Highlight Raster 3 layer.
Click anywhere outside of it with your Magic Wand.
Copy and paste Paper 4 as a new layer.
Resize 15%
Move into position over the template layer.
Tap the delete key.
Deselect.
Delete the template layer.
Give it the same slight Inner Bevel.
Highlight Raster 4 layer.
Click on it with your Magic Wand.
New Raster layer.
Copy and paste Paper 10 Into Selection.
Apply Brush Strokes – Crosshatch (see my ***Note below)
Use same settings.
***NOTE: If you get a message
stating an internal error -
Deselect.
Highlight the template layer.
Click on it with your Magic Wand.
Highlight the paper layer.
Apply the Brush Strokes – Crosshatch effect.
Use Same Settings.
Give it the same slight Inner Bevel.
Copy and paste your tube as a new layer – change the Properties to Hard
Light and Lower the Opacity to about 42.
Move into position over the paper layer.
Selections/Invert
Tap the delete key.
Deselect.
Delete the template layer.
Add your elements. I used:
16: Resize 10% and 40%/Free
rotate Left 5 degrees/Duplicate/Mirror
11: Resize 25%/Free rotate Left
25 degrees/Duplicate
1: Resize 25% and
70%/Flip/Duplicate/Mirror
5: Resize 15% and 85%
1 again: Resize 12%/Duplicate/Mirror/Flip
13: Resize 25% and 70%/Free
rotate Right 15 degrees
33: Resize 20%/Duplicate/Mirror
26: Resize 5%
27: Resize 10% and 70%
28: Resize 10% and 60%
29: Resize 5%
Highlight your white background.
New Raster layer.
Select All.
Copy and paste Paper 7 Into Selection.
Deselect.
Apply the mask.
Merge Group.
Add your credits.
Add your name:
Color Pallet:
Foreground: #d48e00
Background: #4c261d
Stroke: 0.8
Type your name.
Convert to Raster layer.
Effects/Edge Effect/Enhance
Select All/Float/Defloat
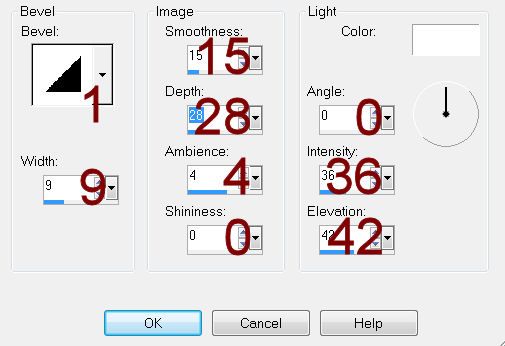
Give it a slight Inner Bevel:

Deselect.
Give your name a drop shadow.
Give it another drop shadow but on its own
layer.
Making sure you're on the drop shadow layer, tap the letter K on
your keyboard to active your Pick Tool.
Pull the top down to squash the drop shadow just a little.
Move into better position behind your name.
To slant the drop shadow slightly to the right -
Hold down the Shift key and move the top left little box to the
right.
Still holding down the Shift key, move the top right box to the
right just a little.
Resize all layers 80%.


No comments:
Post a Comment