

Supplies
1 tube of choice – I used the wonderful artwork of Ellie Milk which can
be purchased from Pics for Design. You must generate
a license to use.
Weescotlass Mask 302 here
Twysted T’s Playroom Template 28 here
Plug Ins used:
Brush Strokes – Crosshatch
“Snow Maiden” is a PTU tagger size scrap kit, also available in Full
size and was created by Leanne of Bella’s Designs and can be purchased from Inspirations of ScrapFriends. You can visit
her blog here.
Thank you Leanne for a really festive holiday kit.
~♥~ Let’s get started ~♥~
Open up the template.
Shift + D.
Close out the original.
Delete the top 2 layers and Copy of Raster 4 layer.
Open up Raster 1 layer.
Highlight Raster 6 layer.
Copy and paste Frame 1 as a new layer.
Resize 90%
Free rotate Right 90 degrees.
Line the right side of the frame up with the right side of the template
layer.
Make your Pick Tool active and pull the left side of the frame in so
that it matches up with the left side of the template layer.
Adjust/Add Remove Noise/Add Noise:
Uniform checked
Noise: 50%
OK
Delete the template layer.
Click inside of the frame with your Magic Wand.
Selections/Modify/Expand by 4.
New Raster layer below the frame.
Copy and paste Paper 8 Into Selection.
Copy and paste Element 77 as a new layer just above the paper layer.
Resize 120%
Move into position – see my tag for reference.
Selections/Invert
Tap the delete key.
Copy and paste Element 70 as a new layer.
Move into position.
Tap the delete key.
Deselect.
Highlight Raster 5 layer.
Click on it with your Magic Wand.
New Raster layer.
Copy and paste Paper 12 Into Selection.
Deselect.
Delete the template layer.
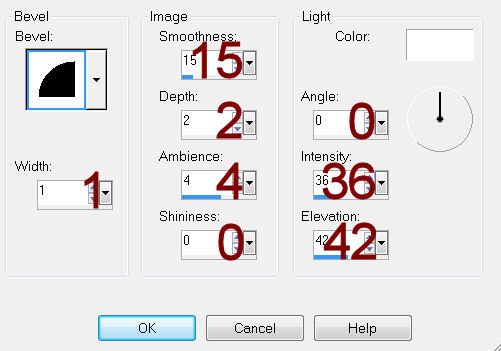
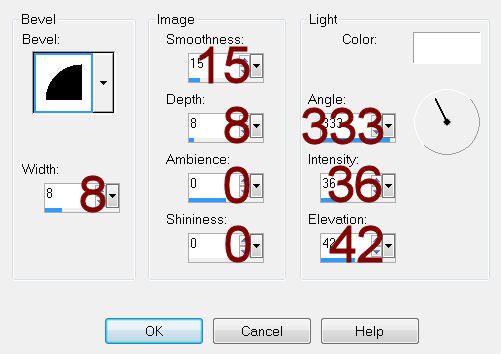
Give the paper layer a slight Inner Bevel:
Highlight Raster 4 layer.
Repeat the above step.
Highlight Raster 2 layer.
Click on each shape with your Magic Wand.
New Raster layer.
Copy and paste Paper 8 Into Selection.
Deselect.
Delete the template layer.
Highlight Raster 12 layer.
Select All/Float/Defloat.
New Raster layer.
Copy and paste Paper 10 Into Selection.
Apply the same noise effect.
Deselect.
Delete the template layer.
Highlight Raster 7 layer.
Click anywhere outside of it with your Magic Wand.
Selections/Invert
New Raster layer.
Paste Paper 10 Into Selection.
Deselect.
Change the Properties to Multiply.
Highlight Raster 3 layer.
Click on it with your Magic Wand.
New Raster layer.
Copy and paste Paper 12 Into Selection.
Apply Brush Strokes – Crosshatch:
Stroke Length: 34
Sharpness: 6
Strength: 1
OK
Copy and paste Element 62 as a new layer – move into a position you
like.
Selections/Invert
Tap the delete key.
Copy and paste Element 51 as a new layer.
Tap the delete key.
Copy and paste your tube as a new layer.
Move into position – tap the delete key.
If you used the same tube as I did, I also added Element 42 and
positioned it so that the tube was sitting on it.
Tap the delete key.
Deselect.
Delete the template layer.
Highlight Raster 11 layer.
Select All/Float/Defloat
New Raster layer.
Copy and paste Paper 10 Into Selection.
Apply the same Noise Effect.
Deselect.
Delete the template layer.
Add your elements. I used:
8: Resize 70%
31: Resize 35%
63: Resize 30%
35: Resize 40%/Free rotate Left
20 degrees
Highlight your white background.
New Raster layer.
Select All.
Copy and paste Paper 2 Into Selection.
Deselect.
Adjust/Blur/Gaussian Blur -
Radius: 10
OK
Apply the mask.
Merge Group.
Add your credits.
Add your name.
Color Pallet:
Foreground: #461e07
Background: #9f6e3e
Stroke: 1.0
Type your name.
Give it a slight Inner Bevel:
Resize all layers 80%.
No comments:
Post a Comment