Supplies
1 tube of choice and 1 image – I
used the adorable artwork of Lisa Victoria which can be purchased from UpYour Art. You must have a license to use.
Vix Mask 451 here
A Kandee New Year Template Collab (template 6) which can be downloaded
from
Dee’s Sign Post here
You can find the collab of templates under Monday, December 17, 2012.
Plug Ins used:
Brush Strokes – Crosshatch
Eyecandy 5: Nature – Snow Drift
Mura’s Meister - Copies
Supplies here
These are for Personal Use and to be used for this tutorial only!
~♥~ Let’s get started ~♥~
Open up the template.
Shift + D.
Close out the original.
Delete the top 2 layers, bottle, word art, word art back, and circle
spray.
Open up bg layer.
Open up Paper 2.
Shift + D.
Close out the original.
Apply Brush Strokes – Crosshatch:
Stroke Length: 42
Sharpness: 10
Strength: 2
OK
Copy
Highlight Beige Square layer.
Click on it with your Magic Wand.
New Raster layer.
Paste the paper Into Selection.
Deselect.
Delete the template layer.
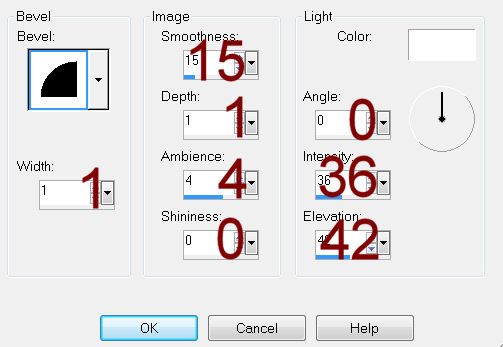
Give it a slight Inner Bevel:

Highlight Black Strip layer.
Click on it with your Magic Wand.
New Raster layer.
Flood fill with #b55968
Give it the same slight Inner Bevel.
Adjust/Add Remove Noise/Add Noise:
Uniform and Monochrome checked
Noise: 50%
OK
Apply Brush Strokes – Crosshatch:
Stroke Length: 42
Sharpness: 3
Strength: 1
OK
Apply the same Inner Bevel.
Deselect.
Delete the template layer.
Highlight Green Strip layer.
Click on it with your Magic Wand.
New Raster layer.
Flood fill with #4185c4.
Give it the same slight Inner Bevel.
Apply the same Noise Effect.
Apply the same Crosshatch effect.
Apply the same Inner Bevel.
Deselect.
Delete the template layer.
Highlight White Strip layer.
Click on it with your Magic Wand.
New Raster layer.
Flood fill with #50885b.
Give it the same slight Inner Bevel.
Apply the same Noise Effect.
Apply the same Crosshatch effect.
Apply the same Inner Bevel.
Deselect.
Delete the template layer.
Highlight Bottom Red Circle layer.
Click on it with your Magic Wand.
New Raster layer.
Copy and paste your Image Into Selection.
Deselect.
Delete the template layer.
Give it the same slight Inner Bevel.
Highlight Top Red Circle layer.
Repeat the above step.
Highlight Large Black Square layer.
Click on it with your Magic Wand.
New Raster layer.
Copy and paste Paper 4 Into Selection.
Deselect.
Delete the template layer.
Give it the same slight Inner Bevel.
Highlight Green Circle layer.
Click on it with your Magic Wand.
New Raster layer.
Copy and paste Paper 2 Into Selection.
Deselect.
Delete the template layer.
Highlight Red Ring layer.
Select All/Float/Defloat
New Raster layer.
Copy and paste Paper 1 Into Selection.
Apply the same Noise Effect.
Deselect.
Delete the template layer.
Highlight White Ring layer.
Select All/Float/Defloat
New Raster layer.
Copy and paste Paper 5 Into Selection.
Apply the same Noise Effect.
Deselect.
Delete the template layer.
Highlight Green Ring layer.
Click on it with your Magic Wand.
New Raster layer.
Copy and paste Paper 2 Into Selection.
Deselect.
Click anywhere outside of the paper layer with your Magic Wand.
Copy and paste your tube as a new layer.
Change the Properties to Soft Light and move into position – see my tag
for reference.
Tap the delete key.
Deselect.
Delete the template layer.
Highlight White Square layer.
Click on it with your Magic Wand.
New Raster layer.
Copy and paste Paper 3 Into Selection.
Deselect.
Delete the template layer.
Give it the same slight Inner Bevel.
Highlight Black Square layer.
Click on it with your Magic Wand.
New Raster layer.
Copy and paste Paper 1 Into Selection.
Deselect.
Delete the template layer.
Give it a slight Inner Bevel.
Color Pallet:
Foreground: #ffffff
Background: #8078c7
Highlight Dotted Square layer.
Make your Color Replacer Tool active.
Double Right click on the dotted square.
The color should have turned to #8078c7
Highlight White Circle layer.
Click anywhere outside of it with your Magic Wand.
Selections/Invert
New Raster layer.
Copy and paste Paper 5 Into Selection.
Apply the same Noise effect.
Deselect.
Delete the template layer.
Make new 500 x 500 blank canvas.
Flood fill with #202f4f
Copy
Close this out. You won’t need
it any more.
Highlight Dotted Lines layer.
Click anywhere outside of it with your Magic Wand.
Selections/Invert
New Raster layer.
Paste the color Into Selection.
Deselect.
Delete the template layer.
Move the dotted lines to just above your white canvas in your layers
pallet.
Copy and paste your tube as a new layer.
Position it in front of the dark blue frame.
Highlight the frame layer.
Click anywhere outside of it with your Magic Wand.
Highlight your tube layer.
Use your Eraser Tool and erase any parts you don’t want to stick
outside of the frame.
Deselect.
Add the elements I supplied:
Duplicate the flower/ Resize 70%/Duplicate both flowers
Also copy the snowflake layer from the tube.
Paste as a new layer.
Resize 10%
Duplicate
Merge Down
Apply Mura’s Meister – Copies:
Choose Wallpaper (Prospective)
Highlight your white background.
New Raster layer.
Select All.
Copy and paste Paper 1 Into Selection.
Deselect.
Apply the mask.
Resize 115%
Merge Group.
Add your credits.
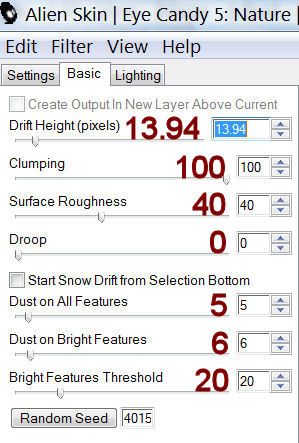
Apply Eyecandy 5: Nature – Snow Drift to elements of your choice:
Settings Tab:
Choose Small, First Flakes
Basic Tab:
Settings Tab:
Choose Small, First Flakes
Basic Tab:

Lighting Tab:
Use Default settings
Add your name.
Color Pallet:
Foreground and Background: #202f4f
Type your name.
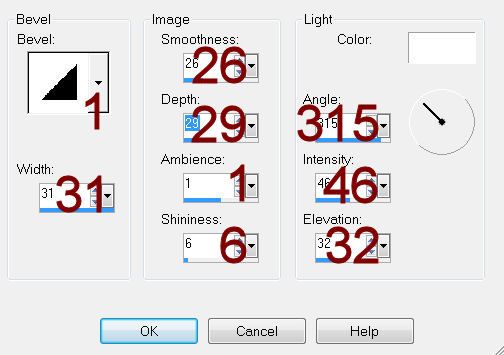
Give it a slight Inner Bevel:

Apply the same Snow Drift effect accept lower the Drift Height to 4.09
Resize all layers 80%.


any idea how to find the template listed in supplies needed? Link takes you to the right place but not able to find any templates can't search for the date ...thanks for any help I will try subbing a different template, unfortunately it is not easy to see by tag what main needs are but I will try. Thanks again beautiful tag
ReplyDelete