

Supplies
Font of choice - I used Centeria Script Demo here
Monti Circular Mask here
Dee’s Sign Post “Energize” template here
It can be found under Saturday, March 19, 2011
Snow which I supply here. The snow is to be used only
for this tutorial. If you would like to
use it for anything else please ask.
Animation Shop
“Snowflake” is a tagger size scrap kit created by Aurelie of Pink Candy
Designs and can be purchased from Lollipops n Gumdrops. You can
visit her blog here.
Thank you Aurelie for a really beautiful winter kit.
This tutorial was written assuming you have a working knowledge of PSP.
~♥~ Let’s get started ~♥~
Open up the template.
Shift + D.
Close out the original.
Delete the top 6 layers.
Image/Canvas Size:
700 x 600
OK
Highlight bg layer.
Flood fill white.
Highlight Black Rectangle layer.
Click on it with your Magic Wand.
New Raster layer.
Copy and paste Paper 4 Into Selection.
Deselect.
Delete the template layer.
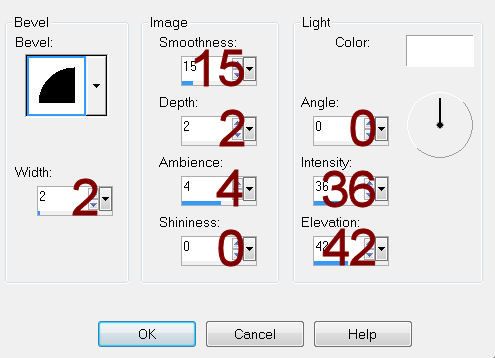
Give it a slight Inner Bevel:
Highlight Pink Oval layer.
Click on it with your Magic Wand.
New Raster layer.
Copy and paste Paper 12 Into Selection.
Deselect.
Delete the template layer.
Highlight White Oval Ring layer.
Select All/Float/Defloat
New Raster layer.
Copy and paste Paper 1 Into Selection.
Adjust/Add Remove Noise/Add Noise:
Gaussian and Monochrome checked
Noise: 35%
OK
Highlight Black Square layer.
Repeat the above step.
Highlight White Square layer.
Click on it with your Magic Wand.
New Raster layer.
Copy and paste Paper 11 Into Selection.
Deselect.
Delete the template layer.
DO NOT give the paper layer a drop shadow.
Add your elements. I used:
Tree 2: Resize 80%
Candle: Resize 50%
Beads
Kitten
Sign: Resize 50%
Cat: Resize 50%
Berries
Candy Stick: Resize 85%
Splat: Resize 70%/Duplicate
Bow 2: Resize 50%
Highlight your white canvas.
New Raster layer.
Select All.
Copy and paste Paper 1 Into Selection.
Deselect.
Apply the mask.
Merge Group.
Add your copyrights.
Add your name.
Color Pallet:
Foreground: #404040
Background: Pattern/Paper 1
Stroke: 1
Type your name.
Give it the same slight Inner Bevel 2x’s.
Open up the snow that I provided.
Open up all layers.
Highlight Frame 10 layer.
Copy.
Highlight your working canvas.
Highlight the paper layer of the snow scene (the square that’s tilted).
Paste - your snow layer should appear.
Rename it S10 (short for Snow 10)
Don’t worry about what overhangs the paper. We’ll clean that up in a bit.
Highlight the animated snow layers.
Highlight Frame 9.
Copy
Highlight your working canvas.
Paste
Rename S9.
Continue to copy and paste all 10 snow layers onto your working canvas.
Once you have all snow layers copied and renamed on your working canvas
highlight the paper layer (that belongs to this frame).
Click anywhere outside of it with your Magic Wand.
Highlight each snow layer and tap the delete key.
Deselect.
Keep S1 layer open and close out all other snow layers.
Copy Merge.
Time to Animate:
Open up Animation Shop
Edit/Paste/As New Animation
Back in PSP.
Close out S1.
Open up S2.
Copy Merge
Back in AS.
Edit/Paste/After Current Frame.
Back in PSP.
Close out S2.
Open up S3.
Copy Merge
Back in AS.
Edit/Paste/After Current Frame.
Back in PSP.
Close out S3.
Open up S4.
Copy Merge
Back in AS.
Edit/Paste/After Current Frame.
Back in PSP.
Close out S4.
Open up S5.
Copy Merge
Back in AS.
Edit/Paste/After Current Frame.
Back in PSP.
Close out S5.
Open up S6.
Copy Merge
Back in AS.
Edit/Paste/After Current Frame.
Back in PSP.
Close out S6.
Open up S7.
Copy Merge
Back in AS.
Edit/Paste/After Current Frame.
Back in PSP.
Close out S7.
Open up S8.
Copy Merge
Back in AS.
Edit/Paste/After Current Frame.
Back in PSP.
Close out S8.
Open up S9.
Copy Merge
Back in AS.
Edit/Paste/After Current Frame.
Back in PSP.
Close out S9.
Open up S10.
Copy Merge
Back in AS.
Edit/Paste/After Current Frame.
Animation/Resize Animation:
Percentage of Original checked
Width x Height: 75
OK
View your animation.
If you’re happy with it then save.
Resize all layers 80%.
No comments:
Post a Comment