Supplies
1 tube of choice – I used the beautiful artwork of Zindy S.D. Nielsen
which can be purchased from her store here. You must have a license to use.
Font of choice – I used Inspiration here
Weescotlass Mask 362 here
Designs by Vaybs “Witch/Bitch” Template here
It’s under Friday, October 19, 2012
“Touch of Autumn” is a full size
scrap kit created by Julie of Whisy’s D’Zines and can be purchased from Lollipops n Gumdrops. You can visit
her blog here.
Thank you Julie for a really wonderful kit.
~♥~ Let’s get started ~♥~
Open up the template.
Shift + D.
Close out the original.
Delete the top 4 layers, Circle 5, Leaves, WA1, and Rays layer.
Image/Canvas Size:
700 x 700
OK
Highlight Raster 1 layer.
Flood fill white.
Highlight Circle 1 layer.
Click on it with your Magic Wand.
New Raster layer.
Copy and paste Paper 2 Into Selection.
Deselect.
Delete the template layer.
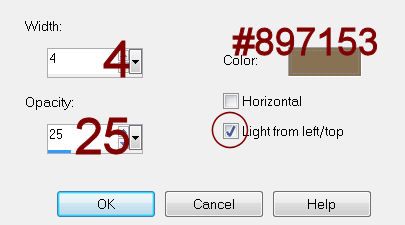
Effecs/Texture Effects/Blinds:

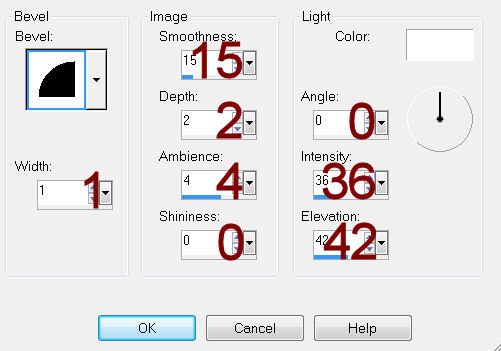
Give it a slight Inner Bevel:

Highlight Circle 2 layer.
Click on it with your Magic Wand.
New Raster layer.
Copy and paste Paper 4 Into Selection.
Deselect.
Delete the template layer.
Highlight Rectangle 1 layer.
Click on it with your Magic Wand.
New Raster layer.
Copy and paste Paper 8 Into Selection.
Deselect.
Delete the template layer.
Give it the same slight Inner Bevel.
Highlight Circle 3 layer.
Click on it with your Magic Wand.
New Raster layer.
Copy and paste Paper 9 Into Selection.
Deselect.
Delete the template layer.
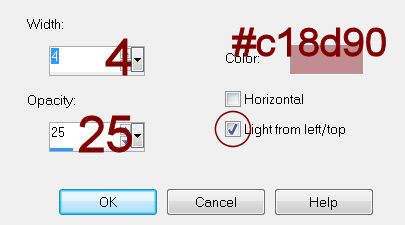
Effects/Texture Effect/Blinds:

Give it the same slight Inner Bevel.
Highlight Circle 4 layer.
Repeat the above step.
Highlight Rectangle 2 layer.
Click on it with your Magic Wand.
New Raster layer.
Copy and paste Paper 6 Into Selection.
Deselect.
Delete the template layer.
Give it the same slight Inner Bevel.
Highlight Ellipse layer.
Click on it with your Magic Wand.
New Raster layer.
Copy and paste Paper 4 Into Selection.
Copy and paste your tube as a new layer over the paper.
Selections/Invert
Tap the delete key.
Deselect.
Delete the template layer.
Highlight Ellipse Frame.
Click on it with your Magic Wand.
New Raster layer.
Copy and paste Paper 2 Into Selection.
Deselect.
Delete the template layer.
Give it the same slight Inner Bevel.
Add your elements. I used:
El 1: Resize 20%
El 23: Resize 15%
El 22: Resize
15%/Duplicate/Erase what overlaps
El 12: Resize
10%/Duplicate/Mirror
El 13: Resize 15%/Mirror
El 2: Resize 10%
El 2 again: Resize 5%/Mirror
Highlight your white background.
New Raster layer.
Select All.
Copy and paste Paper 8 Into Selection.
Deselect.
Apply the mask.
Resize 110%
Merge Group.
Add your credits.
Add your name.
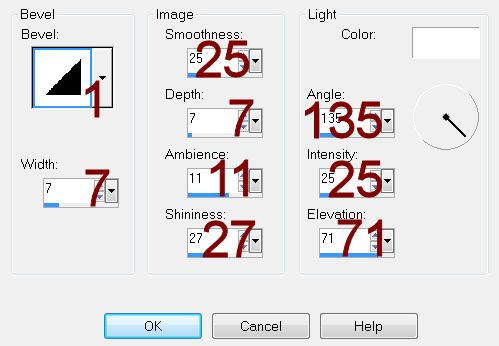
Give it a slight Inner Bevel:

Resize all layers 80%.


No comments:
Post a Comment