

Supplies
Font of choice - I used Vegacute – I’m sorry, I couldn’t find a link
for it.
Weescotlass Mask 249 here
“Falling All Around” is a tagger size scrap
kit created by Nette of Nette’s NightOwl Works and can be purchased from her
store CountryCorner Creations. You can visit her blog here.
Thank you Nette for a really terrific autumn kit.
Thank you Nette for a really terrific autumn kit.
This tutorial was written assuming you have a working knowledge of PSP.
~♥~ Let’s get started ~♥~
Open up a 700 x 700 blank canvas.
Flood fill white.
Copy and paste Frame 1 as a new layer.
Resize 30%
Duplicate twice – Resize one of them 90% and the other 80%
Move all 3 frames into position – see my tag for reference.
To each frame:
Click inside the frame with your Magic.
Selections/Modify/Expand by 4.
New Raster layer below the frame.
Copy and paste Paper 8 Into Selection.
Deselect.
Copy and paste Fallcat as a new layer just above the paper of the
largest frame.
Resize 50%
Move into a position that will look good below the largest and smallest
frames.
Duplicate/Move this cat layer just above the paper of the smallest
frame.
Highlight the paper layer just below the cat.
Click anywhere outside of it with your Magic Wand.
Highlight the cat layer.
Tap the delete key.
Deselect.
Change the Properties to Burn and lower the Opacity to about 22.
Repeat the above step with the other cat layer.
New Raster layer just above your white background.
Make your Selection Tool active set on Rectangle.
Create a rectangle approximately 450 x 275 pixels.
Copy and paste Paper 9 Into Selection.
New Raster layer.
Copy and paste Paper 11 Into Selection.
Deselect.
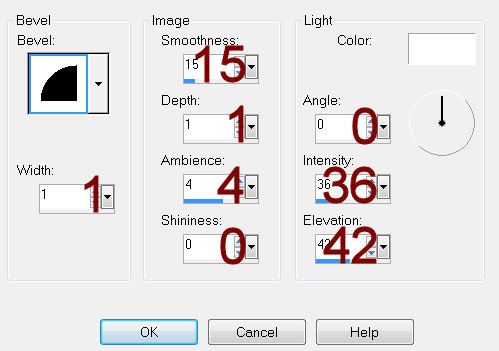
Give each paper a slight Inner Bevel:
Move each paper into position – see my tag for reference.
Add your elements. I used:
Autumn Apples: Resize 35%
Fall Cluster: Resize 15%
Fall Cat: Resize 40%
Bird 1 & 2: Resize 15%
Shiny Swirl: Resize 30%
Fall WA – shadowed: Resize 35%
Crop your image slightly.
Highlight your white background.
New Raster layer.
Select All.
Copy and paste Paper 3 Into Selection.
Deselect.
Apply the mask.
Resize 110%
Make your Pick Tool active and move the mask down just a little and
pull the right side out.
Merge Group.
Add your credits.
Add your name.
Color Pallet:
Foreground: Pattern/Paper 8
Background: Pattern/Paper 9
Stroke: 1.0
Type your name.
Convert to a Raster layer.
Select All/Float/Defloat
Selections/Modify/Contract by 1
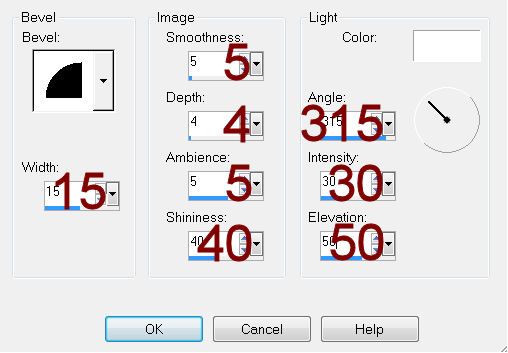
Give it a slight Inner Bevel:
Deselect.
Resize all layers 80%.
No comments:
Post a Comment