

Supplies
1 tube of choice – I used the adorable artwork of Ava Schwark which can
be purchased from PSP TubeStop. You must have a license to use.
Font of choice - I used Sofie 2 here
My Template 30 here
Supplies for this tutorial can be downloaded here.
They are to be used for this tutorial only.
This tutorial was written assuming you have a working knowledge of PSP.
~♥~ Let’s get started ~♥~
Open up the template.
Shift + D.
Close out the original.
Delete the following layers:
Copyright, Circle Background 1, Circle Background 2, and Circle
Background 3.
Highlight Circle 1 layer.
Click on it with your Magic Wand.
New Raster layer.
Copy and paste Paper 2 Into Selection.
Deselect.
DO NOT DELETE THE TEMPLATE LAYER.
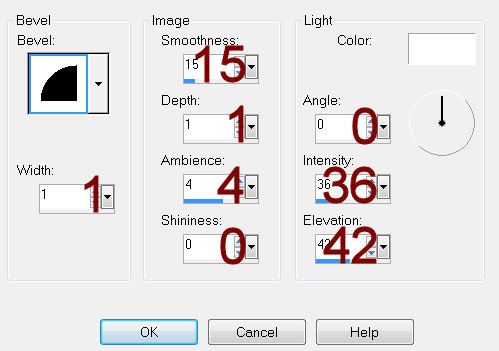
Give the paper layer a slight Inner Bevel:
Highlight Circle 2 layer.
Repeat the above step accept Paste Into Selection Paper 3.
Highlight Circle 3 layer.
Repeat the above step accept Paste Into Selection Paper 1.
Copy and paste your tube as a new layer above the pink paper layer.
Move the tube into a position you’d like to see it covering all 3
circles – see my tag for reference. (It’s the layer that’s barely visible on each
of the circles)
Once you have the tube exactly where you want it:
Highlight Circle 3 template layer.
Click on it with your Magic Wand.
Highlight the tube layer.
In your layers pallet right click/Promote Section to Layer.
Move the promoted layer just above the pink paper.
Deselect.
You can delete the template layer.
Change the Properties of the promoted layer to Overlay.
Highlight Circle 2 template layer.
Click on it with your Magic Wand.
Highlight the tube layer.
In your layers pallet right click/Promote Section to Layer.
Move the promoted layer just above the purple paper.
Deselect.
You can delete the template layer.
Change the Properties of the promoted layer to Overlay.
Highlight Circle 1 template layer.
Click on it with your Magic Wand.
Highlight the tube layer.
In your layers pallet right click/Promote Section to Layer.
Move the promoted layer just above the teal paper.
Deselect.
You can delete the template layer.
Change the Properties of the promoted layer to Overlay.
Color Pallet:
Foreground: #ffffff
Background: #6640b0
Highlight Circle 1 Ring.
Make your Color Replacer Tool active.
Double Right click over the ring.
It should now be purple.
Adjust/Add Remove Noise/Add Noise:
Random checked
Noise: 35%
OK
Repeat the above step with Circle 2 Ring and Circle 3 Ring.
Copy and paste your tube as a new layer.
If you’re using the tube I did, also copy and paste the rabbit as a new
layer.
Copy and paste all the elements that I supplied.
See my tag for reference.
The pencils:
6: Free rotate Right 80 degrees
7: Free rotate Right 90 degrees
8: Free rotate Right 100 degrees
Highlight your white background.
New Raster layer.
Select All.
Copy and paste Paper 4 Into Selection.
Apply the mask.
Resize 110%
Merge Group.
Add your credits.
Add your name.
Color Pallet:
Foreground: #000000
Background: #ee7fc2
Stroke: 1.00
Type your name.
Give it a slight Inner Bevel:
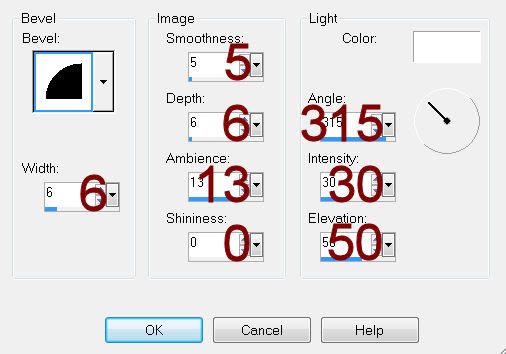
Resize all layers 80%.
No comments:
Post a Comment