

Supplies
2 tubes of choice – I used the beautiful artwork of Katerina Koukiotis
which can be purchased from PSP Tube Stop. You must have a license to use.
Font of choice - I used Before the Rain here
Tracy F. Designz Template 57 here
Tip: Download from her bulk templates. It has been brought to
my attention the individual template link is not working.
Tip: Download from her bulk templates. It has been brought to
my attention the individual template link is not working.
Elements and Paper which I’ve supplied here
These elements are to be used for this tutorial only.
Plug Ins Used:
Apply Eyecandy 5 – Textures: Stone Wall
This tutorial was written assuming you have a working knowledge of PSP.
~♥~ Let’s get started ~♥~
Open up the template.
Shift + D.
Close out the original.
Delete the credit layer.
Image/Canvas Size:
700 x 600
New Raster layer.
Flood fill white.
Send to bottom.
Open up the paper that I supplied.
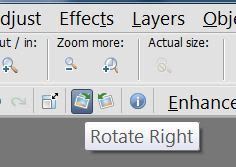
Click on the Rotate Right icon at the top of your work space:
Copy.
Highlight Circle 1 layer.
New Raster layer.
Copy and paste the paper Into Selection.
Duplicate
Effect/Texture Effect/Texture:
Look for “Bricks” and match your settings to mine:
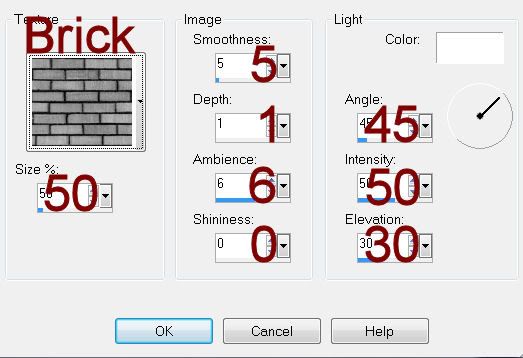
OK
Change the Properties to Soft Light.
Deselect.
Delete the template layer.
Highlight Rectangle layer.
Click anywhere outside of it with your Magic Wand.
Copy and paste the paper as a new layer.
Position it so that the bottom left corner of the paper aligns with the
bottom left corner of the template layer – it can overhang a little.
Tap the delete key.
Duplicate
Apply Eyecandy 5 – Textures: Stone Wall
Choose Cobblestone from the settings tab.
Use Default Settings
OK
Adjust/Blur/Gaussian blur:
Radius: 6
OK
Deselect.
Delete the template layer.
Highlight Circle 2 layer.
Click anywhere outside it with your Magic Wand.
Copy and paste the paper as a new layer.
Move into a position you like.
Tap the delete key.
Copy and paste your tube as a new layer over the paper layer.
Tap the delete key.
Deselect.
Change the Properties of the tube layer to Soft Light.
Highlight Heart 1 layer.
Click on it with your Magic Wand.
New Raster layer.
Copy and paste the paper Into Selection.
Copy and paste your tube as a new layer over the paper layer.
Selections/Invert
Tap the delete key.
Deselect.
Delete the template layer.
Change the Properties to Soft Light.
Color Pallet:
Foreground: #d09271
Background: #dacbc5
Set to Gradient:
Style: Linear
Angle: 11
Repeats: 3
Highlight Hearts layer.
Click anywhere outside of them with your Magic Wand.
New Raster layer.
Flood fill with the gradient.
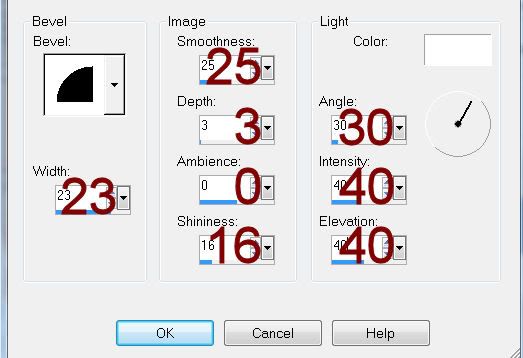
Give it a slight Inner Bevel:
Deselect.
Delete the template layer.
Highlight Heart 2 layer.
Click anywhere outside of it with your Magic Wand.
Selections/Invert
New Raster layer.
Flood fill with the gradient.
Give it the same slight Inner Bevel.
Copy and paste your second tube as a new layer – resize as needed.
Position over the gradient heart.
Selections/Invert
Tap the delete key.
Change the Properties to Soft Light.
Deselect.
Delete the template layer.
Copy and paste your tube as a new layer positioning it in front of the
heart.
If you’d like to give it a feathered look –
Give the tube a drop shadow.
Make your Freehand Selection Tool active.
Circle around the tube letting the dotted line touch wherever you’d
like the tube feathered and staying far away from the area’s you don’t want
feathered.
Selections/Modify/Inside Outside Feather:
Both checked
Feather amount: 35
Selections/Invert
Tap the delete key until you have the feathered effect you like.
Deselect.
Add the elements I provided:
Baby’s Breath: Duplicate/Mirror/Resize 70%
Butterfly: Duplicate/Mirror/Resize 70%
Bow: Duplicate/Mirror
Wording
Highlight your white background.
New Raster layer.
Select All.
Copy and paste the paper Into Selection.
Deselect.
Duplicate/Change the Properties to Multiply
Merge Down.
Apply the mask.
Resize 110%.
Merge Group.
Add your credits.
Add your name.
Resize all layers 80%.
wow evelyn just saw this and LOVE IT xoxo
ReplyDelete