

Supplies
Plug Ins used:
Greg’s Factory Output Vol. II – Pool Shadow
Eyecandy 3.1 - Glow
“Lest We Remember” is a FTU tagger size scrap kit created by Krissy of
Krissy’s Scraps and can be downloaded from her store Exquisite Scraps.
Thank you Krissy for a beautiful kit.
This tutorial was written assuming you have a working knowledge of PSP.
~♥~ Let’s get started ~♥~
Open up the template.
Shift + D.
Close out the original.
Delete the top 4 layers.
Resize all layers 90%.
Image/Canvas Size:
700 x 550
OK
New Raster layer.
Send to bottom.
Flood fill white.
Highlight Back Rectangle layer.
Click on it with your Magic Wand.
New Raster layer.
Copy and paste Paper 5 Into Selection.
Deselect.
Delete the template layer.
Apply Greg’s Factor Output Vol. II – Pool Shadow:
Use default settings accept change the Intensity bar down to 45.
Highlight Back Rectangle Frame layer.
Click on it with your magic Wand.
New Raster layer.
Copy and paste Paper 1 Into Selection.
Deselect.
Delete the template layer.
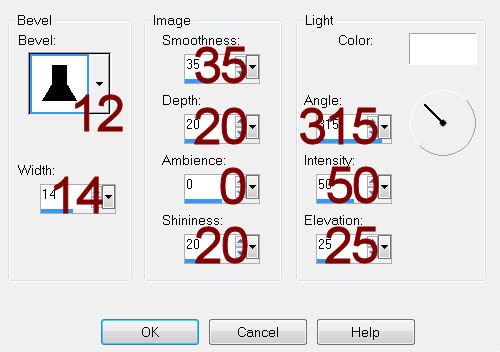
Give it a slight Inner Bevel:
Repeat the above step with:
Sides Rec. Frames layer.
Center Rec. Frame layer.
Highlight Sides Recs layer.
Click on each of them with your Magic Wand.
New Raster layer.
Copy and paste Paper 2 Into Selecction.
Deselect.
Delete the template layer.
Apply the same Pool Shadow effect using same settings.
Repeat the above step with Center Rec layer.
Highlight Center Circle layer.
Click on it with your Magic Wand.
New Raster layer.
Copy and paste Paper 3 Into Selection.
Deselect.
Delete the template layer.
Apply the same Pool Shadow effect accept lower the Intensity bar to 24.
Apply the same Pool Shadow effect accept lower the Intensity bar to 24.
Apply Eyecandy 3.1 – Glow:
Width: 5
Opacity: 100
Opacity Drop Off: Fat
Color: #3d301d
OK
Add your elements. I used:
Wooden Cross 1: Resize 70% (be
sure to erase the credit)
Army Boots 1: Resize 70% (be
sure to erase the credit)
Beaded String 1: Resize 40%/Flip
Buckle 2: Resize
35%/Duplicate/Mirror
Dogs Tags 1 & 2: Resize
45%/Free rotate Left 65 degrees
Dry Foliage 1: Resize 60%
Envelope 1: Resize 60%/Free
rotate Left 7 degrees
Tied Envelope 1: Resize 65%
Poppy 1 & 2: Resize 40%
Word Art 1: Resize 50%
To give the cross and shoes a thrown drop shadow:
Give the element a drop shadow on its own layer.
Click the Layer Link Toggle at the top of the layers pallet until it
says “None”
Move the drop shadow off to the side just a bit.
For the drop shadow of the cross, after you’ve moved it off to the side
a bit make your Pick Tool active and pull the top down just a bit. Press the Ctrl key and stretch the top of the
shadow out just a little.
Highlight your white background.
New Raster layer.
Select All.
Copy and paste Paper 9 Into Selection.
Deselect.
Apply the mask.
Merge Group.
Duplicate.
Be sure to place Krissy’s credit on your tag.
Add your name.
Color Pallet:
Foreground: #000000
Background: #8f2512
Stroke: 1
Type your name.
Give it the same Inner Bevel.
Resize all layers 80%.
This is an awesome tut Bev I loved doing it .
ReplyDeleteHello Bev,
ReplyDeleteMerci pour ce magnifique tuto 🙂