Supplies
1 tube of choice – I used the beautiful artwork of Rachel Anderson which
can be purchased from CDO. You must have a license to
use.
Font of choice - I used Wretched here
Weescotlass Mask 138 here
My template 18 here
Plug Ins used:
Greg’s Factory Output Vol. II – Pool Shadow
“Spirit Lights” is a full size scrap kit created by Myst Designs can be
purchased from Scrappin Naturally. You can visit her blog here.
Thank you Myst for a beautiful kit.
This tutorial was written assuming you have a working knowledge of PSP.
~♥~ Let’s get started ~♥~
Open up the template.
Shift + D.
Close out the original.
Delete the top 3 layers.
Highlight Back 1 layer.
Click anywhere outside of it with your Magic Wand.
Copy and paste Paper 9 as a new layer.
Move into a position over the
template layer that you like.
Tap the delete key.
Deselect.
Delete the template layer.
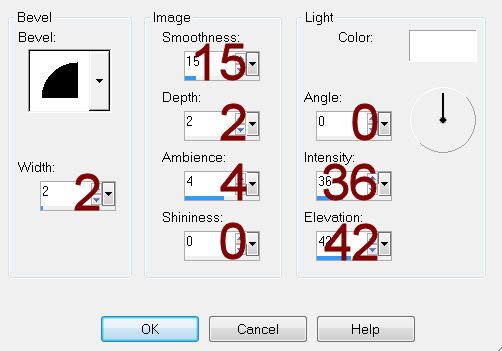
Give it a slight Inner Bevel:

Highlight Back 2 layer.
Click on it with your magic Wand.
New Raster layer.
Copy and paste Paper 9 Into Selection.
Deselect.
Delete the template layer.
Give it the same slight Inner Bevel.
Highlight Back 3 layer.
Click anywhere outside of it with your Magic Wand.
Copy and paste Paper 7 as a new layer.
Resize 70%
Move into a position you like over the template layer.
Tap the delete key.
Deselect.
Delete the template layer.
Give it the same slight Inner Bevel.
Highlight Frame back layer.
Click anywhere outside of it with your Magic Wand.
Copy and paste Paper 7 as a new layer – Rename this layer Frame Back.
Resize 20%
Move into a position you like.
Tap the delete key.
Deselect.
Delete the template layer.
Highlight Frame layer.
Select All/Float/Defloat
New Raster layer.
Copy and paste Paper 7 Into Selection.
Deselect.
Change the Properties to Burn.
Copy and paste your tube as a new layer.
Position at the left side of your canvas.
Duplicate/Mirror
Position below the frame.
Highlight Frame Back paper layer.
Click anywhere outside of it with your Magic Wand.
Highlight the tube layer above it.
Tap the delete key.
Deselect.
Change the Properties of the tube layer to Hard Light.
Lower the Opacity to about 42.
New Raster layer.
Make your Tube tool active.
Choose the Artistic category.
Choose Flare.
On your canvas click to make a flare appear. If you don’t like the flare simply “undo”
until you have the flare you want.
Move the flare so that it’s between where both tube fingers touch.
Copy and paste Ribbon 3 as a new layer.
Resize 10%
Free rotate Left 7 degrees.
Copy and paste Flower 6 as a new layer.
Resize 25%
Copy and paste flower 8 as a new layer.
Resize 10% and 70%
Center it over the larger flower and give it a drop shadow.
Merge Down.
Both flowers should be on the same layer now.
Resize 40% and 80%
Duplicate/Resize 80%/Flip/Duplicate
Duplicate all 3 flower layers.
See my tag for placement.
Crop your image.
Highlight your white background.
Copy and paste Paper 9 as a new layer.
Apply the mask.
Resize 105%
Merge Group.
Duplicate
Move each mask layer to each side of your canvas.
Add your credits.
Add your name.


No comments:
Post a Comment