

Supplies
Font of choice - I used Once Upon a Time here
Becky mask 9 here
Plug Ins Used:
Eyecandy 3.1 - Glow
“Over the Rainbow” is tagger size scrap kit created by the artists at PSP Tube Stop - Lisa Cree, Joanna
Bromley, Mitzi Sato Wiuff, and Constanza Ehrenhaus and can be purchased here.
Thank you to the participating artists for a really beautiful kit!
This tutorial was written assuming you have a working knowledge of PSP.
~♥~ Let’s get started ~♥~
Open up a 700 x 700 blank canvas.
Flood fill white.
Color Pallet:
Foreground: #8cbbf2
Background: #dff3fc
Foreground to gradient –
Style: Linear
Angle: 0
Repeats: 0
Invert unchecked.
Copy and paste Shamrock Frame Green as a new layer.
Resize 65%
Free rotate Left 5 degrees.
Duplicate/Mirror
Move both frames into position – see my tag for reference.
Make your Freehand Selection tool active set on Point to Point and
section out the area of the frame that can be seen within the frame on the
right:
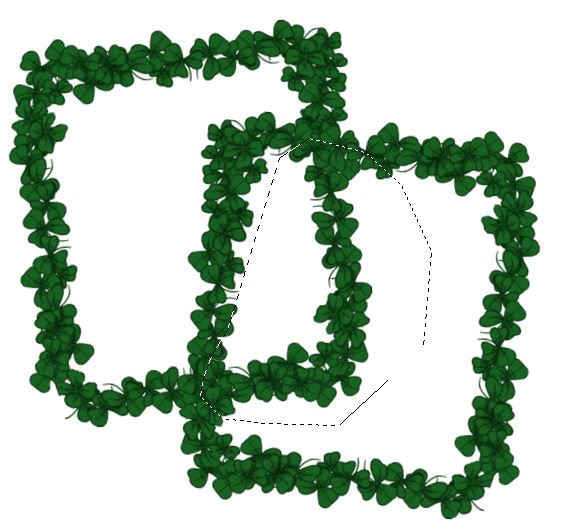
Tap the delete key.
Deselect.
Merge Visible both frame layers.
Use your Freehand Selection Tool again and outline the merged frames.
New Raster layer below the merged layer.
Flood fill with the gradient.
Selections/Invert
Copy and paste the following elements below the frame, tapping the
delete key after each is moved into position – see my tag for reference.
Rainbow 1: Resize 130%
Fence
Deselect.
Add your elements. I used:
Leprechaun Girl: Resize 90%
Rainbow Nature: Resize 90%
Ribbons Double Bow Red: Resize 50%/Free
rotate Right 90 degrees/Mirror
White Daisy Cluster: Resize
60%/Mirror
Butterfly Purple: Resize 15%
Sparkles 2
Butterfly Pink: Resize
10%/Mirror
Green Grass layer:
Duplicate/Match ends up so it created grass across the canvas.
Use your Freehand Selection Tool, section around the grass making sure
the line touches the bottom of the grass element and staying away from the top
of the element.
Selections/Modify/Inside Outside Feather:
Both checked
Feather amount: 17
Selections/Invert
Tap the delete key until you have the feathered effect you like.
Deselect.
Highlight your white canvas.
New Raster layer.
Select All.
Copy and paste Butterfly Paper Into Selection.
Deselect.
Apply the mask.
Use your Pick Tool and pull the sides out just a little.
Merge Group.
Duplicate/Lower the Opacity to about 28
Add your credits.
Add your name.
Apply Eyecandy 3.1 – Glow:
Width: 3
Opacity: 100%
Opacity Drop Off: Fat
Color: White
OK
Free rotate your name Left 5 degrees
Duplicate the grass layer/Mirror/Move below your name in the layers
pallet.
Crop your image.
Resize all layers 80%
No comments:
Post a Comment