Supplies
1 tube of choice – I used the amazing artwork of Tin which can be
purchased from CDO. You must have
a license to use.
Font of choice - I used Dobkin here
Becky Mask 22 here
Denz Designz Template 216 here
“Steampunk Junque” is a tagger
size scap kit created by Krissy of Krissy’s Scraps and can be purchased from her store Exquisite
Scraps. You can visit her blog here.
Thank you Krissy for a truly beautiful steampunk kit.
This tutorial was written assuming you have a working knowledge of PSP.
~♥~ Let’s get started ~♥~
Open up the template.
Shift + D.
Close out the original.
Image Canvas Size:
700 x 500
OK
Highlight the Background layer.
Flood fill white.
Delete the following layers:
Credit layer, Dotted Circle Outline layers 1 & 2, Small Circles 1
& 2, Scattered Hearts layer.
Highlight Pink Rectangle layer.
Click on it with your Magic Wand.
New Raster layer.
Copy and paste Paper 4 Into Selection.
Deselect.
Delete the template layer.
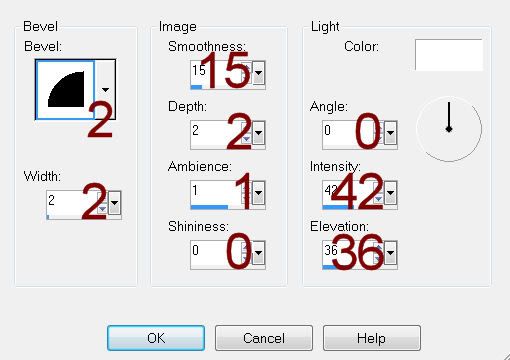
Give it a slight Inner Bevel:

Highlight Black Square 2 layer.
Click on it with your Magic Wand.
New Raster layer.
Copy and paste Paper 2 Into Selection.
Deselect.
Delete the template layer.
Give it the same slight Inner Bevel.
Highlight Black Square 1 layer.
Repeat the above step.
Highlight Large Strip layer.
Click on it with your Magic Wand.
New Raster layer.
Copy and paste Paper 7 Into Selection.
Deselect.
Delete the template layer.
Give it the same slight Inner Bevel.
Highlight Pink Strip layer.
Click anywhere outside of it with your Magic Wand.
Copy and paste Paper 10 as a new layer.
Resize 75%
Tap the delete key.
Deselect.
Delete the template layer.
Give it the same slight Inner Bevel.
Copy and paste Frame 1 as a new layer.
Resize 40%
Move into position over the Frame template layer.
Delete frame template layer and black frame back template layer.
Click inside the element frame with your Magic Wand.
Selections/Modify/Expand by 4.
New Raster layer below the frame.
Copy and paste 5 Into Selection.
Copy and paste your tube as a new layer below the frame.
Selections/Invert
Tap the delete key.
Deselect.
Add your elements. I used:
Victorian Fan 1: Resize 60%
Cogs 2: Resize 45%
Dried Roses: Resize 40%
Floor Lamp 1: Resize 60%
Weathered Lantern 1: Resize 35%
Jeweled Butterfly: Resize 25%
and 70%/Free rotate Right 10 degrees/Duplicate/Mirror
Bow 1: Resize 25%/Mirror
Crop your Image so that it’s centered on the canvas.
Highlight your white canvas.
New Raster layer.
Select All.
Copy and paste Paper 7 Into Selection.
Deselect.
Apply the mask.
Merge Group.
Add your name.
Color Pallet:
Foreground: #0a0000
Background: #8d673b
Stroke: 0.5
Type your name.
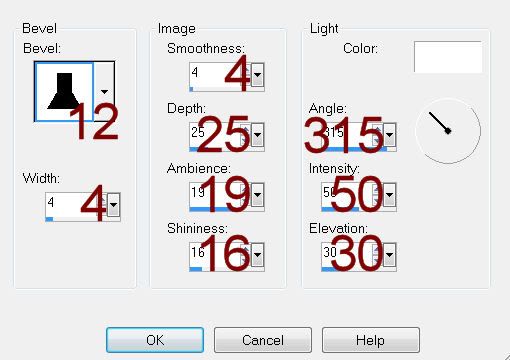
Give it a slight Inner Bevel:

Resize all layers 80%


No comments:
Post a Comment