

Supplies
1 tube of choice – I used the adorable artwork of Lisa Victoria which
can be purchased from Up Your Art. You must have a license to use.
Font of choice - I used Cinnamon Cake here
Becky Mask 22 here
Plug Ins:
Eyecandy 5: Nature – Snow Drift
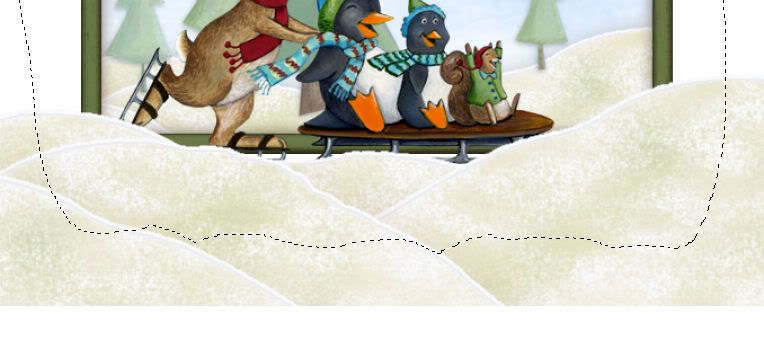
“Christmas Past” is a FTU tagger size scrap kit created by myself, Bev,
HorsePlay’s Pasture Designs and can be downloaded from my blog here.
To all who have left a Thank You….you all are very welcome!
This tutorial was written assuming you have a working knowledge of PSP.
~♥~ Let’s get started ~♥~
Open up a 700 x 700 blank canvas.
Flood fill white.
Copy and paste 30 as a new layer.
Resize 75%
Click inside of it with your Magic Wand.
Selections/Modify/Expand by 4.
New Raster layer below the frame.
Make your Freehand Selection Tool active.
Section out the area of the sky that’s at the top center of the image.

Copy
Make your working canvas active.
Paste Into Selection.
Rename “Sky”.
Copy and paste 18 as a new layer just below the frame.
Resize 75%
Move into position – see my tag for reference.
Selections/Invert
Tap the delete key.
Deselect for now.
Make the tube active again.
Deselect.
Open up and highlight the layer with the trees.
Copy.
Make your working canvas active.
Paste just below the frame.
Resize 50%
Use your Selection Tool and section out the little tree on the far
right.
Edit/Cut
Deselect.
Edit/Paste as a new layer.
Move both tree layers into position – see my tag for reference.
Highlight the sky layer.
Click anywhere outside of it with your Magic Wand.
Highlight the tree layer and tap the delete key.
Deselect.
Copy and paste 17 as a new layer just below the frame.
Resize 60%
Duplicate
Match both ice layers together to create one long line of icicles.
Merge Visible.
Move into position – see my tag for reference.
Highlight the sky layer.
Click anywhere outside of it with your Magic Wand.
Highlight the merged layer.
Tap the delete key.
Deselect.
Copy and paste your tube as a new layer –
I chose Tube (b) layer – resize 65%
Position it in front of the frame.
Copy and paste 18 as a new layer above your tube layer.
Move into position – see my tag for reference.
To feather the snow use your Freehand Selection Tool and outline the
snow:
Selections/Invert
Tap the delete key.
Selections/Modify/Inside Outside Feather:
Both: Checked
Feather amount: 35
OK
Tap the delete key 6 times.
Deselect.
Copy the scarf from the tube layer.
Resize 65%
Free rotate Left 60 degrees
Move into position – see my tag for reference.
Add your elements. I used:
1: Resize 35%
28: Resize 65%/Duplicate
11: Resize 40%
24: Resize 35%/Use your Pick
Tool to turn slightly/Duplicate/Mirror/Resize 70%
19
Crop your Image.
Highlight your white canvas.
New Raster layer.
Select All.
Copy and paste Paper 6 Into Selection.
Deselect.
Apply the mask.
Merge Group.
Move slightly up on your canvas.
Duplicate
Color Pallet:
Foreground: #000000
Background: #7f1c28
Stroke Width: .5
Type out the sentence:
Bad weather always looks worse through a window.
Add your name.
Use same colors but change the stroke width to 1.
Convert to Raster layer.
Apply Eyecandy 5: Nature – Snow Dift.
Settings Tab:
Small, First Flakes
Basic Tab:
Default settings accept lower Dust on All Features to 1.
OK
Resize all layers 80%.
No comments:
Post a Comment