

Supplies
1 tube of choice – I used the amazing artwork of Mitzi Sato-Wiuff which
can be purchased from PSP Tube
Stop. You must have a license to use.
Font of choice - I used Inspiration here
Becky Mask 22 here
My Template 90 here
Plugs Ins:
Eyecandy 3.1 – Glow
Greg’s Factory Output Vol. II – Pool Shadow
“Journey Home” is a tagger size
scrap kit created by Sandra of S.G. Rowe Designs and can be purchased from Aussie Scrap Designs. You can visit
her blog here.
Thank you Sandra for a beautiful kit.
This tutorial was written assuming you have a working knowledge of PSP.
~♥~ Let’s get started ~♥~
Open up the template.
Shift + D.
Close out the original.
Image Canvas Size:
700 x 600
OK
Highlight the Background layer.
Flood fill white.
Delete the credit layer.
Highlight Rectangle 1 layer.
Click on it with your Magic Wand.
New Raster layer.
Copy and paste Paper 8 Into Selection.
Deselect.
Delete the template layer.
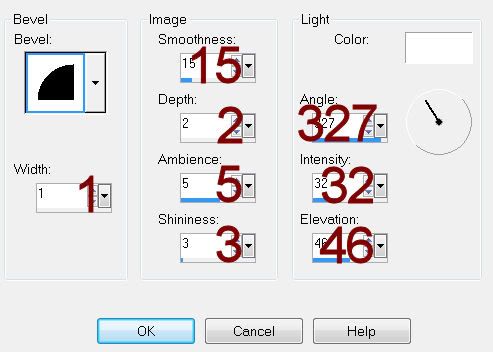
Give it a slight Inner Bevel:
Highlight Rectangle 2 layer.
Click on it with your Magic Wand.
New Raster layer.
Copy and paste Paper 9 Into Selection.
Give it the same slight Inner Bevel.
Copy and paste Groupings 2 Element as a new layer.
Resize 70%
Move into position – see my tag for reference.
Selections/Invert
Tap the delete key.
Change the Properties to Soft Light
Duplicate
Change the Properties to Multiply.
Lower the Opacity to about 34
Deselect.
Delete the template layer.
Highlight Stitching layer.
Click anywhere outside of it with your Magic Wand.
Selections/Invert
New Raster layer.
Flood fill with #e6e6e6
Deselect.
Delete the template layer.
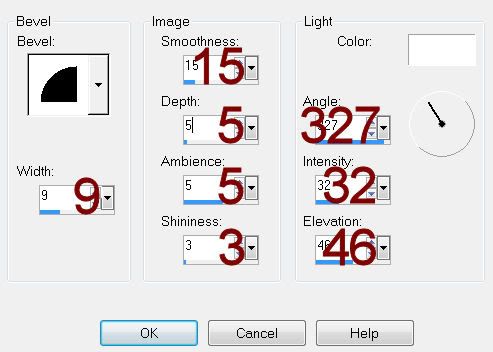
Give it the same slight Inner Bevel.
Highlight Circle 1 Back layer.
Click on it with your Magic Wand.
New Raster layer.
Copy and paste Paper 14 Into Selection.
Adjust/Add Remove Noise/Add Noise:
Gaussian and Monochrome checked
Noise: 25%
OK
Deselect.
Delete the template layer.
Give it the same slight Inner Bevel.
Repeat the above step with Circle 2 Back and Circle 3 Back layers.
Highlight Circle 1 layer.
Click anywhere outside of it with your Magic Wand.
Selections/Invert
New Raster layer.
Copy and paste 11 Into Selection.
Apply Greg’s Factory Output Vol. II – Pool Shadow:
Use Default settings accept lower the Intensity bar to 27
Deselect.
Apply Eyecandy 3.1 – Glow:
Width: 3
Opacity: 100%
Opacity Drop Off: Fat
Color: White
OK
Repeat the above step with Circle 2 and Circle 3 layers.
Copy and paste your tube as a new layer.
Add your elements. I used:
Brad 3: Resize 25%/Duplicate 3x’s
Tree 1: Resize 90%
Floral 4: Resize 65%
Tree 2: Resize 65%
Floral 3: Resize 40%
Bow 5: Resize 25%/Mirror
Flower 2: Resize
25%/Duplicate/Resize 80%
Flower 3: Resize
25%/Duplicate/Resize 80%
Butterfly 1: Resize 25% and 80%
Crop your Image.
Highlight your white canvas.
New Raster layer.
Select All.
Copy and paste Paper 12 Into Selection.
Deselect.
Apply the mask.
Resize 105%
Merge Group.
Add your name.
Color Pallet:
Foreground: #475687
Background: Pattern/Paper 9
Stroke: 1.0
Type your name.
Give it a slight Inner Bevel:
Resize all layers 80%
Beautiful tag and tutorial.thought I would let you know that font is no longer available.
ReplyDelete