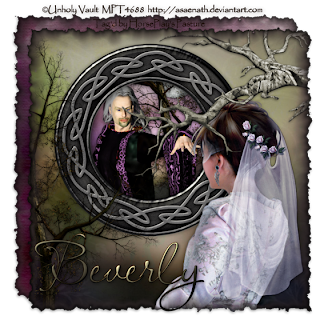
Clicking on the image will all you to enlarge for bigger view.
Supplies
1 tube of choice - I used the artwork of Unholy Vault at MPT
Font of Choice - I used LavishlyYoursRob (pay font) but Aquarelle is nearly identical and can be downloaded from here
Greg’s Factory Output Vol. II - Pool Shadow
Xenofex 2: Burnt Edges
“Destiny” is a PTU tagger size scrap kit created by Jessica of Gothic Inspirations and can be purchased from her store Gothic Inspirations. You can visit her blog here.
Jessica, I just had to create another tut with this absolutely stunning kit! Thank you again.
This tutorial was written assuming you have a working knowledge of PSP.
~♥~ Let’s get started ~♥~
Open up a 700 x 700 blank canvas.
Flood fill white.
Copy and paste Frame 2 as a new layer.
Resize 75%
Click inside with your Magic Wand.
Selections/Modify/Expand by 6.
New Raster layer below the frame.
Copy and paste Paper 5 Into Selection.
Deselect.
Copy and paste below the frame the following embellishments and move them into position (see my tag for reference) - don’t worry about anything that sticks out from the frame sides. We’ll clean that up in just a bit.
Wizard
Tree
Moon: Resize 25% and 25%
Highlight the paper layer.
Click anywhere outside of it with your Magic Wand.
Highlight each element layer and tap the delete key.
Deselect.
Close out your white background.
Merge Visible.
Reopen your white background.
Copy and paste your tube as a new layer.
Move the tube and frame into position - see my tag for reference.
Copy and paste Tree as a new layer.
Position it near the bottom left corner.
Copy and paste Tree Limb as a new layer.
Resize 70%
Mirror
Move into position at the top right corner.
Be sure the tree limb is at the top in your layers pallet.
Highlight your white background.
New Raster layer.
Select All.
Copy and paste Paper 15 Into Selection.
Deselect.
Close out your white background.
Merge Visible.
Reopen your white background.
Highlight the merged layer.
Apply Xenofex: Burnt Edges:
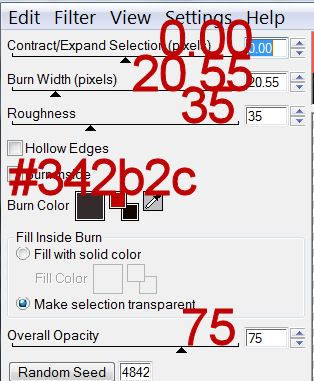
Resize the merged layer 90%
Highlight your white background.
New Raster layer.
Copy and paste Paper 2 Into Selection.
Deselect.
Apply the same Burnt Edges effect.
Resize 90%
Move this layer up toward the upper left corner just a little.
Move the other layer toward the bottom right corner.
See my tag for reference.
Add your credits.
Add your name.
Foreground: #140900
Background: Section out an area of Paper 15/set the background in your color pallet to pattern and find it.
Stroke: 1
Type your name.
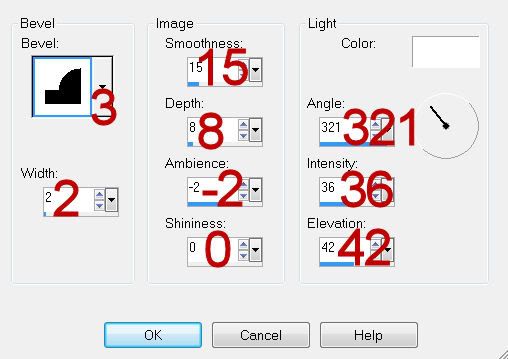
Give it a slight Inner Bevel:
Apply Greg’s Factory Output Vol. II - Pool Shadow twice:
Use Default Settings accept change the Intensity to 182.
Resize all layers 80%
I hope you enjoyed this tutorial.
I’d love to see your results and show it off in my gallery.
Email me!
Hugs,
Bev
Supplies
1 tube of choice - I used the artwork of Unholy Vault at MPT
Font of Choice - I used LavishlyYoursRob (pay font) but Aquarelle is nearly identical and can be downloaded from here
Greg’s Factory Output Vol. II - Pool Shadow
Xenofex 2: Burnt Edges
“Destiny” is a PTU tagger size scrap kit created by Jessica of Gothic Inspirations and can be purchased from her store Gothic Inspirations. You can visit her blog here.
Jessica, I just had to create another tut with this absolutely stunning kit! Thank you again.
This tutorial was written assuming you have a working knowledge of PSP.
~♥~ Let’s get started ~♥~
Open up a 700 x 700 blank canvas.
Flood fill white.
Copy and paste Frame 2 as a new layer.
Resize 75%
Click inside with your Magic Wand.
Selections/Modify/Expand by 6.
New Raster layer below the frame.
Copy and paste Paper 5 Into Selection.
Deselect.
Copy and paste below the frame the following embellishments and move them into position (see my tag for reference) - don’t worry about anything that sticks out from the frame sides. We’ll clean that up in just a bit.
Wizard
Tree
Moon: Resize 25% and 25%
Highlight the paper layer.
Click anywhere outside of it with your Magic Wand.
Highlight each element layer and tap the delete key.
Deselect.
Close out your white background.
Merge Visible.
Reopen your white background.
Copy and paste your tube as a new layer.
Move the tube and frame into position - see my tag for reference.
Copy and paste Tree as a new layer.
Position it near the bottom left corner.
Copy and paste Tree Limb as a new layer.
Resize 70%
Mirror
Move into position at the top right corner.
Be sure the tree limb is at the top in your layers pallet.
Highlight your white background.
New Raster layer.
Select All.
Copy and paste Paper 15 Into Selection.
Deselect.
Close out your white background.
Merge Visible.
Reopen your white background.
Highlight the merged layer.
Apply Xenofex: Burnt Edges:

Resize the merged layer 90%
Highlight your white background.
New Raster layer.
Copy and paste Paper 2 Into Selection.
Deselect.
Apply the same Burnt Edges effect.
Resize 90%
Move this layer up toward the upper left corner just a little.
Move the other layer toward the bottom right corner.
See my tag for reference.
Add your credits.
Add your name.
Foreground: #140900
Background: Section out an area of Paper 15/set the background in your color pallet to pattern and find it.
Stroke: 1
Type your name.
Give it a slight Inner Bevel:

Apply Greg’s Factory Output Vol. II - Pool Shadow twice:
Use Default Settings accept change the Intensity to 182.
Resize all layers 80%
I hope you enjoyed this tutorial.
I’d love to see your results and show it off in my gallery.
Email me!
Hugs,
Bev

muy interesante conseguir este escenario!
ReplyDelete