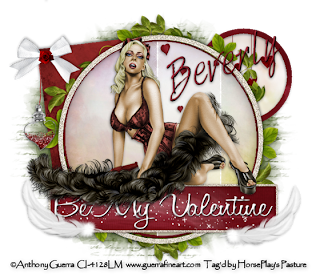
Clicking on the image will allow you to enlarge for bigger view.
Supplies
1 tube of choice - I used the artwork of Anthony Guerra. His work can now be found at CDO
Font of Choice - I used Honey Script here and HarabaraHand here
Artmama’s Template 25 here
“Be My Valentine” is a PTU tagger size scrap kit created by Kesha of KnC Scrapz and can be purchased from her store Lollipops n Gumdrops. You can visit her blog here.
Thank you Kesha for a beautiful Valentine’s Day kit!
This tutorial was written assuming you have a working knowledge of PSP.
~♥~ Let’s get started ~♥~
Open up the template.
Shift + D.
Close out the original.
Delete the top 5 layers and Tiny Words layer.
Highlight the background layer.
Image/Canvas Size
700 x 600
OK
Flood fill white.
Highlight Small Circle layer.
Click on it with your Magic Wand.
Copy and paste Paper 3 as a new layer.
Resize 25%
Move into position over the circle template layer.
Selections/Invert
Tap the delete key.
Copy and paste Hanging Hearts as a new layer.
Resize 25% and 80%
Move into position over the paper.
Tap the delete key.
Deselect.
Delete the template layer.
Highlight Small Circle Frame layer.
Click on it with your Magic Wand.
New Raster layer.
Copy and paste Paper 8 Into Selection.
Deselect.
Delete the template layer.
Repeat the above step with Lg Circle Back layer and Horizontal Rectangle layer.
Highlight Lg Rectangle layer.
Click on it with your Magic Wand.
New Raster layer.
Copy and paste Paper 1 Into Selection.
Deselect.
Delete the template layer.
Highlight Lg Circle layer.
Click on it with your Magic Wand.
New Raster layer.
Copy and paste Paper 2 Into Selection.
Deselect.
Delete the template layer.
In your Color Pallet:
Foreground and Background both set to white.
Using the Honey Script font type out the words “Be My Valentine”
(or other words if you choose!)
Position and center them over the rectangle.
Note: I needed to use the Pick Tool to push the bottom up a bit because the “y” hung over the frame and to also stretch the words out just a tad. If you need to do this just be sure you don’t disfigure the words too much.
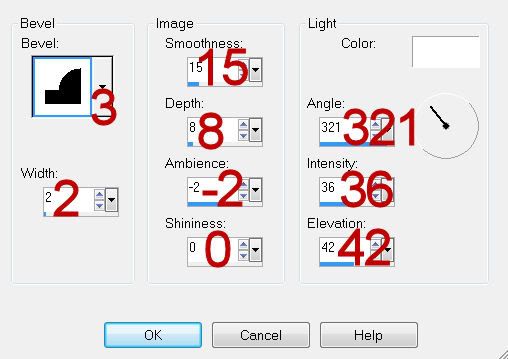
Give the words a slight Inner Bevel:

Copy and paste your tube as a new layer.
Copy and paste Branch 3 as a new layer.
Resize 90%
Position behind the large Glitter Circle.
Get the left side so it looks nicely positioned. As you can see the right side doesn’t look so great.
Use your Freehand Selection tool to section the entire right side of the element.
Tap the delete key.
Duplicate/Mirror/Flip
You should now have what appears to be a full leaf circle.
Add your embellishments. I used:
Hearts: Resize 40%
Glitter Heart String: Resize 70%
Bow 3: Resize 50%
Stars: Resize 50%
Feather: Resize 25%/Free rotate Right 45 degrees/Duplicate/Free rotate Right 30 degrees - duplicate and mirror both feathers.
Highlight your white background.
New Raster layer.
Select All.
Copy and paste Paper 7 Into Selection.
Deselect.
Apply the maks.
Use your Pick tool to pull the sides out slightly.
Merge Group.
Add your credits.
Add your name.
Give it the same Inner Bevel.
Free rotate left 20 degrees
Resize all layers 80%
I hope you enjoyed this tutorial.
I’d love to see your results and show it off in my gallery.
Email me!
Hugs,
Bev
Supplies
1 tube of choice - I used the artwork of Anthony Guerra. His work can now be found at CDO
Font of Choice - I used Honey Script here and HarabaraHand here
Artmama’s Template 25 here
“Be My Valentine” is a PTU tagger size scrap kit created by Kesha of KnC Scrapz and can be purchased from her store Lollipops n Gumdrops. You can visit her blog here.
Thank you Kesha for a beautiful Valentine’s Day kit!
This tutorial was written assuming you have a working knowledge of PSP.
~♥~ Let’s get started ~♥~
Open up the template.
Shift + D.
Close out the original.
Delete the top 5 layers and Tiny Words layer.
Highlight the background layer.
Image/Canvas Size
700 x 600
OK
Flood fill white.
Highlight Small Circle layer.
Click on it with your Magic Wand.
Copy and paste Paper 3 as a new layer.
Resize 25%
Move into position over the circle template layer.
Selections/Invert
Tap the delete key.
Copy and paste Hanging Hearts as a new layer.
Resize 25% and 80%
Move into position over the paper.
Tap the delete key.
Deselect.
Delete the template layer.
Highlight Small Circle Frame layer.
Click on it with your Magic Wand.
New Raster layer.
Copy and paste Paper 8 Into Selection.
Deselect.
Delete the template layer.
Repeat the above step with Lg Circle Back layer and Horizontal Rectangle layer.
Highlight Lg Rectangle layer.
Click on it with your Magic Wand.
New Raster layer.
Copy and paste Paper 1 Into Selection.
Deselect.
Delete the template layer.
Highlight Lg Circle layer.
Click on it with your Magic Wand.
New Raster layer.
Copy and paste Paper 2 Into Selection.
Deselect.
Delete the template layer.
In your Color Pallet:
Foreground and Background both set to white.
Using the Honey Script font type out the words “Be My Valentine”
(or other words if you choose!)
Position and center them over the rectangle.
Note: I needed to use the Pick Tool to push the bottom up a bit because the “y” hung over the frame and to also stretch the words out just a tad. If you need to do this just be sure you don’t disfigure the words too much.
Give the words a slight Inner Bevel:

Copy and paste your tube as a new layer.
Copy and paste Branch 3 as a new layer.
Resize 90%
Position behind the large Glitter Circle.
Get the left side so it looks nicely positioned. As you can see the right side doesn’t look so great.
Use your Freehand Selection tool to section the entire right side of the element.
Tap the delete key.
Duplicate/Mirror/Flip
You should now have what appears to be a full leaf circle.
Add your embellishments. I used:
Hearts: Resize 40%
Glitter Heart String: Resize 70%
Bow 3: Resize 50%
Stars: Resize 50%
Feather: Resize 25%/Free rotate Right 45 degrees/Duplicate/Free rotate Right 30 degrees - duplicate and mirror both feathers.
Highlight your white background.
New Raster layer.
Select All.
Copy and paste Paper 7 Into Selection.
Deselect.
Apply the maks.
Use your Pick tool to pull the sides out slightly.
Merge Group.
Add your credits.
Add your name.
Give it the same Inner Bevel.
Free rotate left 20 degrees
Resize all layers 80%
I hope you enjoyed this tutorial.
I’d love to see your results and show it off in my gallery.
Email me!
Hugs,
Bev

No comments:
Post a Comment