Supplies
1 tube of choice - I used the amazing artwork of Camilla Drakenborg and can be purchased from Up Your Art. You must have a license to use.
Font of choice - I used Dark II here
Weescotlass Mask 208 here
Divine Intentionz template 373 here
Plugs Ins:
Greg’s Factory Output Vol. II - Pool Shadow
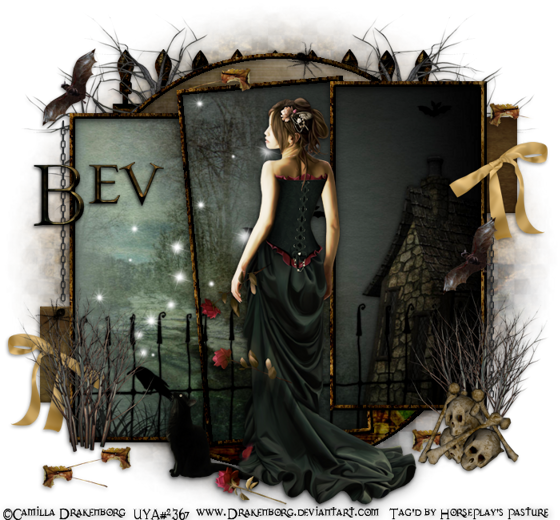
“The Perfect Scare” is a tagger size scrap kit created by myself, HorsePlay’s Pasture Designs and can be downloaded here.
Leaving a thank you after you download will most definitely be appreciated.
This tutorial was written assuming you have a working knowledge of PSP.
~♥~ Let’s get started ~♥~
Open up the template.
Shift + D.
Close out the original.
Delete the top 7 layers, Stars, Dotted Lines, and Dots layers.
Image/Canvas Size:
700 x 650
Highlight and open up the background layer.
Flood fill white.
Highlight Circle layer.
Click on it with your Magic Wand.
New Raster layer.
Copy and paste Paper 2 Into Selection.
New Raster layer.
Copy and paste Paper 8 Into Selection.
Selection/Modify/Contract by 7.
Tap the delete key.
Deselect.
Delete the template layer.
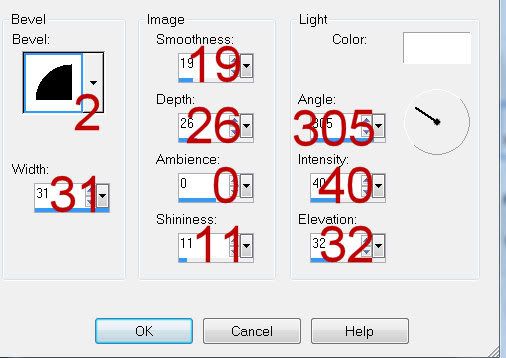
Give the “frame” a slight Inner Bevel:

Highlight Thin Rectangle layer.
Click on it with your Magic Wand.
New Raster layer.
Copy and paste Paper 10 Into Selection.
Deselect.
Delete the template layer.
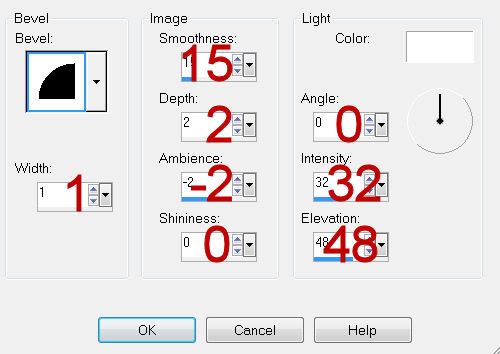
Give it a slight Inner Bevel:

Highlight the other Thin Rectangle layer.
Repeat the above step.
I’m hoping I won’t lose you on the next part of this tutorial. Take your time and follow step by step and you’ll do just fine!
Highlight Rectangle 3 layer.
Copy and paste Paper 4 as a new layer - It’s important that you don’t move this paper at all.
Resize 75% and 90%
Highlight Rectangle 1 layer.
Click on it with your Magic Wand.
Highlight the resized paper layer.
Right Click
Click on Promote Section to Layer.
Deselect.
Delete the template layer.
Highlight Rectangle 2 layer.
Click on it with your Magic Wand.
Highlight the resized paper layer.
Right Click
Click on Promote Section to Layer.
Deselect.
Delete the template layer.
Highlight Rectangle 3 layer.
Click on it with your Magic Wand.
Highlight the resized paper layer.
Right Click
Click on Promote Section to Layer.
Deselect.
Delete the template layer.
You can now delete the resized paper layer as you won’t be using it any more.
Highlight the Left Rectangle paper.
Click anywhere outside of it with your Magic Wand.
Selections/Invert
New Raster layer above the paper.
Copy and paste Paper 8 Into Selection.
Selections/Modify/Contract by 7
Tap the delete key.
Deselect.
Give it the same Inner Bevel you gave to the round frame you made.
Repeat the above step with the Middle and Right rectangle paper layers.
To each rectangle paper apply Greg’s Factory Output Vol. II - Pool Shadow:
Use Default settings accept move the intensity bar down to 60 or so.
Copy and paste your tube as a new layer.
Add your embellishments. I used:
12: Resize 70%/Duplicate/Mirror
34
2: Resize 35%/Duplicate/Mirror
17: Resize 40%/Position at the side of the rectangle/Use Pick Tool to pull the length down to be even with the Rectangle/Duplicate/Mirror
7: Resize 45%
13: Resize 50%/Duplicate/Mirror
29: Resize 50%
19: Resize 29%/Free Rotate Left 45%/Duplicate and/or mirror as you like
38: Resize 25%/Duplicate and/or mirror as you like
40: Resize 65%
Highlight your white canvas.
New Raster layer.
Select All.
Copy and paste Paper 11 Into Selection.
Deselect.
Apply the mask.
Resize 110%
Merge Group.
Add your copyrights.
Add your name.
Foreground: #000000
Background: Pattern/Paper 11
Make your Text Tool active.
Stroke set at .30
Type your name.
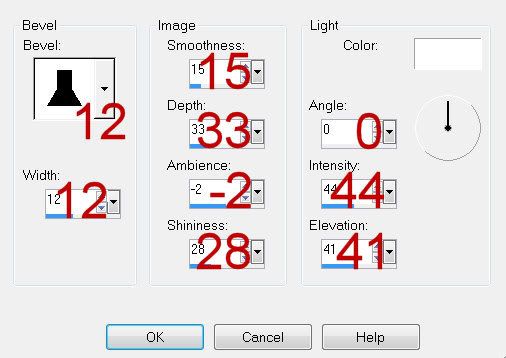
Give it a slight Inner Bevel:

Resize all layers 80%.
I hope you enjoyed this tutorial.
I’d love to see your results and shoMuw it off in my gallery.
Email me!
Hugs,
Bev

No comments:
Post a Comment