Supplies
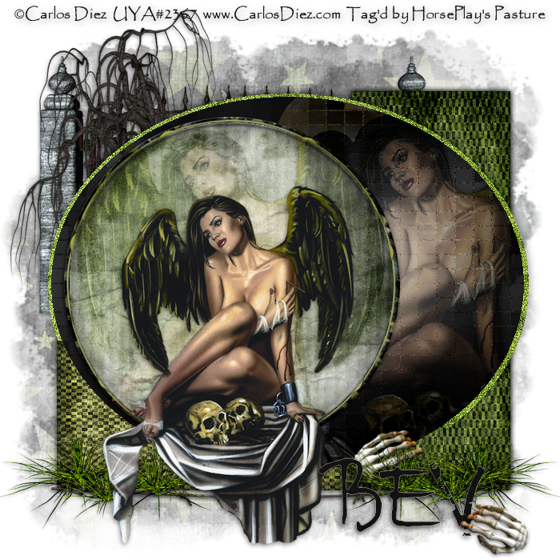
1 tube of choice - I used the gorgeous artwork of Carlos Diez and can be purchased from Up Your Art. You must have a license to use.
Font of choice - I used Rat Infested Mailbox here
Becky Mask 22 here
Divine Intentionz Template 291 here
Plug Ins:
Greg’s Factory Output Vol. II - Pool Shadow
“Ghosts of Halloween Past” is a tagger size scrap kit created by Vicki of Gemini Creationz and can be purchased from TKO Scraps. You can visit her blog here.
Thank you for a super Halloween kit! Wow, I just loved this one!!
This tutorial was written assuming you have a working knowledge of PSP.
~♥~ Let’s get started ~♥~
Open up the template.
Shift + D.
Close out the original.
Delete the top 6 layers.
Image/Canvas Size
700 x 700
OK
Highlight and open Background layer.
Flood fill white.
Highlight Rectangle 1 layer.
Select All/Float/Defloat
Copy and paste Paper 10 Into Selection.
Deselect.
Highlight Rectangle 2 layer.
Repeat the above step accept use Paper 9.
Highlight Dotted Line layer.
Select All/Float/Defloat
New Raster layer.
Flood Fill with #131313
Deselect.
Delete the template layer.
Highlight Glittered Shape layer.
Click anywhere outside of it with your Magic Wand.
New Raster layer.
Copy and paste Paper 16 Into Selection.
Adjust/Add Remove Noise/Add Noise:
Monochrome and Gaussian checked
Noise: 63%
OK
Delete the template layer.
Highlight Oval layer.
Click on it with your Magic Wand.
New Raster layer.
Flood fill with #131313
Duplicate
Apply Greg’s Factory Output Vol. II - Pool Shadow:
Use Default settings accept move the Intensity bar to 191
OK
Effects/Texture Effects/Mosaic - Antique
Use Default Settings.
OK
Copy and paste your tube as a new layer over the Mosaic layer.
Move into position - see my tag for reference.
Change the Properties to Soft Light.
Selections/Invert
Tap the delete key.
Copy and paste Full Moon as a new layer.
Resize 25%
Move into position behind the tube - see my tag for reference - you’ll see the moon right through the tube layer. It’s ok. We’ll take care of that in a bit.
Change the Properties to Soft Light.
Tap the delete key.
Deselect.
Highlight the tube layer.
Click anywhere outside of it with your Magic Wand.
Selections/Invert
Highlight the moon layer.
Tap the delete key.
Deselect.
Delete the template layer.
Highlight Circle layer.
Click on it with your Magic Wand.
New Raster layer.
Copy and paste Paper 13 Into Selection.
Deselect for now.
Copy and paste your tube as a new layer.
Position it in front of the circle.
Paste your tube again.
This layer you want a little larger and move just over the circle paper layer in your layers pallet.
Change the Properties to Soft Light.
Highlight the circle template layer.
Click anywhere outside of it with your Magic Wand.
Highlight the tube layer.
Tap the delete key.
Deselect.
Delete the template layer.
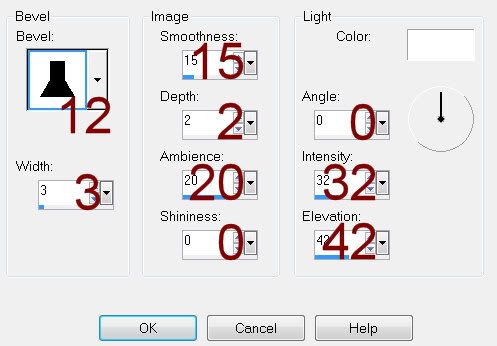
Give the circle paper layer a slight Inner Bevel:

Add your embellishments. I used:
Creepy Tree: Resize 70%/Erase the grassy area of it.
Gate: Resize 70%
Frame 2: Resize 75% and 95%
Barbed Wire: Resize 50%
Grass: Resize 40%/Duplicate/Mirror
Skeleton Hand: Resize 25% and 60%/Free rotate Left 25 degrees
Highlight your white canvas.
New Raster layer.
Select All.
Copy and paste Paper 6 Into Selection.
Deselect.
Apply the mask.
Use your Pick Tool to pull the sides out just a little.
Merge Group.
Add your copyrights.
Add your name.
Resize all layers 80%.
I hope you enjoyed this tutorial.
I’d love to see your results and show it off in my gallery.
Email me!
Hugs,
Bev

No comments:
Post a Comment