
Supplies
1 tube of choice - I used the amazing artwork of Vicki Yeager and can be purchased from Up Your Art. You must have a license to use.
Font of choice - I used SNF Infinity, a pay font. Aquarelle will work just as nice here
Weescotlass Mask 236 here
Divine Intentionz template 386 here
Plugs Ins:
Greg’s Factory Output Vol. II - Pool Shadow
Eyecandy 5: Nature - Fire
Animation Shop
“Tricks and Treats” is a full size scrap kit also available in tagger size created by Kesha of KnC Scrapz and can be purchased from her store Lollipops n Gumdrops. You can visit her blog here.
Thank you Kesha for a super terrific kit!!
This tutorial was written assuming you have a working knowledge of PSP.
~♥~ Let’s get started ~♥~
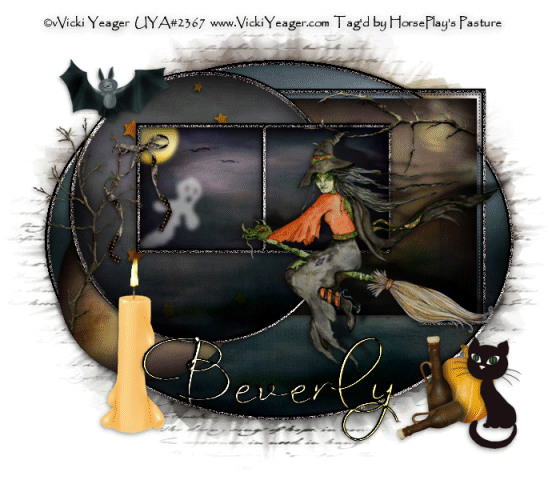
Open up the template.
Shift + D.
Close out the original.
Delete the top 4 layers.
Image/Canvas Size:
700 x 600
Highlight and open up the background layer.
Flood fill white.
Highlight the Oval layer.
Click on it with your Magic Wand.
New Raster layer.
Copy and paste Paper 2 Into Selection.
New Raster layer.
Copy and paste Paper 7 Into Selection.
Selection/Modify/Contract by 7.
Tap the delete key.
Deselect.
Delete the template layer.
Adjust/Add Remove Noise/Add Noise:
Monochrome and Gaussian checked
Noise: 73%
OK
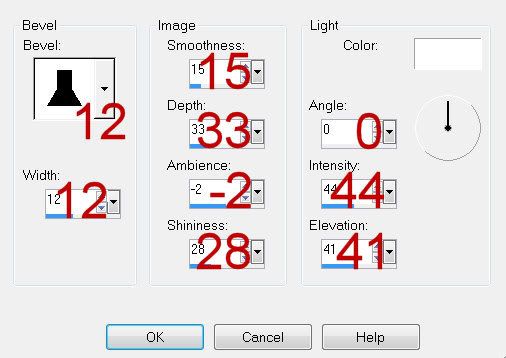
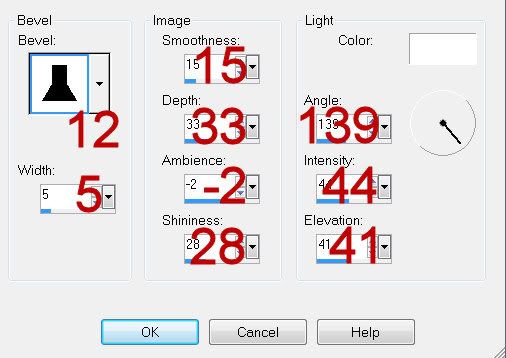
Give the “frame” a slight Inner Bevel:
Highlight Rectangle layer.
Click on it with your Magic Wand.
New Raster layer.
Open Paper 8
Mirror
Copy
Make your working canvas active and paste Paper 10 Into Selection.
Deselect.
Delete the template layer.
Make Paper 8 active.
Flip
Copy
Highlight Circle 2 layer.
Click on it with your Magic Wand.
New Raster layer.
Paste Into Selection.
Deselect.
Delete the template layer.
Highlight Frame layer.
Click on it with your Magic Wand.
New Raster layer.
Copy and paste Paper 7 Into Selection.
Deselect.
Delete the template layer.
Give it the same Noise as you did to the oval “frame”.
Give it the same slight Inner Bevel.
Repeat the above step with Frame layer.
Highlight Circle Back layer.
Click anywhere outside of it with your Magic Wand.
Selections/Invert
New Raster layer.
Paste Paper 7 Into Selection.
Deselect.
Delete the template layer.
Give it the same noise effect.
Give it the same slight Inner Bevel.
Highlight Dotted Rectangle layer.
Select All/FloatDefloat
New Raster layer.
Paste Paper 7 Into Selection.
Deselect.
Delete the template layer.
Highlight Circle 1 layer.
Click on it with your Magic Wand.
New Raster layer.
Copy and paste Paper 6 Into Selection.
New Raster layer.
Copy and paste Paper 7 Into Selection.
Selections/Modify/Contract by 7.
Tap the delete key.
Deselect.
Give it the same Noise effect.
Give it the same slight Inner Bevel.
Delete the template layer.
Highlight Frame Back layer.
Click on both squares with your Magic Wand.
New Raster layer.
Copy and paste Paper 3 Into Selection.
Copy and paste Ghost 3 as a new layer above the paper layer.
Resize 25% and 35%
Move into position.
Selections/Invert
Tap the delete key.
Copy and paste Moon as a new layer.
Resize 25% and 40%
Move into position.
Tap the delete key.
Deselect.
Delete the template layer.
Copy and paste your tube as a new layer.
Give it an exaggerated drop shadow.
Add your embellishments. I used:
Stars: Resize 25%/Duplicate/Move both into the position you want. Change the Properties to Overlay.
Branch 1: Resize 25%
Branch: Resize 25%
Bow 2: Resize 25% and 70%
Bat: Resize 25% and 50%
Element 3: Resize 25% and 60%
Cat: Resize 25% and 50%
Candle 1: Resize 25% and 85%
Highlight your white canvas.
New Raster layer.
Select All.
Copy and paste Paper 8 Into Selection.
Deselect.
Apply the mask.
Resize 110%
Use your Pick Tool and pull the sides out slightly.
Merge Group.
Add your copyrights.
Add your name.
Open the Moon element and section out the center of it with your Selection Tool.
Foreground: #000000
Background: Pattern/Look for the moon element section.
Make your Text Tool active.
Stroke set at 1.0
Type your name.
Give it a slight Inner Bevel:
Highlight the candle layer.
Duplicate 2 times for a total of 3 candle layers.
Rename them Candle 1, 2, and 3.
Highlight Candle 1 layer.
Make your Freehand Selection Tool active set on Freehand and draw out the shape of a flame at the top where the wick is.
Apply Eyecandy 5: Nature - Fire
Settings Tab: Small, Candle
On the Colors Tab: Move the Column Length slider until you have the flame height where you like.
OK
Close out Candle 1 layer.
Highlight Candle 2 layer.
Apply the same Fire effect accept hit the Random Seed button until you have a flame you like.
OK
Close out Candle 2 layer.
Highlight Candle 3 layer.
Repeat the above step.
Deselect.
Close out Candle 3 layer.
Reopen Candle 1 layer.
Copy Merge.
Time to Animate:
Open Animation Shop.
Edit/Paste as New Animation.
Back in PSP.
Close out Candle 1 layer.
Open up Candle 2 layer.
Copy Merge
Back in AS.
Edit/Paste/After Current Frame.
Back in PSP.
Close out Candle 2 layer.
Open up Candle 3 layer.
Copy Merge
Back in AS.
Edit/Paste/After Current Frame.
Ctrl + A (to highlight all frames).
Animation/Frame Properties:
Change the number to 22.
OK
Animation/Resize Animation:
Percentage of Original checked
Width & Height: 80
OK
Save your animation.
I hope you enjoyed this tutorial.
I’d love to see your results and show it off in my gallery.
Email me!
Hugs,
Bev
No comments:
Post a Comment