Supplies
1 tube of choice - I used the artwork of PinUpToons and can now be purchased from CDO. You must have a license to use.
Font of choice - I used AlSandra here
Becky Mask 23 here
Plug Ins:
Eyecandy 3.1 - glow
Xero-Porcelain
“Ms. I Bug & Friends Tagger Kit” is a tagger size scrap kit created by Sandra of S.G. Rowe Designs and can be purchased from Inspirations of Scrap Friends. You can visit her blog here.
Thank you Sandra for such a wonderful kit!
This tutorial was written assuming you have a working knowledge of PSP.
~♥~ Let’s get started ~♥~
Open up a 700 x 700 blank canvas.
Flood fill white.
Copy and paste Frame 3 as a new layer.
Resize 50%
Free rotate Right 5 degrees.
Click inside of it with your Magic Wand.
Selections/Modify/Expand by 4.
New Raster layer below the frame.
Copy and paste Paper 3 Into Selection.
Copy and paste your tube as a new layer below the frame.
Selections/Invert
Tap the delete key.
Deselect.
Apply Xero-Porcelain to the tube layer:
Use Default settings accept move the blue channel button to 0.
Close out your white canvas.
Merge visible.
Reopen your canvas.
Make your Selection Tool active set on Circle.
Create a circle approximately 400 pixels.
New Raster layer.
Copy and paste Paper 13 Into Selection.
Deselect.
Move the circle and merged layer into their exact positions.
Highlight the circle layer.
Click anywhere outside of it with your Magic Wand.
Copy and paste Tree Swing as a new layer.
Resize 60%
Position it over the circle - see my tag for reference.
Make your Eraser Tool active and erase the part of the branch that overhangs the circle that you don’t want.
Deselect.
Highlight the circle layer.
Apply Eyecandy 3.1 - Glow:
Width: 5
Opacity: 100
Opacity Dropoff: Fat
Color: #845a23
OK
Copy and paste Satchet 1 as a new layer behind the circle.
Resize 95%
Center it behind the circle, but only worry about how the left side of it looks.
As you can see, the right side is sticking just a tag further out.
Make your Pick Tool and active and just push that side in until it looks completely centered behind the circle.
In your color pallet change the foreground to #575223
Make your Target Tool active and change the color of the Satchet.
Copy and paste your tube as a new layer.
Add your embellishments. I used:
Ladybug 2: Resize 10%/Free rotate Right 5 degrees/Duplicate/Mirror
Flowers 1: Resize 40%
Vine 2: Resize 85%
Dragonfly 1: Resize 25%/Free rotate Right 25 degrees/Duplicate/Mirror
Crop your image.
Highlight your white canvas.
New Raster layer.
Select All.
Copy and paste Paper 1 Into Selection.
Deselect.
Apply the mask.
Merge Group.
Add your copyrights.
Add your name.
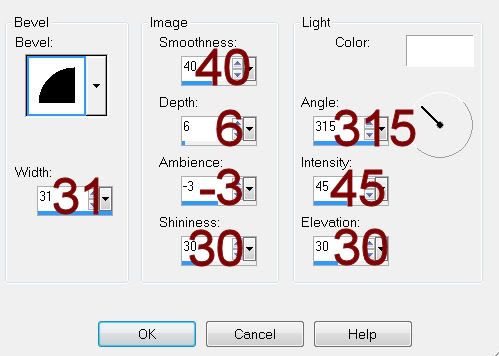
Give it a slight Inner Bevel:

Resize all layers 80%.
I hope you enjoyed this tutorial.
I’d love to see your results and show it off in my gallery.
Email me!
Hugs,
Bev

No comments:
Post a Comment