

Supplies
1 tube of choice - I used the artwork of Carlos Diez which can be purchased from Up Your Art. You must have a license to use.
Font of choice - I used Clive Barker here
Becky mask 22 here
“Ocean Dreams” is a tagger size scrap kit created by Dani of Darkmoon’s Dream and can be purchased from Lollipops n Gumdrops. You can visit her blog here.
Thank you Dani for such a gorgeous summer themed kit!
This tutorial was written assuming you have a working knowledge of PSP.
~♥~ Let’s get started ~♥~
Open up a 700 x 700 blank canvas.
Flood fill white.
Copy and paste Frame 1 as a new layer.
Resize 70%
Move it up slightly on the canvas.
Use your Magic Wand and click inside of each square.
Selections/Modify/Expand by 4.
New Raster layer below the frame.
Copy and paste Paper 2 Into Selection.
Deselect.
We’re going to add the embellishments that go below the frame.
See my tag for placement.
Don’t worry about any that overhangs the frame. We’ll clean that up in a bit.
Clouds: Resize 60%/Duplicate
Pier: Resize 60%
Driftwood: Resize 60%
Seagull 1: Resize 25%/Duplicate/Resize 60%
Add your embellishments. I used:
Branch 2: Resize 30%/Duplicate/Mirror/Flip
Flower 4: Resize 25% and 50%/Duplicate/Resize 70%/Duplicate both flowers
Highlight your white canvas.
New Raster layer.
Select All.
Copy and paste Paper 1 Into Selection.
Deselect.
Duplicate/Change the Properties to Multiply.
Merge Visible both papers.
Apply the mask.
Merge Group.
Duplicate
Copy and paste Driftwood as a new layer.
Move it snuggly into the bottom right corner.
Highlight the mask layer.
Select All/Float/Defloat
Selections/Invert
Highlight the Driftwood layer.
Tap the delete key.
Deselect.
Duplicate the driftwood layer twice.
Copy and paste Seagull 2 as a new layer.
Resize 25%
Duplicate
Resize 60%/Mirror
Add your copyrights.
Add your name.
Open up Flower 4.
Use your Selection Tool set on Rectangle and section out an area of a petal.
In your color pallet:
Foreground: #310000
Background: Pattern/Find the section of the Flower
Stroke: 1.5
Type your name.
Convert to a Raster layer.
Select All/Float/Defloat
Selection/Modify/Contract by 1.
Give it a slight Inner Bevel:
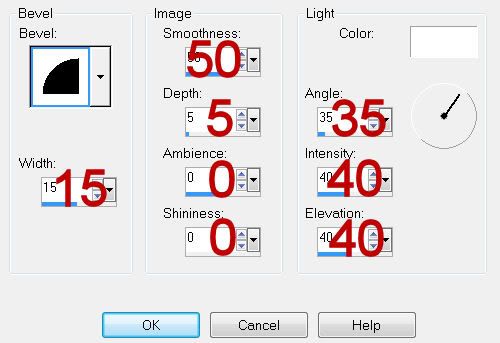
Deselect.
Resize all layers 80%.
I hope you enjoyed this tutorial.
I’d love to see your results and show it off in my gallery.
Email me!
Hugs,
Bev
Love it, hun, thank you SO much!! :D
ReplyDeleteYou're welcome Dani!
ReplyDelete