 Supplies
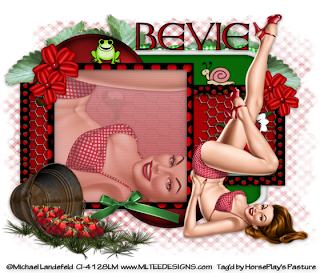
1 tube and 1 Close-up of choice - I used the artwork of Michael Landefelt than can now be purchased at CDO. You must have a license to use.
Font of Choice - I used Anglo Saxon here
Becky Mask 22 here
Greg’s Factory Output Vol. II - Pool Shadow
“Strawberry Kisses” is a FTU scrap kit created by Tezza’s Tagger Scraps and can be downloaded from her blog here. Please leave a thank you when downloading as it’s a small gesture for grand generosity. Thank you so much Tezza for such a fun kit. It’s perfect for this time of year!
This tutorial was written assuming you have a working knowledge of PSP.
~♥~ Let’s get started ~♥~
Open up a 700 x 700 blank canvas.
Flood fill white.
Copy and paste Background 9 as a new layer.
Resize 40%
Click anywhere outside of the paper with your Magic Wand.
Selections/Invert
Selections/Modify/
Contract by 15.
Tap the delete key.
Deselect.
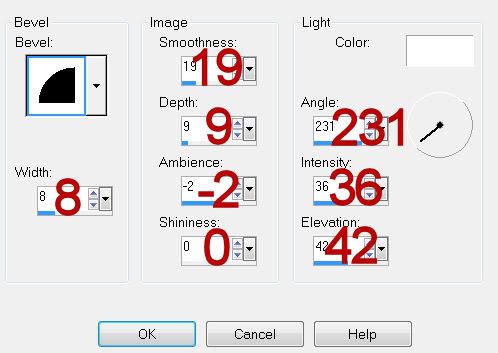
Give it a slight Inner Bevel:

Don’t worry about the position of it right now.
Click inside of it with your Magic Wand.
Selections/Modify/Expand by 6.
New Raster layer below the frame.
Flood fill with a gradient of your choice.
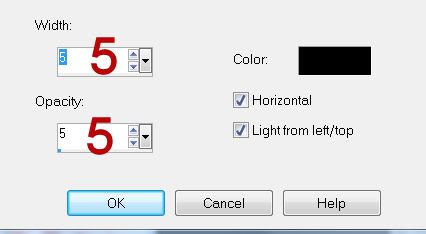
Effect/Texture Effects/Blinds -
Match your settings to mine:

Adjust/Sharpnes/Sharpen
Copy and paste Vinewire element as a new layer just below the frame.
Selections/Invert
Tap the delete key.
Copy and paste your Close Up tube as a new layer below the frame.
Low the Opacity to about 53
Tap the delete key.
Deselect.
Be sure the Close up tube is highlight and click anywhere outside of it with your Magic Wand.
Selections/Invert.
Highlight the Vine Wire layer and tap the delete key.
Deselect.
Close out your white canvas.
Merge Visible.
Reopen your canvas.
Position the merged layer more on the left side of your canvas.
Copy and paste Frame 4 as a new layer.
Resize 80%
Give it the same Inner Bevel.
Duplicate
Move both into position behind the merge layer - see my tag for reference.
Highlight the right frame.
Click inside of it with your Magic Wand.
Selections/Modify/Expand by 6.
New Raster layer below the frame.
Flood fill with #ac0608
Apply the same blinds effect.
Adjust/Sharpness/Sharpen
Copy and paste Vine Wire just below the frame.
Resize 70%
Selections/Invert
Tap the delete key.
Deselect.
Highlight the Left frame.
Repeat the above step.
Copy and paste Button 4 as a new layer.
Resize 70%
Select All/Float/Defloat
Apply Greg’s Factory Output Vol. II - Pool Shadow:
Default Settings.
Duplicate
Move both buttons into position - see my tag for reference.
Copy and paste your tube as a new layer.
Add your embellishments. I used:
Beaded Ribbon 1: Resize 60%
Bow 1: Resize 50%
Spilled Bucket: Resize 60%
Grass 1: Resize 60%
Red Flower: Resize 35%/Duplicate/Resize 80%/Duplciate/Duplicate/Resize 90%
Foliage: Resize 60%/Duplicate
Frog 1: Resize 50%
Snail: Resize 50%
Crop your Image.
Highlight your white background.
New Raster layer.
Select All.
Copy and paste Background 2 Into Selection.
Deselect.
Apply the mask.
Use your Pick Tool to pull the side out a bit and move the bottom up a little if you have to.
Merge Group.
Add your copyrights.
Add your name.
Give it a slight Inner Bevel.
Resize all layers 85%.
I hope you enjoyed this tutorial.
I’d love to see your results and show it off in my gallery.
Email me!
Hugs,
Bev

No comments:
Post a Comment