Supplies
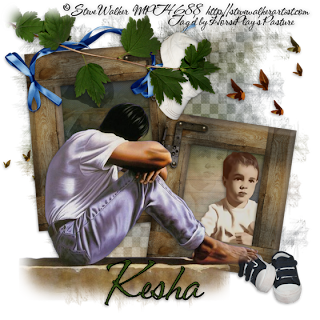
2 tubes of choice - I used the awesome artwork of Steve Walker at MPT
Font of Choice - I used CAC Shishoni Brush here
Weescotlass Mask 297 here
“He‘s all Boy” is a PTU scrap kit in tagger size created by Kesha of KcNScrapz and can be downloaded from her store Lollipops n Gumdrops. You can visit her blog here.
Thank you so much Kesha for a kit that displays all male, big or small!
This tutorial was written assuming you have a working knowledge of PSP.
~♥~ Let’s get started ~♥~
Open up a 700 x 700 blank canvas.
Flood fill white.
Copy and paste Frame 1 as a new layer.
Resize 70%
Click inside of each frame with your Magic Wand.
Selections/Modify/Expand by 6.
New Raster layer below the frame.
Copy and paste Paper 7 Into Selection.
Deselect.
Highlight the frame layer.
Click inside the bottom frame with your Magic Wand.
Selections/Modify/Expand by 6.
Copy and paste one of your tubes below the bottom frame.
Move into position - see my tag for reference.
Selections/Invert
Tap the delete key.
Paste your tube again below the same frame - resize so it’s just a bit larger than the other.
Move into position behind the other tube and offset a bit.
Tap the delete key.
Change the Properties to Soft Light.
Lower the Opacity to about 44.
Deselect.
Copy and paste your other tube as a new layer.
Position in front of the frames.
Paste your tube again.
This time move it below the top frame - see my tag for reference.
Highlight the frame layer.
Click inside the top frame with your Magic Wand.
Selections/Modify/Expand by 6.
Selections/Invert
Highlight the tube frame.
Tap the delete key.
Deselect.
Change the Properties to Soft Light.
Lower the Opacity to about 44.
Add your embellishments. I used:
Leaves: Resize 70%/Mirror
Ribbon: Resize 50%/Flip
Branch: Resize 45%
Hat; Resize 30%/Free rotate Right 80 degrees
Shoes 1: Resize 30%
Highlight your white background.
New Raster layer.
Select All.
Copy and paste Paper 7 Into Selection.
Deselect.
Apply the mask.
Merge Group.
Add your copyrights.
Add your name.
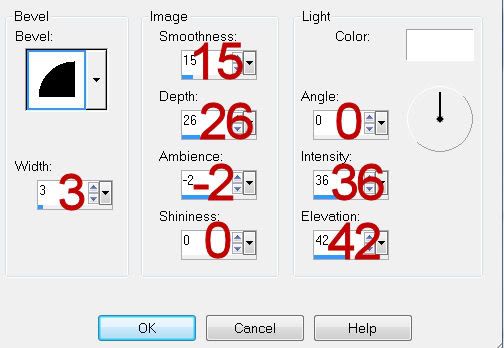
Give it a slight Inner Bevel:

Resize all layers 85%.
I hope you enjoyed this tutorial.
I’d love to see your results and show it off in my gallery.
Email me!
Hugs,
Bev

No comments:
Post a Comment