

Clicking on the image will allow you to enlarge for bigger view.
Supplies
Font of Choice - I used Reklame Script Demo here - choose the top one (free), place in cart and go through the purchase routine.
My Mask 5 here
Country Bug’s template 14 here
DSB Flux - Bright Noise
Eyecandy 5: Impact
Mura’s Meister - Copies
“Winter Wishes” is FTU scrap kit created by Cindy of Puddicat Creations and can be downloaded from her blog here.
Please leave a thank when downloading as it‘s a small gesture for hard work given freely.
This tutorial was written assuming you have a working knowledge of PSP.
~♥~ Let’s get started ~♥~
Open up the template.
Shift + D.
Close out the original.
Image/Canvas size
700 x 700
OK
Flood fill Raster 1 white.
Delete Dotted Lines layer and Raster 2 (credit) layer.
Highlight Rec Frame layer.
Click on it with your Magic Wand.
New Raster layer.
Copy and paste Paper 3 Into Selection.
Deselect.
Delete the template layer.
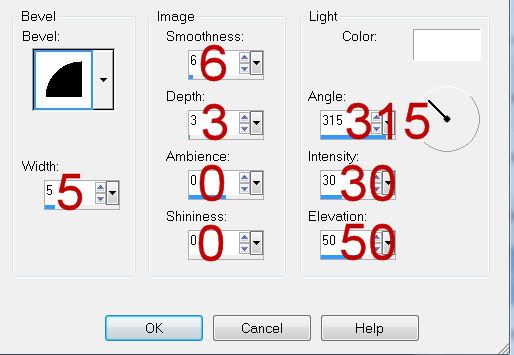
Give it a sight Inner Bevel:
Apply DSB Flux - Bright Noise:
Intensity: 42
Mix checked
OK
Repeat the above steps with the following layers:
Square Frame, Square Frame 2, Square Frame 3, and Square Frame 4
Highlight Square back layer.
Click on it with your Magic Wand.
New Raster layer.
Copy and paste Paper 1 Into Selection.
Deselect.
Delete the template layer.
Repeat the above step with Square Back 2, 3, and 4 layers.
Merge Visible both square back layers on the left side.
Merge Visible both square back layers on the right side.
Copy and paste Snowmen 1 as a new layer.
Center it in front of the large rectangle.
Duplicate/In your layers pallet move just above the merged square back layers on the right side. Move them into position - see my tag for reference.
Highlight the merged square back paper layers.
Click anywhere outside of them with your Magic Wand.
Highlight the element layer above it.
Tap the delete key.
Deselect.
Change the Properties to Overlay.
Duplicate/Mirror/In your layers pallet move just above the merged square back layers on the right side. It should already be in position beneath the frame, but if not, go ahead and move it.
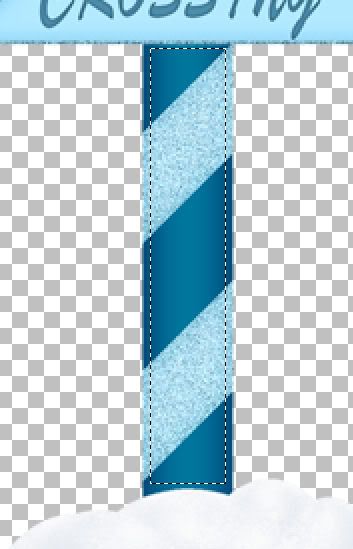
Open up Santa’s Sign 1.
Use your Selection Tool set on rectangle and section out the barber pole area:
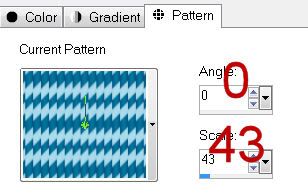
In your materials pallet set it to Pattern and look for the barber pole. Match your settings to mine:
On your working canvas Highlight Black Line layer.
Click on it with your Magic Wand.
New Raster layer.
Flood fill with your pattern.
Deselect.
Delete the template layer.
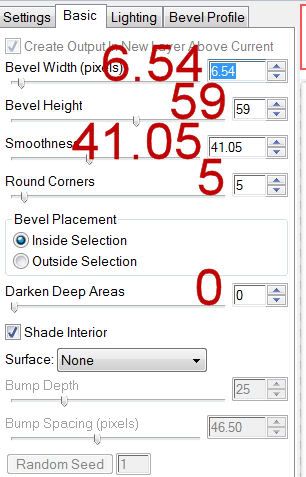
Apply Eyecandy 5: Impact-Bevel:
Basic Tab:
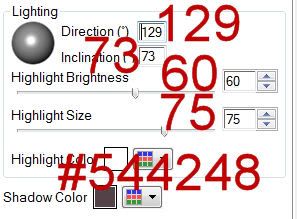
Lighting Tab:
Bevel Profile tab:
Set to Button
Highlight Black Line 2 and repeat the above step.
Add your embellishments. I used:
Bird 1: Resize 50%
Bow 1: Resize 25% and 80%/Duplicate/Mirror
Open up Snow Doodle 1.
Use your Selection Tool set on Rectangle and section out a snowflake of your choice.
Copy
Make your working canvas active and paste.
Move the flake anywhere on your canvas.
Apply Mura’s Meister: Copies
Set to Wallpaper (perspective)
Default settings.
OK
If you don’t like the way the flakes look then simply undo, move the flake and apply the effect again. You can also use your eraser tool to erase any unwanted flakes.
Highlight Raster 1 (white canvas layer)
Select All.
New Raster layer.
Copy and paste Paper 5 Into Selection.
Deselect.
Apply the mask.
Resize 130%
Merge Group.
Add your credits.
Add your name.
Give it the same slight inner bevel.
Free rotate Left 10 degrees.
Resize all layers 80%.
I hope you enjoyed this tutorial.
I’d love to see your results and show it off in my gallery.
Email me!
Hugs,
Bev
Supplies
Font of Choice - I used Reklame Script Demo here - choose the top one (free), place in cart and go through the purchase routine.
My Mask 5 here
Country Bug’s template 14 here
DSB Flux - Bright Noise
Eyecandy 5: Impact
Mura’s Meister - Copies
“Winter Wishes” is FTU scrap kit created by Cindy of Puddicat Creations and can be downloaded from her blog here.
Please leave a thank when downloading as it‘s a small gesture for hard work given freely.
This tutorial was written assuming you have a working knowledge of PSP.
~♥~ Let’s get started ~♥~
Open up the template.
Shift + D.
Close out the original.
Image/Canvas size
700 x 700
OK
Flood fill Raster 1 white.
Delete Dotted Lines layer and Raster 2 (credit) layer.
Highlight Rec Frame layer.
Click on it with your Magic Wand.
New Raster layer.
Copy and paste Paper 3 Into Selection.
Deselect.
Delete the template layer.
Give it a sight Inner Bevel:
Apply DSB Flux - Bright Noise:
Intensity: 42
Mix checked
OK
Repeat the above steps with the following layers:
Square Frame, Square Frame 2, Square Frame 3, and Square Frame 4
Highlight Square back layer.
Click on it with your Magic Wand.
New Raster layer.
Copy and paste Paper 1 Into Selection.
Deselect.
Delete the template layer.
Repeat the above step with Square Back 2, 3, and 4 layers.
Merge Visible both square back layers on the left side.
Merge Visible both square back layers on the right side.
Copy and paste Snowmen 1 as a new layer.
Center it in front of the large rectangle.
Duplicate/In your layers pallet move just above the merged square back layers on the right side. Move them into position - see my tag for reference.
Highlight the merged square back paper layers.
Click anywhere outside of them with your Magic Wand.
Highlight the element layer above it.
Tap the delete key.
Deselect.
Change the Properties to Overlay.
Duplicate/Mirror/In your layers pallet move just above the merged square back layers on the right side. It should already be in position beneath the frame, but if not, go ahead and move it.
Open up Santa’s Sign 1.
Use your Selection Tool set on rectangle and section out the barber pole area:
In your materials pallet set it to Pattern and look for the barber pole. Match your settings to mine:
On your working canvas Highlight Black Line layer.
Click on it with your Magic Wand.
New Raster layer.
Flood fill with your pattern.
Deselect.
Delete the template layer.
Apply Eyecandy 5: Impact-Bevel:
Basic Tab:
Lighting Tab:
Bevel Profile tab:
Set to Button
Highlight Black Line 2 and repeat the above step.
Add your embellishments. I used:
Bird 1: Resize 50%
Bow 1: Resize 25% and 80%/Duplicate/Mirror
Open up Snow Doodle 1.
Use your Selection Tool set on Rectangle and section out a snowflake of your choice.
Copy
Make your working canvas active and paste.
Move the flake anywhere on your canvas.
Apply Mura’s Meister: Copies
Set to Wallpaper (perspective)
Default settings.
OK
If you don’t like the way the flakes look then simply undo, move the flake and apply the effect again. You can also use your eraser tool to erase any unwanted flakes.
Highlight Raster 1 (white canvas layer)
Select All.
New Raster layer.
Copy and paste Paper 5 Into Selection.
Deselect.
Apply the mask.
Resize 130%
Merge Group.
Add your credits.
Add your name.
Give it the same slight inner bevel.
Free rotate Left 10 degrees.
Resize all layers 80%.
I hope you enjoyed this tutorial.
I’d love to see your results and show it off in my gallery.
Email me!
Hugs,
Bev
Thanks for this cute tut...it is so hard to find tuts without sexy exposed woment these days...
ReplyDelete