

Clicking on the image will allow you to enlarge for bigger view.
Supplies
1 tube of choice - I used the artwork of Jennifer Janesko and can be purchased at CDO
Font of Choice - I used Reklame Script Demo here - choose the top one (free), place in cart and go through the purchase routine.
My Mask 1 here
“Love Is” is a FTU tagger size scrap kit created by me and can be downloaded from my blog here.
This tutorial was written assuming you have a working knowledge of PSP.
~♥~ Let’s get started ~♥~
Open up a 700 x 700 blank canvas.
Flood fill white.
Copy and paste Frame 2 as a new layer.
Resize 85%
Click inside of it with your Magic Wand.
Selections/Modify/Expand by 3
New Raster layer below the frame.
Copy and paste Paper 6 Into Selection.
Copy and paste your tube as a new layer just below the frame.
Position it to the left - see my tag for reference.
Selections/Invert
Tap the delete key.
Paste your tube again and move this layer below the other in your layers pallet.
Keep the size a bit larger than the other.
Move into position toward the left.
Tap the delete key.
Change the Properties to Soft Light.
Deselect.
Add your embellishments. I used:
Butterfly 1: Resize 25%
Butterfly 2 : Resize 25%/Mirror
Ribbon 4
Heart Swirl 1: Resize 60%
Forget Me Not 2: Resize 30%/Duplicate/Resize 70%
Forget me Not 2 again: Resize 25% and 70%
Forget Me Not 1: Resize 30%/Duplicate/Resize 70%
Forget me Not 1 again: Resize 25% and 70%
Scattered Hearts 2
Flower Stem 1: Resize 70%/Mirror
Sparkle
Copy and paste Word Art 1 (or a word art of your choice) as a new layer.
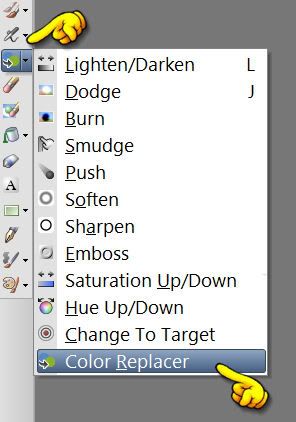
Make your Color Replacer tool active:
In your layer’s pallet set your background color to the color you want the word art to be.
Click on the foreground color - the materials property box will open up.
Move the courser onto your working canvas and Right click on the black word art.
Click OK on the Materials Pallet. It will close.
Move your cursor over the word art - be sure its ON the black word art and Double Left Click your mouse.
There you go! Your word art is now colored.
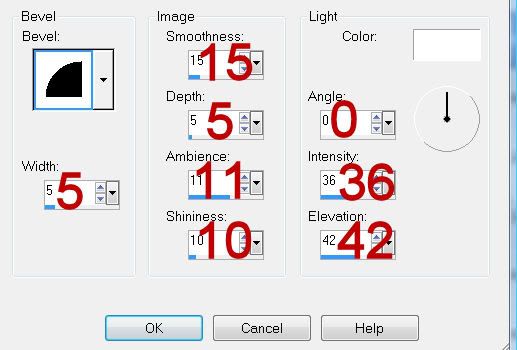
Give it a slight inner bevel:
Highlight your white background.
New Raster layer.
Copy and paste Paper 5 Into Selection.
Deselect.
Apply the mask.
Merge Group.
Add your credits.
Add your name.
Give it the same slight Inner Bevel.
Resize all layers 80%
I hope you enjoyed this tutorial.
I’d love to see your results and show it off in my gallery.
Email me!
Hugs,
Bev
Supplies
1 tube of choice - I used the artwork of Jennifer Janesko and can be purchased at CDO
Font of Choice - I used Reklame Script Demo here - choose the top one (free), place in cart and go through the purchase routine.
My Mask 1 here
“Love Is” is a FTU tagger size scrap kit created by me and can be downloaded from my blog here.
This tutorial was written assuming you have a working knowledge of PSP.
~♥~ Let’s get started ~♥~
Open up a 700 x 700 blank canvas.
Flood fill white.
Copy and paste Frame 2 as a new layer.
Resize 85%
Click inside of it with your Magic Wand.
Selections/Modify/Expand by 3
New Raster layer below the frame.
Copy and paste Paper 6 Into Selection.
Copy and paste your tube as a new layer just below the frame.
Position it to the left - see my tag for reference.
Selections/Invert
Tap the delete key.
Paste your tube again and move this layer below the other in your layers pallet.
Keep the size a bit larger than the other.
Move into position toward the left.
Tap the delete key.
Change the Properties to Soft Light.
Deselect.
Add your embellishments. I used:
Butterfly 1: Resize 25%
Butterfly 2 : Resize 25%/Mirror
Ribbon 4
Heart Swirl 1: Resize 60%
Forget Me Not 2: Resize 30%/Duplicate/Resize 70%
Forget me Not 2 again: Resize 25% and 70%
Forget Me Not 1: Resize 30%/Duplicate/Resize 70%
Forget me Not 1 again: Resize 25% and 70%
Scattered Hearts 2
Flower Stem 1: Resize 70%/Mirror
Sparkle
Copy and paste Word Art 1 (or a word art of your choice) as a new layer.
Make your Color Replacer tool active:
In your layer’s pallet set your background color to the color you want the word art to be.
Click on the foreground color - the materials property box will open up.
Move the courser onto your working canvas and Right click on the black word art.
Click OK on the Materials Pallet. It will close.
Move your cursor over the word art - be sure its ON the black word art and Double Left Click your mouse.
There you go! Your word art is now colored.
Give it a slight inner bevel:
Highlight your white background.
New Raster layer.
Copy and paste Paper 5 Into Selection.
Deselect.
Apply the mask.
Merge Group.
Add your credits.
Add your name.
Give it the same slight Inner Bevel.
Resize all layers 80%
I hope you enjoyed this tutorial.
I’d love to see your results and show it off in my gallery.
Email me!
Hugs,
Bev
No comments:
Post a Comment