1 tube of your choice - I used the artwork of Anna Marine at CILM
Font of Choice - I used Treasure here
Vix Mask 403 here
Divine Intentions Template 358 here
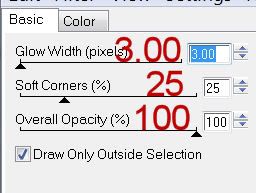
Eyecandy 4000 - Gradient Glow
“The Witching Hour” is a PTU tagger size scrap kit created by Shani of Wicked Princess Scraps and can be purchased at Twilight Scraps. You can visit her blog here.
Thank you Shani for a stunning kit!
This tutorial was written assuming you have a working knowledge of PSP.
~♥~ Let’s get started ~♥~
Open up the template.
Shift +D.
Close out the Original.
Delete the following layers:
Top 2 layers, Heart 1, Heart 2, and Heart 3 layers.
Resize all layers 90%
Image/Canvas Size
700 X 600
OK
Highlight Raster 1 layer and flood fill white.
Highlight Glitter Circle 1 layer.
Click on it with your Magic Wand.
New Raster layer.
Copy and paste PP 3 Into Selection.
Adjust/Add Remove Noise/Add Noise:
Monochrome and Gaussian checked
Noise: 33%
OK
Deselect.
Delete the template layer.
Repeat the above step with Glitter Circle Left, Glitter Circle Right, and Glitter Circle Center.
Highlight Rectangle 1 layer.
Select All/Float/Defloat
Copy and paste Paper 3 Into Selection
DO NOT DESELECT.
Apply Eyecandy 4000 - Gradient Glow:

Color Tab:
Highlight "Fat"
Color: white
OK
Deselect.
Delete the template layer.
Highlight Rectangle 2 layer.
Click on it with your Magic Wand.
New Raster layer.
Copy and paste Paper 17 Into Selection.
Deselect.
Delete the template layer.
Highlight Circle 1 layer.
Click on it your Magic Wand.
New Raster layer.
Copy and paste Paper 7 Into Selection.
Deselect.
Delete the template layer.
Highlight Circle Left layer.
Click on it with your Magic Wand.
New Raster layer.
Copy and paste Paper 2 Into Selection.
Copy and paste Old Tree as a new layer above the paper.
Resize 130% and move into position - see my tag for reference.
Selections/Invert
Use your Eraser Tool and erase the trunk of the tree that overhangs the circle.
Deselect.
Delete the template layer.
Highlight Circle Right layer.
Click on it with your Magic Wand.
New Raster layer.
Copy and paste Paper 2 Into Selection.
Deselect.
Delete the template layer.
Highlight Circle Center layer.
Click on it with your Magic Wand.
New Raster layer.
Copy and paste Paper 12 Into Selection.
Deselect for now.
Delete the template layer.
Copy and paste your tube as a new layer.
Position it over the circle.
Copy and paste Bush 2 as a new layer.
Move into position behind the tube - see my tag for reference.
Copy and paste Creepy Ghost as a new layer.
Move into position behind the bush - see my tag for reference.
Highlight the paper layer.
Use your Magic Wand and click anywhere outside of the paper.
Highlight your tube and each of the element layers and using your eraser tool erase the areas you don’t want to overhang the circle.
Deselect.
Add your embellishments. I used:
PA Sign
Fang Pumpkin: Resize 50%
Pansy: Resize 50%
Highlight your white canvas.
New Raster layer.
Select All
Copy and paste a paper of choice Into Selection.
Deselect.
Apply the mask.
Merge Group.
Add your credits.
Add your name.
Resize all layers 80%.
I hope you enjoyed this tutorial.
I’d love to see your results and show it off in my gallery.
Email me!
Hugs,
Bev


No comments:
Post a Comment