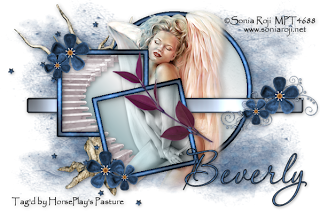
Clicking on the image will allow you to enlarge for bigger view.
Supplies
1 tube of choice - I used the artwork of Sonia Roji at MPT
Font of Choice - I used Aquarelle here
Scraps of Enchantment Template 109 here
Gem’s Mask 161 here
Dsb Flux - Bright Noise
Filters Unlimited 2.0 - Optional
“It‘s a Kind of Magic” is a tagger size scrap kit and part of a beautiful collaboration. This portion was created by Dark Kat‘s Kreationz. The collaboration can be purchased at Heartbeatz Creationz.
Thank you Dark Kat, your portion is beautiful!
This tutorial was written assuming you have a working knowledge of PSP.
~♥~ Let’s get started ~♥~
Open up the template.
Shift + D.
Close out the original.
Delete the top 2 layers.
New Raster layer.
Send to bottom.
Flood fill white.
Highlight Circle Background layer.
Click on it with your Magic Wand.
New Raster layer.
Flood fill with a gradient of your choice.
Deselect.
Delete the template layer.
Give the gradient a texture.
I used Filters Unlimited 2.0 - Wallpaper Fine:
Intensity: 20
Lightness: 110
OK
Highlight Grey Strip layer.
Click on it with your Magic Wand.
New Raster layer.
Copy and paste Paper 9 Into Selection.
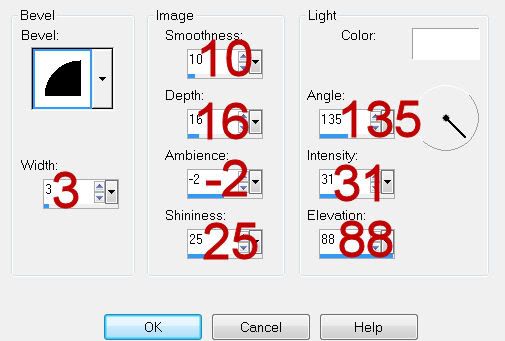
Apply a slight inner bevel:

Deselect.
Highlight Top Background layer.
Click on it with your Magic Wand.
New Raster layer.
Flood fill with the same gradient.
Deselect.
Delete the template layer.
Highlight Bottom Background layer.
Repeat the above step.
Highlight Top Frame layer.
Click on it with your Magic Wand.
New Raster layer.
Copy and paste Paper 6 Into Selection.
Apply the same inner bevel.
Deselect.
Delete the template layer.
Highlight Bottom Frame layer.
Repeat the above step.
Copy and paste your tube as a new layer just above the round frame layer.
Move it into exact position.
Duplicate twice.
In your layers pallet move each tube below each of the square frame layers.
To each Square paper layer:
Click anywhere outside the square.
Highlight the tube that’s just above the paper.
Tap the delete key.
Deselect.
Change the Properties to Luminance Legacy.
Highlight the tube in the bottom layer and use your Freehand Selection Tool to outline the part of the tube where you can see the staircase.
Highlight the staircase.
Tap the delete key.
Copy and paste Element 24 as a new layer.
Image/Mirror
Move it into exact position behind one of the frames - see my tag for reference.
Duplicate/Move it beneath the other frame in your layers pallet.
Click anywhere outside the square paper.
Highlight each of the stairs layers and tap the delete key.
Highlight Stars layer.
Select All/Float/Defloat
New Raster layer.
Flood fill with a dark color of choice.
Apply DSB Flux - Bright Noise:
Intensity: 32
Mix checked.
OK
Add your embellishments. I used:
Element 6: Resize 85%
Element 20: Resize 70%
Element 8: Resize 25%/Duplciate/Resize 70%
Element 27: Resize 60%
Highlight your white background.
Select All.
Copy and paste a paper of choice Into Selection.
Deselect.
Apply the mask.
Merge Group.
Add your credits.
Add your name.
Give it the same slight inner bevel.
I hope you enjoyed this tutorial.
I’d love to see your results and show it off in my gallery.
Email me!
Hugs,
Bev

No comments:
Post a Comment