r
Supplies
1 tube of choice - I’m using the wonderful artwork of Dominic Marco here
Font of Choice - I’m using Jester here
Weescotlass mask 249 here
Dezigns by Ali Template 115 here
Filters Unlimited 2.0 - Photo Aging - Optional
Xerox - Porcelain
“Hippity-Hop” is a PTU tagger size scrap kit created by Julie of Bits n Bobs and can be purchased at Exquisite Scraps. You can visit her blog here.
This tutorial was written assuming you have a working knowledge of PSP.
~♥~ Let’s get started ~♥~
Open up the template.
Shift + D.
Close out the original.
New Raster layer.
Send to bottom.
Flood fill white.
Delete the top 4 layers (credit layer and 3 staple layers)
I opened up Paper 8 and grabbed my colors from there that I used in this tutorial.
Highlight Raster 1 layer.
Use your Magic Wand and click on it.
New Raster layer.
Flood fill with a gradient of choice.
Deselect.
Delete the template layer.
Give it a texture of your choice.
I used Filters Unlmited 2.0 - Photo Aging Kit
Film Grain - Default Settings
Highlight Raster 3 layer.
Use your Magic Wand and click on it.
New Raster layer.
Invert your gradient and flood fill.
Give it the same texture.
DO NOT DESELECT YET.
Copy and paste your tube as a new layer.
Resize a bit larger if you have to and position over the circle.
Selections/Invert
Tap the delete key.
Deselect.
Apply Xerox - Porcelain
Default Settings
Highlight Raster 4 layer.
Use your Magic Wand and click on it.
New Raster layer.
Flood fill with a plain color.
Deselect.
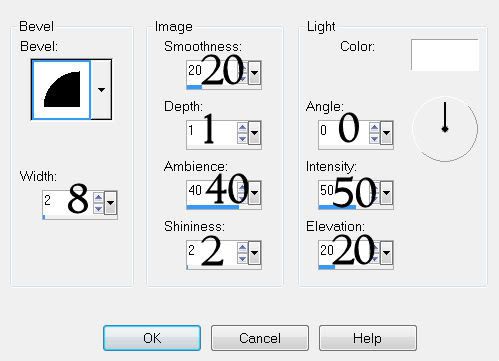
Give it a slight inner bevel:

Highlight Raster 2 layer.
Repeat the above step.
Highlight Merged Layer.
Using your Magic Wand click on the top rung.
New Raster layer.
Flood fill with a bright color.
Deselect.
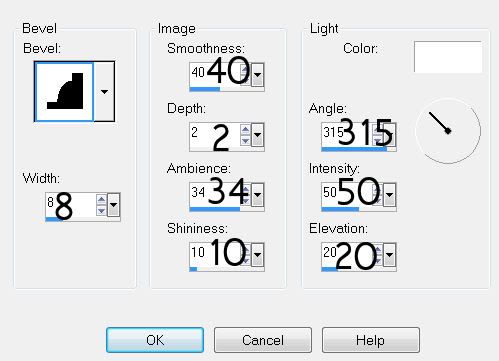
Give it an inner bevel:

Repeat the above step with the remaining 2 rungs, using a different color on each one.
Once you have all 3 rungs done delete the template layer.
Copy and paste your tube as a new layer.
Add your embellishments. I used:
Stitching 2: Resize 40% It’s alright a tad hangs over - it can be hidden with the added embellishments.
Flower Spray 2: Resize 80%
Rabbit 1: Resize 40%
Dragonfly 1 and 2: Resize 25%
Butterfly 2 & 3: Resize 35% Free rotate 25 degrees
Highlight your white background.
New Raster layer.
Select All.
Copy and paste a paper of choice Into Selection.
Deselect.
Apply the Mask.
Resize 120%
Merge Group.
Duplicate.
Add your copyrights.
Add your name.
Give it the same inner bevel you used last.
Resize all layers 90%.
I hope you enjoyed this tutorial.
I’d love to see your results and show it off in my gallery.
Email me!
Hugs,
Bev
Repeat the above step.
Highlight Merged Layer.
Using your Magic Wand click on the top rung.
New Raster layer.
Flood fill with a bright color.
Deselect.
Give it an inner bevel:

Repeat the above step with the remaining 2 rungs, using a different color on each one.
Once you have all 3 rungs done delete the template layer.
Copy and paste your tube as a new layer.
Add your embellishments. I used:
Stitching 2: Resize 40% It’s alright a tad hangs over - it can be hidden with the added embellishments.
Flower Spray 2: Resize 80%
Rabbit 1: Resize 40%
Dragonfly 1 and 2: Resize 25%
Butterfly 2 & 3: Resize 35% Free rotate 25 degrees
Highlight your white background.
New Raster layer.
Select All.
Copy and paste a paper of choice Into Selection.
Deselect.
Apply the Mask.
Resize 120%
Merge Group.
Duplicate.
Add your copyrights.
Add your name.
Give it the same inner bevel you used last.
Resize all layers 90%.
I hope you enjoyed this tutorial.
I’d love to see your results and show it off in my gallery.
Email me!
Hugs,
Bev


No comments:
Post a Comment