

Supplies
2 tubes of choice - I’m using the wonderful artwork of PinUpToons here
Font of Choice - I’m using Dragonfly here
Weescotlass mask 297 here
Divine Intentions Template 218 here
Greg’s Factory Output Vol. II - Pool Shadow
Animation Shop - Optional
“Spring Into Easter” is a PTU tagger size scrap kit created by MoMo of Country Style Designs and can be purchased at Scraps with Attitude. You can visit her site here.
Thank you MoMo for such a precious Spring/Easter kit!
This tutorial was written assuming you have a working knowledge of PSP.
~♥~ Let’s get started ~♥~
Open up the template.
Shift +D.
Close out the original.
Delete By Missy layer.
Image/Canvas Size
650 X 550
OK
Flood fill background layer white.
Highlight Frame Backgrounds layer.
Use your Magic Wand and click on all 3 circles.
New Raster layer.
Copy and paste a paper of choice Into Selection.
Deselect.
DO NOT DELETE THE TEMPLATE LAYER.
Highlight Circle Frames layer.
Select All/Float/Defloat
New Raster layer.
Open up Frame 4 from the kit.
Zoom in on it. Using your Selection Tool choose out a small section of the frame.

In your Color pallet set the foreground to pattern and find the basket pattern.
Angle: 0
Scale: 100
Make your canvas active and flood fill.
Deselect.
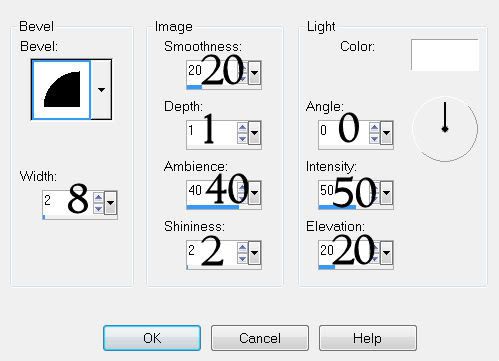
Give the frames a slight inner bevel:
Delete the frame template layer.
You can now close out Frame 4 image as you’ll no longer need that pattern for this tutorial.
Highlight the Frame Background template layer.
Using your Magic Wand, click on the top circle.
Copy and paste your tube above the paper.
Selections/Invert
Tap the delete key.
Deselect.
Repeat the above step with the large circle.
Now we’re going to put all those tulips in the bottom circle.
For now:
Copy/Paste/Resize all the tulips 25%
Move them into position over the lower circle.
Once you’ve got them all where you want them, merge visible all tulips.
Highlight the template layer.
Use your Magic Wand and click on the bottom circle.
Highlight your merged tulip layer.
Selections/Invert
Tap the delete key.
Deselect.
Highlight Large Rectangle layer.
Use your Magic Wand and click on it.
New Raster layer.
Copy and paste a paper of choice Into Selection.
Deselect.
Delete the template layer.
Repeat the above step with Rectangle, Rectangle 2, and Rectangle 3.
Add your embellishments. I used:
Flower 2: Resize 40% Free rotate right 10 degrees
Egg 1: Resize 25% Free rotate right 5 degrees
Egg 2: Resize 25% and 80% Free rotate left 10 degrees
Flowers 3 & 5: Resize 25%
Flowers 4 & 6: Resize 25% and 85%
Highlight your white background.
New Raster layer.
Select All.
Copy and paste a paper of choice Into Selection.
Deselect.
Apply the Mask.
Merge Group.
Add your copyrights.
Add your name.
Choose your colors, but make your stroke set at 1.5.
Convert to Raster layer.
Select All/Float/Defloat
Selections/Modify/Contract by 1
OK
Give it the same inner bevel.
Apply Greg’s Factory Output Vol. II - Pool Shadow:
Default Settings.
Deselect.
If you don’t want to animate then resize all your layers 80%.
Save your tag.
If you DO want to animate DO NOT RESIZE YET!
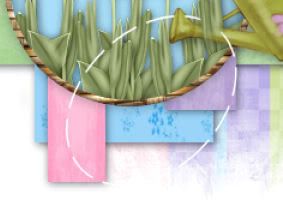
Activate your Ellipse Tool set on “Draw Ellipse”
In your Layers Pallet:
Foreground: white
Background: Null
Line Style: Dashed
Width: 2
Draw out an oval circle near the spout of the watering can:
Convert to Raster layer.
Free rotate to make the side of the oval at a slant.
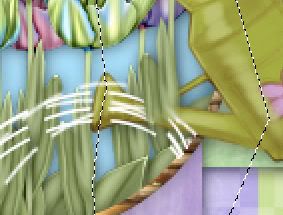
Diplicate 5 times for a total of 6 oval layers.
Rename them Water 1, 2, 3, 4,5, and 6.
Try to only concentrate on where the lines are coming out of the spout, and free rotate each circle layer a bit to form a “shower”.
Highlight Frame Background template layer.
Click on the bottom circle with your Magic Wand.
Selections/Invert
Highlight Water 1 layer.
Tap the delete key.
Repeat that with each water layer.
Deselect.
Using your Freehand Selection Tool, on the right side of the spout section out the area where the circles are:
Highlight Water 1 and tap the delete key.
Repeat this with each of the water layers.
Deselect.
Highlight Water 1.
Adjust/Blur/Gaussian Blur
Radius: 1
OK
Repeat the above step with the rest of the water layers.
Copy Merge.
Open up AS
Edit/Paste/As New Animation
Back in PSP.
Click on the Undo button until all your rain layers are unblurred.
Moving the rain streams at the top and bottom, just move those away from the spout a little. The streams in between you can move in or out, up a little, down a little...however you like.
Copy Merge.
Carry into AS.
Edit/Paste/After Current Frame.
Back in PSP.
Click the undo button again until all the stream lines are unblurred.
Move them around again like you just did - again, only move the top and bottom rain streams closer to or away from the spout.
Copy Merge.
Carry into AS.
Edit/Paste/After Current Frame.
Repeat the above steps until you have 4 frames total in AS.
View your animation.
Animation/Resize Animation
Percentage of Original checked
Width & Height: 80
OK
Save your animation.
I do hope you stuck with this tutorial and was able to animate your tag. It’s some work - but I find this type of work relaxing, challenging, and fun…and I hope you found it to be the same as well.
Oooooor, I hope I didn’t confuse you too much! Yikes!!
If you have any questions just email me and I’ll do my best to help you out.
I’d love to see your results and show it off in my gallery.
Email me!
Hugs,
Bev
No comments:
Post a Comment