Clicking on the image will allow you to enlarge for bigger view.
Supplies
1 tube of choice - I used the artwork of Ismael Rac here. This particular tube is free!
Font of Choice - I used Amaze Normal
Weescotlass Mask 236 here
Vix Template 9 here - takes you right to the page, just scroll down
Greg’s Factory Output Vol. II - Pool Shadow
“Ho Ho Ho” is a PTU scrap kit created by Nikki of Creative Intentionz and can be purchased from her store Twilight Scraps. You can visit her blog here.
Thank you Nikki for one sweet kit!! I totally loved tutting this one!
This tutorial was written assuming you have a working knowledge of PSP.
~♥~ Let’s get started ~♥~
Open up the template.
Shift + D.
Close out the original.
Delete the following layers:
TOU, Pleasures, Simple, and Optional Tagback
Highlight Square Fills layer.
Click on both squares with your Magic Wand.
New Raster layer.
Copy and paste Paper 3 Into Selection.
Deselect.
Delete the template layer.
Highlight Square Frames.
Click on both of the frame with your Magic Wand.
New Raster layer.
Copy and paste Paper 4 Into Selection.
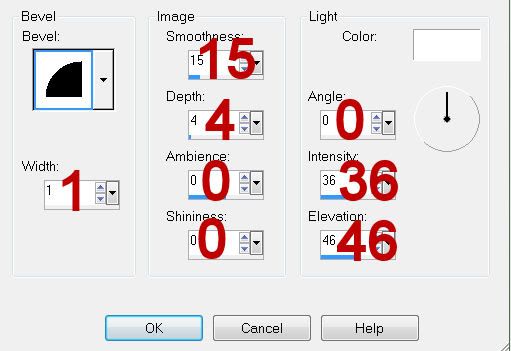
Give it a slight Inner Bevel:

Adjust/Add Remove Noise/Add Noise:
Uniform and Monochrome checked.
Noise: 55%
OK
Deselect.
Highlight Rectangle Frame.
Repeat the above step.
Highlight Copy of Rectangle Fill.
Click on it with your Magic Wand.
Copy and paste Paper 6 as a new layer.
Resize 60%
Selections/Invert
Tap the delete key.
Deselect.
Copy and paste your tube as a new layer.
Move it into exact position.
Duplicate - Move below the square frames into exact position.
Highlight the square paper layer.
Click outside the paper with your Magic Wand.
Highlight the tube layer.
Tap the delete key.
Deselect.
Change the Properties to Lighten.
Add your embellishments. I used:
Tree: Resize 90%
Dazzling Bow: Resize 25%
Holly Swag: Resize 75%
Snowman Stocking: Resize 55%/Free rotate Right 15 degrees
Sparkles
Highlight your white background.
Select All.
New Raster layer.
Flood fill with a gradient of choice. I used Metal Brass.
Copy and paste Snow Sheet as a new layer.
Merge Down.
Apply the mask.
Merge Group.
Add your credits.
Add your name.
Color pallet:
Foreground: Pattern/Paper 3
Background: Pattern Paper 4
Stroke: 2
Type your name out.
Convert to Raster layer.
Select All/Float/Defloat
Selections/Modify/Contract by 2
Give it a slight inner bevel - same settings - 3x’s
Apply Greg’s Factory Output Vol. II - Pool Shadow:
Default Settings - just change the intensity to 56
Deselect.
I hope you enjoyed this tutorial.
I’d love to see your results and show it off in my gallery.
Email me!
Hugs,
Bev
Supplies
1 tube of choice - I used the artwork of Ismael Rac here. This particular tube is free!
Font of Choice - I used Amaze Normal
Weescotlass Mask 236 here
Vix Template 9 here - takes you right to the page, just scroll down
Greg’s Factory Output Vol. II - Pool Shadow
“Ho Ho Ho” is a PTU scrap kit created by Nikki of Creative Intentionz and can be purchased from her store Twilight Scraps. You can visit her blog here.
Thank you Nikki for one sweet kit!! I totally loved tutting this one!
This tutorial was written assuming you have a working knowledge of PSP.
~♥~ Let’s get started ~♥~
Open up the template.
Shift + D.
Close out the original.
Delete the following layers:
TOU, Pleasures, Simple, and Optional Tagback
Highlight Square Fills layer.
Click on both squares with your Magic Wand.
New Raster layer.
Copy and paste Paper 3 Into Selection.
Deselect.
Delete the template layer.
Highlight Square Frames.
Click on both of the frame with your Magic Wand.
New Raster layer.
Copy and paste Paper 4 Into Selection.
Give it a slight Inner Bevel:

Adjust/Add Remove Noise/Add Noise:
Uniform and Monochrome checked.
Noise: 55%
OK
Deselect.
Highlight Rectangle Frame.
Repeat the above step.
Highlight Copy of Rectangle Fill.
Click on it with your Magic Wand.
Copy and paste Paper 6 as a new layer.
Resize 60%
Selections/Invert
Tap the delete key.
Deselect.
Copy and paste your tube as a new layer.
Move it into exact position.
Duplicate - Move below the square frames into exact position.
Highlight the square paper layer.
Click outside the paper with your Magic Wand.
Highlight the tube layer.
Tap the delete key.
Deselect.
Change the Properties to Lighten.
Add your embellishments. I used:
Tree: Resize 90%
Dazzling Bow: Resize 25%
Holly Swag: Resize 75%
Snowman Stocking: Resize 55%/Free rotate Right 15 degrees
Sparkles
Highlight your white background.
Select All.
New Raster layer.
Flood fill with a gradient of choice. I used Metal Brass.
Copy and paste Snow Sheet as a new layer.
Merge Down.
Apply the mask.
Merge Group.
Add your credits.
Add your name.
Color pallet:
Foreground: Pattern/Paper 3
Background: Pattern Paper 4
Stroke: 2
Type your name out.
Convert to Raster layer.
Select All/Float/Defloat
Selections/Modify/Contract by 2
Give it a slight inner bevel - same settings - 3x’s
Apply Greg’s Factory Output Vol. II - Pool Shadow:
Default Settings - just change the intensity to 56
Deselect.
I hope you enjoyed this tutorial.
I’d love to see your results and show it off in my gallery.
Email me!
Hugs,
Bev

No comments:
Post a Comment