

Supplies
1 tube of choice - I used the artwork of Agent Melon. He is no longer at MPT. I could only find his blog here.
Font of Choice - I used Aquarelle here
Monti Circular Mask here
Eyecandy 5: Nature - Snow Drift
VM Natural - Sparkle
“Christmas Sparkle” is a FTU scrap kit created by me and can be downloaded from my blog here.
I hope you enjoy!
This tutorial was written assuming you have a working knowledge of PSP.
~♥~ Let’s get started ~♥~
Open up a 700 x 700 blank canvas.
Flood fill white.
Copy and paste Frame 2 as a new layer.
Resize 75%
Free rotate left 5 degrees
Click inside of it with your Magic Wand.
Selections/Modify/Expand by 6.
New Raster layer below the frame.
Copy and paste Paper 6 Into Selection.
Deselect.
Copy and paste Tree 1 as a new layer below the frame.
Resize 50% - position on the left side
Copy and paste Tree 2 as a new layer below the frame.
Position on the right side.
Highlight your paper layer.
Click anywhere outside of it with your Magic Wand.
Highlight Tree 2 layer and tap the delete key.
If you added any other embellishments and they’re sticking outside of the frame, go ahead and highlight each of those element layers and tap the delete key.
Deselect.
Close out your white canvas.
Merge Visible.
Reopen your white canvas.
Copy and paste Tree 2 as a new layer.
Position behind the frame at the right side - see my tag for reference.
Copy and pate Tree 1 as a new layer.
Position behind the frame at the left side - see my tag for reference.
Now we’re going to decorate the trees.
The elements I used are:
Baubles 1, 2, and 3: Resize 25% and 40%
Duplicate as many times as you like placing them about the tree
TIP: Only decorate the part of the tree that you see.
Candy Cane: Resize 25% and 50%
Use your Eraser Tool to erase bits of the cane to give it the effect like it’s hung on the branch.
Duplicate as many times as you like but duplicate BEFORE you erase.
Make String Lights element active.
Shift + D
Close out the Original.
Resize all layers 25% and 80%
Copy
Make your working canvas active.
Paste
Move the lights into position over the tree where you like.
Use your Eraser Tool and erase the lights and string you don’t want.
Paste again.
Move into position and erase what you don’t want.
Keep doing this until you have your trees decorated.
If you like you can Merge Visible the trees and decorations layers.
Copy and paste your tube as a new layer.
Add you embellishments. I used:
Chain
Ribbon 1: Resize 75%/Free rotate Left 5 degrees
Ribbon 2: Resize 75%
Holly Sprig: Resize 40%
Snowflake 1: Resize 25% and 80%
Snowflake 2: Resize 25% and 80%
Highlight your white background.
Select All.
New Raster layer.
Copy and paste Paper 2 Into Selection.
Deselect.
Apply the mask.
Merge Group.
Copy and paste Fence as a new layer.
Position it so that it sticks out from the Left side of the frame.
Erase what you see sticking out at the right side.
Paste the Fence again.
Position so that it sticks out from the right side.
Erase what you sticking out at the left side.
Merge Down.
Apply the mask.
Merge Group.
Move just above the mask layer in your layers pallet.
Add your credits.
Add your name.
Apply Eyecandy 5: Nature - Snow Drift
Settings Tab:
Small, First Flakes
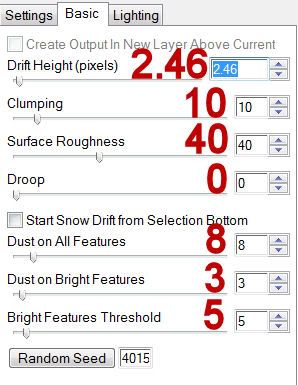
Basic Tab:
Also add the same effect to any of the embellishments you choose.
I add it to the holly sprig and frame.
Resize all layers 80%
Merge all layers.
Apply Vm Natural - Sparkle.
Play around with the top and bottom slider to get the affect you want.
I hope you enjoyed this tutorial.
I’d love to see your results and show it off in my gallery.
Email me!
Hugs,
Bev
No comments:
Post a Comment