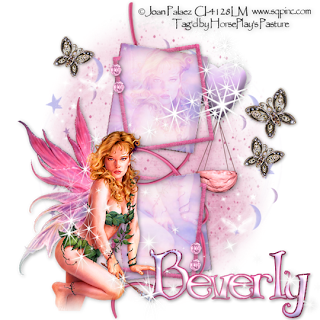
Clicking on the image will allow you to enlarge for bigger view.
Supplies:
1 tube of choice - I used the artwork of Joan Paleaz at CILM
Font of Choice - I used Bibliotheque here
My Template 88 here
Becky Mask 9 here
“The Kingdom of Fairies and Fantasies” is a PTU tagger size scrap kit created by Conchi Dnscraps and can be purchased from Lollipops n Gumdrops. You can visit her blog here.
Thank you Conchi for such a magical kit!
This tutorial was written assuming you have a working knowledge of PSP.
~♥~ Let’s get started ~♥~
Open up the template.
Shift + D.
Close out the original.
Delete the top 3 layers and Wire layer.
Highlight Top Square layer.
Click on it with your Magic Wand.
New Raster layer.
Copy and paste Paper 2 Into Selection.
Deselect.
Delete the template layer.
Highlight Top Frame layer.
Click on it with your Magic Wand.
Copy and paste Paper 24 as a new layer.
Selection/Invert
Tap the delete key.
Deselect.
Delete the template layer.
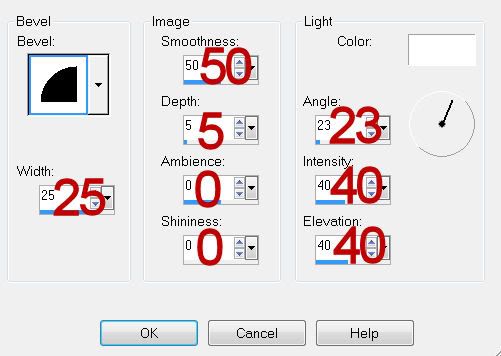
Give it a slight inner bevel:

Repeat the above 2 steps with Bottom Square and Bottom Frame layers.
Copy and paste your tube as a new layer.
Resize so it’s large enough to cover both the top and bottom squares.
Move it into exact position over the top square.
Duplicate - move this tube layer just above the bottom square in your layers pallet.
Highlight the top square paper.
Click anywhere outside of it with your Magic Wand.
Highlight the tube layer just above the paper.
Tap the delete key.
Deselect.
Repeat the above step with the bottom square and tube layer.
Copy and paste your tube as a new layer.
Position it wherever you like outside of the frames.
Because the element names are so long just look at the ends of the element names for the elements as they’re listed in this tutorial. Thanks…saves on a lot of typing on my end and reading on your end J
Copy and paste Rope as a new layer.
Resize 80%
Move into position so that it‘s above both of the frames in your layers pallet.
Duplicate - move it so that it’s below both of the squares in your layers pallet.
Highlight the rope above the frames and use your Eraser Tool to erase what you don’t want to be seen above the frames.
Normally I like to apply the mask last in my tutorials, but because some of the elements white we’ll go ahead and add the mask now:
Highlight your white background.
New Raster layer.
Select All.
Copy and paste a paper of choice Into Selection.
Deselect.
Apply the mask.
Merge Group.
Add your embellishments. I used:
ButterfliesPapallions: Resize 80%
Diamond: Resize 25% and 25%/Duplciate 3x’s
Balloon: Resize 35%
Butterflyes: Resize 25% and 50%/Duplciate/Resize 80%/Mirror/Duplicate
Magicc 2
Sparkles 2: Resize 80%
Add your credits.
Add your name.
Give it the same inner bevel.
Resize all layers 90%.
I hope you enjoyed this tutorial.
I’d love to see your results and show it off in my gallery.
Email me!
Hugs,
Bev
Supplies:
1 tube of choice - I used the artwork of Joan Paleaz at CILM
Font of Choice - I used Bibliotheque here
My Template 88 here
Becky Mask 9 here
“The Kingdom of Fairies and Fantasies” is a PTU tagger size scrap kit created by Conchi Dnscraps and can be purchased from Lollipops n Gumdrops. You can visit her blog here.
Thank you Conchi for such a magical kit!
This tutorial was written assuming you have a working knowledge of PSP.
~♥~ Let’s get started ~♥~
Open up the template.
Shift + D.
Close out the original.
Delete the top 3 layers and Wire layer.
Highlight Top Square layer.
Click on it with your Magic Wand.
New Raster layer.
Copy and paste Paper 2 Into Selection.
Deselect.
Delete the template layer.
Highlight Top Frame layer.
Click on it with your Magic Wand.
Copy and paste Paper 24 as a new layer.
Selection/Invert
Tap the delete key.
Deselect.
Delete the template layer.
Give it a slight inner bevel:

Repeat the above 2 steps with Bottom Square and Bottom Frame layers.
Copy and paste your tube as a new layer.
Resize so it’s large enough to cover both the top and bottom squares.
Move it into exact position over the top square.
Duplicate - move this tube layer just above the bottom square in your layers pallet.
Highlight the top square paper.
Click anywhere outside of it with your Magic Wand.
Highlight the tube layer just above the paper.
Tap the delete key.
Deselect.
Repeat the above step with the bottom square and tube layer.
Copy and paste your tube as a new layer.
Position it wherever you like outside of the frames.
Because the element names are so long just look at the ends of the element names for the elements as they’re listed in this tutorial. Thanks…saves on a lot of typing on my end and reading on your end J
Copy and paste Rope as a new layer.
Resize 80%
Move into position so that it‘s above both of the frames in your layers pallet.
Duplicate - move it so that it’s below both of the squares in your layers pallet.
Highlight the rope above the frames and use your Eraser Tool to erase what you don’t want to be seen above the frames.
Normally I like to apply the mask last in my tutorials, but because some of the elements white we’ll go ahead and add the mask now:
Highlight your white background.
New Raster layer.
Select All.
Copy and paste a paper of choice Into Selection.
Deselect.
Apply the mask.
Merge Group.
Add your embellishments. I used:
ButterfliesPapallions: Resize 80%
Diamond: Resize 25% and 25%/Duplciate 3x’s
Balloon: Resize 35%
Butterflyes: Resize 25% and 50%/Duplciate/Resize 80%/Mirror/Duplicate
Magicc 2
Sparkles 2: Resize 80%
Add your credits.
Add your name.
Give it the same inner bevel.
Resize all layers 90%.
I hope you enjoyed this tutorial.
I’d love to see your results and show it off in my gallery.
Email me!
Hugs,
Bev

No comments:
Post a Comment