

Clicking on the image will allow you to enlarge for bigger view.
Supplies
1 tube of your choice and 1 close up image - I used the artwork of Keith Garvey and can be purchased at MPT
Font of Choice - I used Al Sandra here
Scrap Rebellion Template 36 here
Vix Mask 431 here
Filters Unlimited 2.0 - Optional
“A Touch of Autumn” is a PTU tagger size scrap kit created by Tina’s Magical Scraps and can be purchased at Scrappin‘ Warehouse. You can visit her blog here.
Thank you Tina for such a stunning seasonal kit!
This tutorial was written assuming you have a working knowledge of PSP.
~♥~ Let’s get started ~♥~
Open up the template.
Shift + D.
Close out the original.
Resize all layers 90%
Image/Canvas Size
700 X 550
Highlight the background layer.
Flood fill white.
Delete the top 7 layers.
Highlight Pink Square layer.
Use your Magic Wand and click on it.
Copy and paste Paper 20 as a new layer.
Resize 80%
Move into position.
Selections/Invert
Tap the delete key.
Deselect.
Delete the template layer.
Highlight Pink Oval layer.
Click on it with your Magic Wand.
New Raster layer.
Copy and paste Paper 24 Into Selection.
Deselect.
Delete the template layer.
Adjust/Add Remove Noise/Add Noise
Monochrome and Gaussian checked
Nosie: 33%
OK
Highlight 2 Tone Back layer.
Repeat the above step but only close the template layer out.
Highlight Black Oval layer.
Click on it with your Magic Wand.
New Raster layer.
Copy and paste Paper 7 Into Selection.
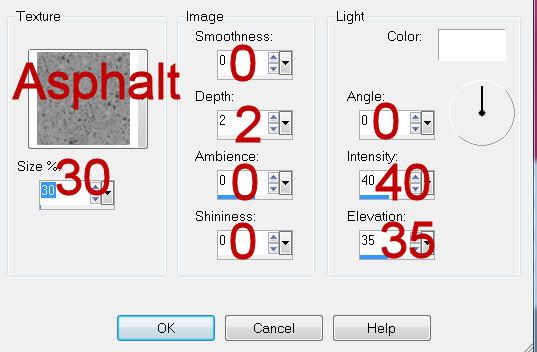
Apply Filters Unlimited 2.0 -
Paper Textures/Striped Paper, Course
Intensity: 29
Lightness: 87
Deselect.
Delete the template layer.
TIP: If you don’t have Filters Unlimited 2.0 then try this:
Effects/Texture Effects/Blinds
Width: 8
Opacity: 10
Color: white
Horizontal checked
OK
Highlight Black Rectangle layer.
Click on it with your Magic Wand.
New Raster layer.
Flood fill with #af0b2e.
Apply Filters Unlimited 2.0 -
Paper Textures/Mineral Paper, Sandstone:
Intensity: 57
Lightness: 62
Deselect.
Delete the template layer.
TIP: If you don’t have Filters Unlimited 2.0 then try this -
Effects/Texture Effects/Texture:
Highlight Blue Square layer.
Click on it with your Magic Wand.
New Raster layer.
Copy and paste Paper 8 Into Selection.
Copy and paste your close up image as a new layer.
Move into position over the paper.
Selections/Invert
Tap the delete key.
Deselect.
Delete the template layer.
Copy and paste your tube as a new layer.
Copy, paste, and move into position the following elements as new layers just above the red rectangle layer - don’t worry about what overhangs. We’ll take care of that in a bit. You can use my tag as reference:
Diamond Splash 3: Resize 80%
Grass 1: Resize 85%
Pumpkin Patch 2 layers: Resize each element 50%
Highlight the template layer.
Click anywhere outside of it.
Highlight whatever elements that overhang the paper layer and tap the delete key.
Deselect.
Delete the template layer.
Add your embellishments. I used:
Pin Heart: Resize 40%
Fabric flower 1: Resize 30%
Fabric flower 2; Resize 25%/Mirror
Glitter Butterfly 1: Resize 25%
Candle Arrangement 1: Resize 80%
Folded Ribbon: Resize 80%
Acorn: Resize 40%/Free rotate left 10 degrees/Duplicate/Mirror
Hedgehog 1: Resize 40%
Sparkles 2: Resize 80%
Crop your image.
Highlight your white background.
Select All.
Copy and paste a paper of choice Into Selection.
Deselect.
Apply the mask.
Resize 10%
Merge Group.
Move it up slightly on your canvas.
Add your credits.
Add your name.
Give it an inner bevel:

Repeat the inner bevel 2 more times.
Resize all layers 80%.
I hope you enjoyed this tutorial.
I’d love to see your results and show it off in my gallery.
Email me!
Hugs,
Bev
No comments:
Post a Comment