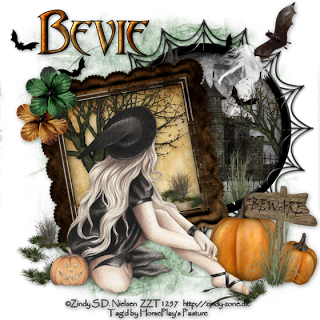
Clicking on the image will allow you to enlarge for bigger view.
Supplies
1 tube of your choice - I used the wonderful artwork of Zindy S.D. Nielsen here.
This is a free tube found here.
Font of Choice - I used Abaddon here
“The Gothic Journey Express” is a PTU tagger size scrap kit created by Designed by Stina and can be purchased at Twilight Scraps. You can visit her blog here.
Thank you Stina for a stunning kit!
This tutorial was written assuming you have a working knowledge of PSP.
~♥~ Let’s get started ~♥~
Open up a 700 X 700 blank canvas.
Flood fill white.
Copy and paste Frame 9 as a new layer.
Resize 65%
Free rotate left 10 degrees.
Click inside with your Magic Wand.
Selections/Modify/Expand by 2.
New Raster layer below the frame.
Copy and paste a paper of choice Into Selection.
Deselect for now.
Copy and paste Old Tree as a new layer below the frame.
Move into position.
Duplicate/Mirror/Move into position so you use the grass to decorated inside the frame.
Highlight the frame layer.
Click inside of it with your Magic Wand.
Selections/Modify/Expand by 3
Selections/Invert
Highlight each of the element layers and tap the delete key.
Deselect.
Close out your white canvas.
Merge Visible.
Reopen your white canvas.
Copy and paste Frame 10 as a new layer.
Resize 75%
Click inside with you Magic Wand.
Selections/Modify/Expand by 3.
New Raster layer below the frame.
Copy and paste a paper of choice Into Selection.
Copy and paste Castle 2 as a new layer below the frame.
Move into position.
Duplicate/Move it above the frame in your layers pallet and close it out for now.
Highlight the original element layer.
Selections/Invert
Tap the delete key.
Open up the duplicate castle layer and use your Eraser tool to erase everything but a few bats of your choice that you’d like to see on the tag.
Copy and paste Ghost 1 as a new layer.
Resize 30%
Move into position behind the castle so that it looks like it’s floating out from behind it.
Close out the merged layer and your white background.
Merge Visible.
Reopen all layers.
Move the merged layers into position - see my tag for reference.
Copy and paste your tube as a new layer.
Add your embellishments. I used:
Flower 1: Resize 25% and 80%
Flower 4: Resize 25% and 80%
Old Tree - Use the grass only and erase the tree portion of it.
Pumpkin 3: Resize 30%
Pumpkin 4; Resize 25% and 70%
Beware: Resize 35%
Highlight your white background.
Select All.
Copy and paste a paper of choice Into Selection.
Deselect.
Apply the mask.
Merge Group.
Add your credits.
Add your name.
Convert to a raster layer.
Select All/Float/Defloat
Selections/Modify/Contract by 1.
OK
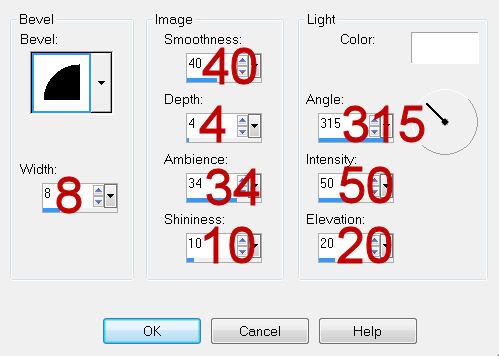
Give it a slight inner bevel:

DO NOT DESELECT.
Apply the Inner bevel again.
Deselect.
Resize all layers 80%
I hope you enjoyed this tutorial.
I’d love to see your results and show it off in my gallery.
Email me!
Hugs,
Bev

Which Zindy tube is that? I can not find it unless I am about as blind as my daughter LOL
ReplyDeleteIt's a very sweet tag :)
ReplyDeleteLori, you can find it in my free tubes: http://zindy-zone.dk/html/free_tubes.html
Thank you so much Zindy:)
ReplyDeleteI just love your art work!
Hugs
Bev
I LOVED this tutorial. Thank you so much for sharing your talent! I fully intend to do more of them :)
ReplyDelete