Supplies
2 tubes of choice - I used the awesome artwork of Keith Garvey here
Font of choice - I used Dream Orphans here
Weescotlass mask 297 here
Divine Intentionz Template 259 here
Mura’s Meister - Copies
“Christy” is a PTU scrap kit created by Scraps by CWD and can be purchased at TKO Scraps. You can visit her blog here.
Thank you for a really awesome kit!
This tutorial was written assuming you have a working knowledge of PSP.
~♥~ Let’s get started ~♥~
Open up the template.
Shift + D.
Close out the original.
Delete By Missy layer.
Highlight Rectangle layer.
Use your Magic Wand and click on it.
New Raster layer.
Copy and paste a paper of choice Into Selection.
Copy and paste a tube as a new layer above the paper.
Selections/Invert
Tap the delete key.
Deselect.
Change the Properties to Soft Light.
Delete the template layer.
Highlight Circle layer.
Use your Magic Wand and click on it.
New Raster layer
Copy and paste a paper of choice Into Selection.
Deselect.
Delete the template layer.
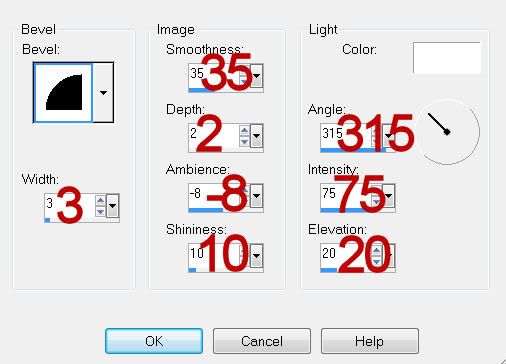
Give it a slight inner bevel:

Highlight Thin Rectangle layer.
Use your Magic Wand and click on it.
New Raster layer.
Copy and paste a dark colored paper of choice Into Selection.
Selections/Modify/Contract by 4.
Selections/Invert
Tap the delete key.
Selections/Modify/Expand by 2.
New Raster layer below the frame you just created.
Copy and paste a light colored paper of choice Into Selection.
Deselect.
Delete the template layer.
Highlight Thin Rectangle layer.
Merge Down.
Both skinny rectangle layers should be on one layer together now.
Use your Magic Wand and click on them both.
New Raster layer.
Copy and paste the dark colored paper you just used Into Selection.
Deselect.
Delete the template layer.
Give it the same inner bevel.
Highlight Dotted Line 2 layer.
Merge Down.
Select All/Float/Defloat
New Raster layer.
Copy and paste a paper of choice Into Selection.
Deselect.
Delete the template layer.
Give it the same inner bevel.
Highlight Words layer.
Select All/Float/Defloat
New Raster layer.
Flood fill with a gradient of choice.
Deselect.
Delete the template layer.
Highlight Frame Background layer.
Click on it with your Magic Wand.
New Raster layer.
Copy and paste a paper of choice Into Selection.
Copy and paste your tube as a new layer above the paper.
Move into position.
Selections/Invert
Tap the delete key.
Paste your tube again - resize larger - position behind the smaller tube.
Change the Properties to Soft Light.
Tap the delete key.
Deselect.
Give your tube an exaggerated drop shadow.
Highlight Frame layer.
Click on it with your Magic Wand.
New Raster layer.
Copy and paste a paper of choice Into Selection.
Deselect.
Delete the template layer.
Give it an inner bevel.
Copy and paste Flower 2 as a new layer.
Resize 50%
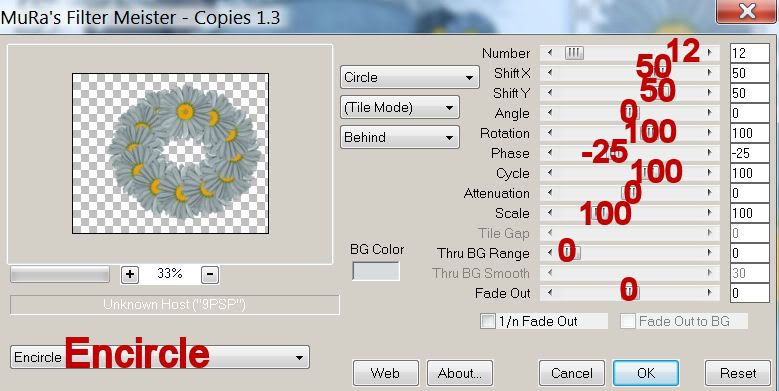
Apply Mura’s Meister - Copies:

The circle won’t be an exact circle so activate your Pick Tool.
Move the circle of daisies behind the big Circle layer and pull the sides out just slightly.
Add your embellishments. I used:
Flowers 1, 2, and 3: Resize 25% and 70%
Eyelet 2: Mirror/Resize 25%
Buckle Ribbon 3: Resize 35% Free rotate left 30 degrees
Butterfly Charm: Free rotate left 30 degrees
Key: Duplicate/Mirror
Twisted Ribbon Blue: Resize 25%
Highlight your white background.
New Raster layer.
Select All.
Copy and paste a paper of choice Into Selection.
Deselect.
Apply the Mask.
Resize 105%
Merge Group.
Add your copyrights.
Add your name.
In your Colors pallet:
Foreground: Dark color of choice
Background: Light color of choice.
Have your stroke set to 2.
Have Font direction going down.
Type your name.
Convert to Raster layer.
Select All/Float/Defloat
Selections/Modify/Contract by 2.
Give it the same inner bevel.
Apply some noise - settings are your choice.
Deselect.
Resize all layers 80%.
I hope you enjoyed this tutorial.
I’d love to see your results and show it off in my gallery.
Email me!
Hugs,
Bev


No comments:
Post a Comment