
 Clicking on the image will enlarge to full view.
Supplies
2 tubes of choice - I used the wonderful artwork of Greg Horn here
Font of choice - I used Felix Titling which came with my pc
Gem Mask 33 here
My Template 77 here
Eyecandy 5 - Impact: Bevel
“Bad Poison” is a PTU scrap kit created by Missy Lynn of Immortal Dreamsand can be purchased at Twilight Scraps. You can visit her blog here.
Thank you Missy Lynn for a really awesome kit!
This tutorial was written assuming you have a working knowledge of PSP.
~♥~ Let’s get started ~♥~
Open up the template.
Shift + D.
Close out the original.
Delete my credit layer.
Highlight Square layer.
Use your Magic Wand and click on it.
New Raster layer.
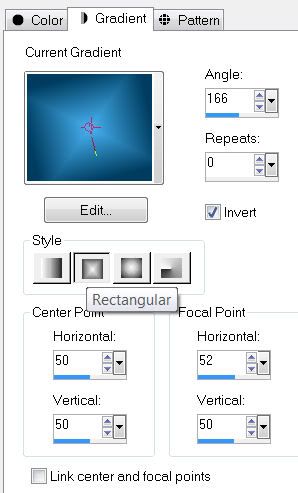
Flood fill with a gradient of your choice using colors that match the kit.
DO NOT DESELECT YET
Copy and pate your tube as a new layer.
Resize and move it into position where you want it.
Selections/Invert
Tap the delete key.
DO NOT DESELECT.
Paste your tube again as new layer behind your other tube.
Move it behind your tube.
Resize larger than your other tube layer and move into position.
Tap the delete key.
Deselect.
Change the Properties to Multiply.
Delete the template layer.
Highlight Square Dashes layer.
Select All/Float/Defloat
New Raster layer
Zoom in and flood fill with a bright light color.
Deselect.
Delete the template layer.
Highlight Circle 1 layer.
Use your Magic Wand and click on it.
New Raster layer.
Invert your gradient and flood fill.
DO NOT DESELECT.
Copy and paste your other tube as a new layer.
Move into position.
Selections/Invert
Tap the delete key.
Deselect.
Change the Properties to Soft Light.
Delete the template layer.
Highlight Circle 2 layer.
Repeat the above 2 steps using the same tube.
Highlight Strip 1 layer.
Use your Magic Wand and click on it.
New Raster layer.
Copy and paste a paper of choice Into Selection.
Deselect.
Delete the template layer.
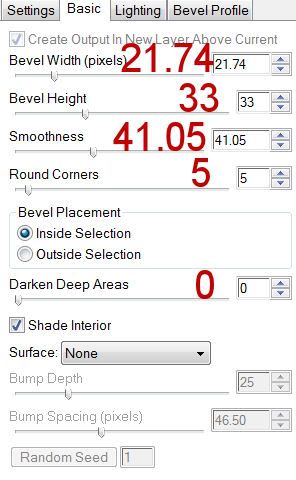
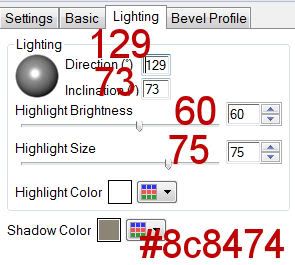
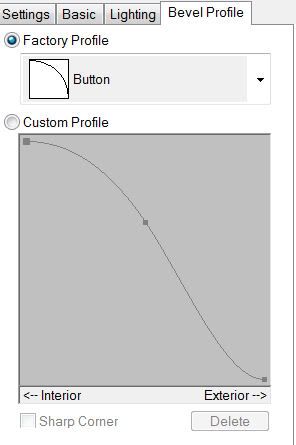
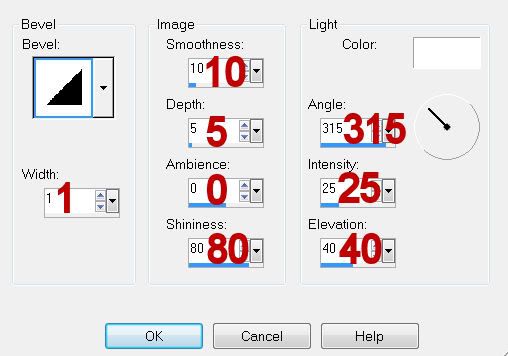
Apply Eyecandy 5: Impact - Bevel:
Basic Tab:
Lighting Tab:
Bevel Profile Tab:
Highlight Strip 2 layer.
Repeat the above step.
Copy and paste Frame 6 as a new layer.
Resize 50%
Move into position over the tube of the top circle.
Paste Frame 6 again as a new layer.
Resize 40%
Move into position over the tube of the bottom circle.
Add your embellishments. I used:
Bad: Resize 50%
Butterflies 1 & 2: Resize 25%
Star: Resize 25% & 70%
Flower 1: Resize 25% and 70%
Flower 7: Resize 25% and 60%
Bow 6: Resize 40%
Highlight your white background.
New Raster layer.
Select All.
Copy and paste a paper of choice Into Selection.
Deselect.
Apply the Mask.
Merge Group.
Add your copyrights.
Add your name.
Foreground the dark color from your gradient.
Background: the gradient you’ve been using
Stroke set to 2
Type out your name.
Convert to Raster layer.
Select All/Float/Defloat
Seletctions/Modify/Contract by 2
Give it a slight inner bevel:
Resize all layers 90%.
I hope you enjoyed this tutorial.
I’d love to see your results and show it off in my gallery.
Email me!
Hugs,
Bev
No comments:
Post a Comment