Supplies
1 tube of choice - I used the wonderful artwork of PinUpToons here
Font of choice - I used Bonheur Royale which is a pay font
Gem Mask 150 here
Scraps of Enchantment Template 68 here - you'll find the link under Template and Wordart Links on the right hand side.
“Butterfly Effect” is a PTU scrap kit created by Helga of Classie Creationz and can be purchased at Butterfly Blush Designs. You can visit her blog here.
Thank you Helga for a really sweet kit!
This tutorial was written assuming you have a working knowledge of PSP.
~♥~ Let’s get started ~♥~
Open up the template.
Shift + D.
Close out the original.
Delete the Info layer.
Image/Canvas size
650 X 700
OK
New Raster layer.
Send to bottom.
Flood fill white.
Copy and paste Temp 2 as a new layer.
Resize 45%
Move into position over the Mat Template layer.
Delete the template layer.
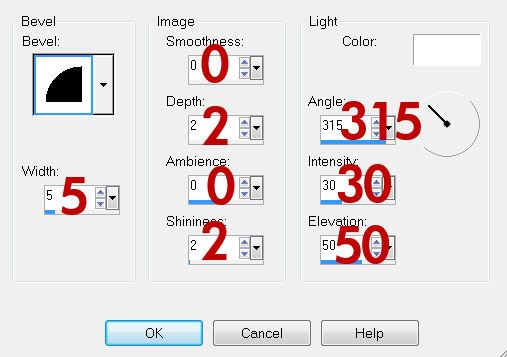
Give it a slight inner bevel:

Highlight Black Square layer.
Use your Magic Wand and click on it.
New Raster layer
Copy and paste a paper of choice Into Selection.
Deselect.
Delete the template layer.
Give it the same inner bevel.
Highlight Long Gray Rectangle layer.
Use your Magic Wand and click on it.
Copy and paste a paper of choice as a new layer.
Selections/Invert
Tap the delete key.
Deselect.
Give it the same inner bevel.
Delete the template layer.
Highlight Pink Frame layer.
Use your Magic Wand and click on it.
Copy and paste a paper of choice as a new layer.
Selections/Invert
Tap the delete key.
Deselect.
Delete the template layer.
Highlight White Frame layer.
Use your Magic Wand and click on it.
Flood fill with a dark color of choice.
Deselect.
Give it a slight inner bevel:

Copy and paste your tube as a new layer.
Highlight Stitch 4 as a new layer.
Resize 75%
Free rotate 90 degrees
Position to one side of the long rectangle.
Duplicate/Move to other side of rectangle.
See my tag for reference.
Paste Stitch 4 again.
Resize 50%
Move into position at the top of the square.
See my tag for reference.
Dupliciate/Flip
Position at bottom of square.
Duplicate Original/Free rotate 90 degrees
Move into position at the right side of the square.
Merge Visible all 3 stitch layers.
Add your embellishments. I used:
Flower 2: Resize 25% and 70%
Flower 1: Resize 25% and 80%
Bow Heart 3: Resize 30% Free rotate right 25 degrees
Firefly 2: Resize 25% Free rotate left 20 degrees
Highlight your white background.
New Raster layer.
Select All.
Copy and paste a paper of choice Into Selection.
Deselect.
Apply the Mask.
Merge Group.
Add your copyrights.
Add your name.
Give it the first inner bevel you used.
Resize all layers 80%.
I hope you enjoyed this tutorial.
I’d love to see your results and show it off in my gallery.
Email me!
Hugs,
Bev


No comments:
Post a Comment