Supplies
Font of choice - I used Oh Lara and is a pay font here
Weescotlass Mask 82 here
“Royal Roses” is a PTU art kit created by Kat of KatNKDA and can be purchased at her store NK Art Shop. You can visit her blog here.
Kat, I cam up with two words to fit this kit…..stunningly beautiful!
Thank you!
This tutorial was written assuming you have a working knowledge of PSP.
~♥~ Let’s get started ~♥~
Open up a 700 X 700 blank canvas.
Flood fill white.
Flood fill white.
Copy and Paste Element 38 as a new layer.
Resize 80%
Free rotate left 90 degrees
Use your Magic Wand and click inside the frame.
Selections/Modify/Expand by 6.
New Raster layer below the frame.
Copy and paste a paper of choice Into Selection or flood fill with a gradient.
Deselect.
Resize 80%
Free rotate left 90 degrees
Use your Magic Wand and click inside the frame.
Selections/Modify/Expand by 6.
New Raster layer below the frame.
Copy and paste a paper of choice Into Selection or flood fill with a gradient.
Deselect.
Copy and paste Element 42 as a new layer.
Mirror/Resize 65%
Move into position outside of the frame.
(See my tag for reference)
Paste Element 42 again.
Move it below the frame and into position.
(See my tag for reference)
Use your Magic Wand and click inside the frame.
Selections/Modify/Expand by 6.
Selections/Invert.
Highlight the owl that’s behind the frame.
Tap the delete key.
Deselect.
Change the properties to Soft Light.
Highlight the owl that’s on the outside of the frame.
Close the layer out….now we can decorate the frame without the owl being in our way.
Copy and paste Element 5 as a new layer.
Mirror.
Place behind the frame.
Paste Element 5 again as a new layer.
Resize 60%
Free rotate left 45 degrees.
Move into position.
Paste Element 5 once more.
Resize 50%
Move into position.
Resize 50%
Move into position.
Copy and paste Element 3 as a new layer.
Image/Mirror
Resize 35%
Move into position.
Copy and paste Element 3 again.
Resize 40% and move behind the frame.
See my tag for refrence. - the leaves peek out from the bottom left of the frame.
Duplicate and move so that it peeks out at the top right of the frame.
Duplicate/Mirror
Move into position right next to the other.
Again, see my tag for reference.
Resize 40% and move behind the frame.
See my tag for refrence. - the leaves peek out from the bottom left of the frame.
Duplicate and move so that it peeks out at the top right of the frame.
Duplicate/Mirror
Move into position right next to the other.
Again, see my tag for reference.
Copy and paste Element 2 as a new layer.
Resize 30%
Mirror.
Resize 30%
Mirror.
Copy and paste Element 1 as a new layer.
Resize 25%.
Move into position next to the other rose.
Copy and paste Element 6 as a new layer.
Mirror/Resize 60%
Move into position behind the bottom left of the frame.
Mirror/Resize 60%
Move into position behind the bottom left of the frame.
Copy and paste Element 32 as a new layer.
Resize 60%
Resize 60%
Copy and paste Element 30 as a new layer.
Free rotate right 30 degrees.
Move into position so that it looks like it’s hanging from below the bow.
Free rotate right 30 degrees.
Move into position so that it looks like it’s hanging from below the bow.
Copy and paste Element 23 as a new layer.
Resize 50%
Resize 50%
Open up your owl layer.
Highlight your white canvas.
New Raster layer.
Select All.
Copy and paste a paper of choice Into Selection
Deselect.
Apply the mask.
Use your Pick Tool and pull the sides out slightly.
Merge Group.
Add your credits.
If you only used this kit to create your tag please credit Kat
“art kit by KatNKDA”
Adding her website link would be greatly appreciated.
If you only used this kit to create your tag please credit Kat
“art kit by KatNKDA”
Adding her website link would be greatly appreciated.
Add your name.
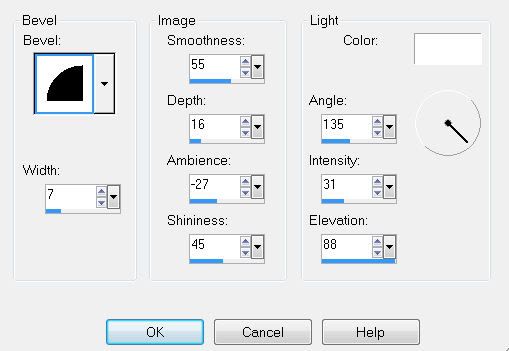
Give it an inner bevel:

Resize all layers 80%.
I hope you enjoyed this tutorial.
I’d love to see your results.
Email me!
Hugs,
Bev
Bev


No comments:
Post a Comment