

Clicking on the image will enlarge to full view.
Supplies
1 tube of choice - I used the wonderful artwork of Ted Hammond here
Font of choice - I used Angelina here.
Weescotlass Mask 82 here
Created by Hunne Designs Template #9 here
Filters Unlimited 2.0 - Optional
Xenofex 1 - Shower Door - Optional
Greg’s Factory Output Vol. II - Pool Shadow
“In a Heartbeat” is a FTU scrap kit created by Julie of Bits n Bobs and can be found on her blog here.
Thank you Julie for sharing such a nice little kit!
This tutorial was written assuming you have a working knowledge of PSP.
All the filters used in this tutorial are optional and using the ones in your PSP program can work just as well. Toying with the filters in your PSP program is half the fun!
~♥~ Let’s get started ~♥~
Open up the template.
Shift + D
Close out the original.
Delete Rasters 11, 10, Heart Frame, and Heart layers.
Flood fill Raster 1 white.
Shift + D
Close out the original.
Delete Rasters 11, 10, Heart Frame, and Heart layers.
Flood fill Raster 1 white.
Highlight the Large Rectangle layer.
Select All/Float/Defloat
New Raster layer.
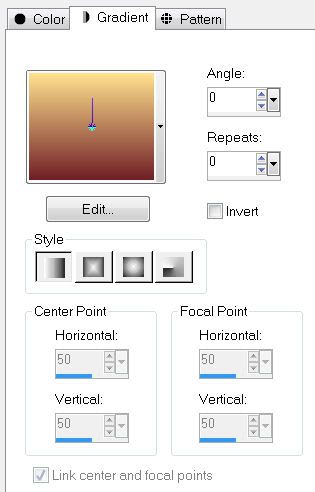
Flood fill with a gradient that will match the tube you’re using. (If you’re using the tube I used, I used the yellow and brown colors from one of the papers in the kit.)
Use these settings:
Deselect.
Delete the template layer.
Apply Filters Unlimited 2.0 -
Choose Special Effects 1 - Aged Film
Apply the default settings
Copy and paste 8 as a new layer just above your gradient layer.
Resize 25%
Move into position near the top of your gradient.
See my tag for reference.
Duplicate/Flip
Duplicate/Free rotate 90 degrees.
Duplicate/Mirror
Merge Visible all the stitch layers.
Highlight your gradient layer.
Select All/Float/Defloat
Selections/Invert
Highlight the merged stitch layer.
Tap the delete key.
Deselect.
Copy and Paste 7 as a new layer.
Resize 25% and 25%.
Position at the bottom left corner of your gradient layer above your stitching.
Duplicate/Flip
Duplicate/Mirror
Duplicate/Flip
Highlight Square Layer.
Select All/Float/Defloat
New Raster layer.
Check Invert in your color pallet.
Flood fill with your inverted gradient color.
DO NOT DESELECT.
Copy and paste your tube as a new layer.
Tap the delete key.
Deselect.
Highlight Square Frame layer.
Select All/Float/Defloat
We’ll come back to the frame.
For now, make Paper 2 from the kit active.
Shift + D.
Close out the original.
Adjust/Blur/Gaussian Blur
Radius: 10
OK
Copy
Make your working canvas active.
Edit/Paste Into Selection
Apply Greg’s Factory Output Vol. II - Pool Shadow
Default Settings
OK
Apply it once again.
Deselect.
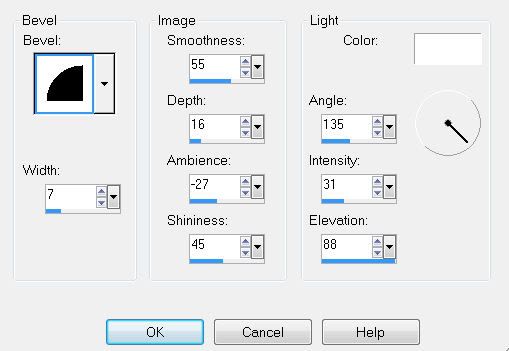
Give your frame a slight inner bevel:
Highlight the Diamond Layer.
Select All/Float/Defloat
New Raster layer.
Flood Fill with your gradient.
Selections/Modify/Contract by 5
OK
Tap the delete key.
Deselect.
Apply Greg’s Factory Output Vol. II - Pool Shadow
Same settings.
Apply it once again.
Give it the same inner bevel.
Highlight the Diamond template layer once again.
Select All/Float/Defloat
Selections/Modify/Contract by 2.
New Raster layer below the your diamond frame layer.
Invert your gradient again.
Flood fill.
DO NOT DESELECT.
Highlight your tube layer.
Duplicate/Mirror
Position beneath your diamond frames.
Selections/Invert
Tap the delete key.
Change the Properties to Hard Light.
Deselect.
Delete the template layer.
Copy and paste 9 as a new layer.
Resize 25% and 70%
Position behind the top Diamond layer.
Duplicate twice and position them beneath the remaining 2 diamonds.
Resize 25% and 70%
Position behind the top Diamond layer.
Duplicate twice and position them beneath the remaining 2 diamonds.
Copy and paste 2 as a new layer.
Resize 25%
See my tag for position.
Copy and paste 5 as a new layer.
Resize 25% and 50%
Position on each side of the heart.
Copy and paste 1 as a new layer.
Resize 30%
Position behind each corner of the square frame where your tube is.
Type out your name.
Free rotate left 15 degrees.
Apply the same inner bevel.
Crop your image.
Highlight your white background.
New Raster Layer.
Select All.
Copy and paste a paper of choice Into Selection.
(I used Paper 2)
Deselect.
Apply Xenofex - Show Door - default settings.
Apply the mask.
Use your Pick tool and pull the sides out slights.
Merge Group.
Add your copyrights.
Resize all layers 80%.
I hope you enjoyed this tutorial..
I’d love to see your results.
Email me!
Hugs,
Bev
Bev
No comments:
Post a Comment