Supplies
Font of Choice - Whutever here
Weescotlass Mask 39 here
My Template 32 here
“Beginning Fall” is a PTU tagger size scrap kit created by Mim of Contraste Scrap and can be purchased at Butterfly Blush Designs.
Thank you Mim for an incredibly precious kit!
This tutorial was written assuming you have a working knowledge of PSP.
~♥~ Let’s get started ~♥~
Open up my template.
Delete the copyright and Raster 3 layer.
Highlight the background layer.
Image/Canvas Size
700 x 700
Flood fill white.
We’re going to make the layer for the mask first.
Close out Diamond 1 & 2 layers, and also the frame layer.
New Raster Layer.
Copy and paste a paper of choice Into Selection.
Deselect.
Copy and paste E14 (the fence) as a new layer.
Position it to the center right side of your canvas.
Duplicate/Mirror
Don’t worry that there’s a gap in between the fences.
Copy and paste E4 as a new layer.
Position it at the bottom of the fence.
Copy and paste E13 as a new layer.
Resize 80%
Position in the top left corner of your canvas.
Copy and paste E32 as a new layer.
Resize 30%
Position behind the fence on the right side.
Close out your white canvas.
Merge Visible.
Reopen all your layers - even the template layers.
Be sure the layer you just made is highlighted.
Apply the mask.
Highlight the Mask layer itself.
Resize 120%.
Merge Group.
Highlight Diamond 1 layer.
Select All/Float/Defloat
New Raster layer.
Copy and paste a paper of choice Into Selection.
Deselect.
Change the Properties to Overlay.
Merge Down.
Repeat with Diamond 2 layer.
Highlight the Frame layer.
Select All/Float/Defloat
New Raster Layer.
Flood fill with a complimentary color.
Selections/Invert
Tap the delete button.
Deselect.
Change the Properties to Overlay.
Merge Down.
Using your Free Hand Selection Tool, outline the frame.
Copy and paste a paper of choice below the frame.
Selections/Invert
Tap the delete button.
Deselect.
Copy and paste E35 as a new layer.
Get rid of any that overhangs the frame near the bottom.
Add your embellishments. I used:
E19 & E20: Resize 30%
E6: Resize 40%
E26: Resize 40%
E15: Resize 50% Duplicate/Resize 80%
Add your copyrights.
If you only used the scrap kit and no PTU artist tube then please give credit to the designer of the kit.
Add your name.
What I did with mine is this:
In your color pallet:
Foreground: #4c3a21
Background: Set on Patter with Paper 4 from the kit
Stroke set on 2.
Type out your name.
Change it to a Raster layer.
Select All/Float/Defloat
Selections/Modify/Contract by 2
Copy and paste E5 as a new layer, positioning it over your name.
Selections/Invert
Tap the delete key.
Change the Properties to Overlay.
Deselect.
Merge Down.
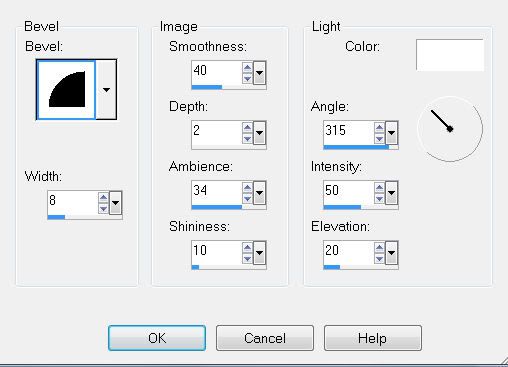
Give it a slight bevel:

Resize all layers 85%
I hope you enjoyed this tutorial.
I’d love to see your results and show it off in my Show Arena.
Email me!
Hugs,
Bev


No comments:
Post a Comment