 Clicking on the image will enlarge to full view.
 Supplies
1 tube of choice - I’m using the artwork of Elias Chatzoudis which you can purchase here
Font of Choice - AL Sandra here
Weescotlass Mask 133 here
Kelly’s Kreations Template #11 here
Eyecandy 5: Impact - Gradient Glow
Greg’s Factory Output Vol. II - Pool Shadow
“Summer Serenade” is a PTU scrap kit available in both tagger and full size created by Lori of Crazy Lady Scraps. It can be purchased at The Scrap Assylum.
This kit is packed full with embellishments as well as rich bright colors!!
Thank you so much, Lori!
This tutorial was written assuming you have working knowledge of PSP.
~♥~ Let’s get started ~♥~
Open up the template.
Shift + D. Close out the original.
Delete the copyright layer.
Highlight BKG layer.
Flood fill white.
Highlight Heart 1 layer,.
Select All/Float/Defloat
Copy and paste a paper of choice as a new layer.
Selections/Invert
Hit the delete key.
Deselect.
Delete the template layer.
Highlight Heart Outline.
Select All/Float/Defloat
Copy and paste a paper of choice as a new layer.
Selections/Invert
Hit the delete key.
Deselect.
Apply Greg’s Factory Output Vol. II - Pool Shadow using default settings.
Apply it once again.
Delete the template layer.
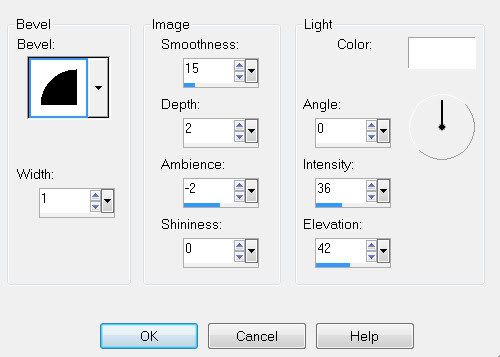
Give it a slight inner bevel:

Use your Magic Wand and click inside the Heart Outline.
Selections/Modify/Expand by 2
New Raster layer BELOW the Heart Outline.
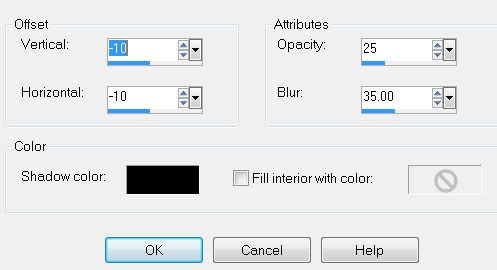
Effects/3D Effects/Cutout

New Raster layer.
Repeat the above cutout.
Merge Visible Heart 1, Heart 1 Outline, and the cutout layers.
Repeat all of the above steps with all the remaining hearts in this template.
Highlight Rectangle Outline.
Select All/Float/Defloat
Copy and paste a paper of choice as a new layer.
Selections/Invert
Hit the delete key.
Deselect.
Delete the template layer.
Give it the same slight inner bevel.
Highlight Rect Inner layer.
Select All/Float/Defloat
Copy and paste a paper of choice as a new layer.
Selections/Invert
Hit the delete key.
Deselect.
Delete the template layer.
Highlight Rect Inner 1 layer.
Select All/Float/Defloat
Copy and paste a paper of choice as a new layer.
(I created a New Raster Layer and pasted a paper Into Selection)
Selections/Invert
Hit the delete key.
DO NOT DESELECT.
Delete the template layer.
Highlight Rect Inner layer.
Selections/Modify/Contract by 3
Tap the delete key.
Deselect.
Move Rect Inner 1 Layer below Rect Inner Layer.
Give Rect Inner Layer a slight inner bevel.
Use your Magic Wand and click inside Rect Inner 1 Layer.
New Raster Layer below Rect Inner 1 layer.
Apply the same Cutout as before.
Merge Visible Rect Outline, Rect Inner 1, Cutout layers, and Rect Inner layers.
Highlight Hearts layer.
Select All/Float/Defloat
Copy and paste a paper of choice as a new layer.
Selections/Invert
Hit the delete key.
Deselect.
Delete the template layer.
Copy and paste the grass as a new layer.
Resize 50%
Duplicate as many times as you like creating a bed of grass.
Merge Visible all grass layers.
Using your Selection Tool, outline the grass - make sure the Tool line isn’t near the top of the blades of grass.
Selections/Modify/Feather
Number of Pixels: 53
Selections/Invert
Tap the delete key until you’re happy with the feathered look.
Deselect.
Add your embellishments. I used:
Hummingbird: Resize 25% and 70%
Element 20: Resize 35%
Butterfly: Resize 25% Duplicate/Mirror: Resize 70%
Element 3: Resize 20%
Element 4: Resize 20% and 80%
Element 34
Highlight your white canvas.
New Raster Layer.
Select All.
Copy and paste a paper of choice Into Selection.
Deselect.
Apply the mask.
Merge Group.
Resize 110%
Add your copyrights.
Add your name.
Give it a slight inner bevel.
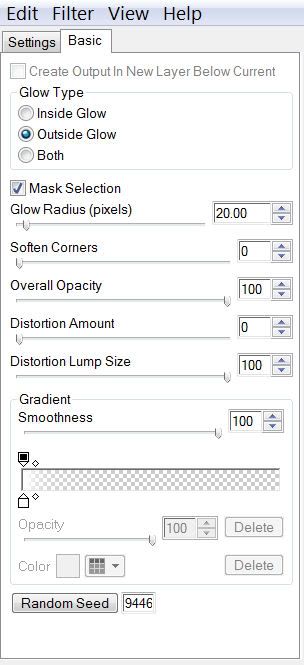
I gave mine a glow using Eyecandy 5: Impact Gradient Glow

Resize all layers 85%.
I hope you enjoyed this tutorial.
I’d love to see your results and show it off in my Show Arena.
Email me!
Hugs,
Bev

No comments:
Post a Comment