
 Clicking on the above image will enlarge to full view.
The one below shows the animation.
Supplies
1 tubes of choice - I’m using the artwork of Elizabeth Austin which you can purchase here
Font of Choice - Partridge here
Babes Designz Template #14 here
Penta.com - Jeans
DSB Flux - Bright Noise
Animation Shop
“Fantasia” is a tagger size scrap kit created Terry of Treasures by Terry and can be purchased here. You can visit her blog here.
Thank you Terry for such a fabulous kit!
This tutorial was written assuming you have working knowledge of PSP.
~♥~ Let’s get started ~♥~
Open up the template.
Shift +D and close out the original.
Delete the copyright layer.
Highlight the background layer.
Image/Canvas Size
700 x 700
Flood fill white.
Highlight the Heart Border layer.
Select All/Float/Defloat
Copy and paste a paper of choice as a new layer.
Selections/Invert
Hit the delete key.
Deselect.
Delete the template layer.
Repeat the above step with all remaining layers.
Highlight the Circles layer.
Select All/Float Defloat
Copy and paste your tube as a new layer -
Positioning it over the larger circle.
Selections/Invert
Hit the delete key.
Change the Properties to Luminance.
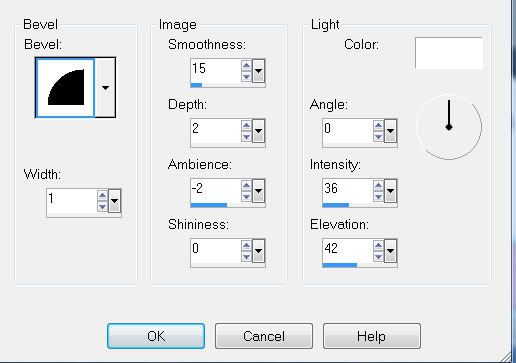
Now go back and add a slight inner bevel to each layer accept your tube layer.
Add your embellishments. I used:
Feather 3: Resize 60% - position behind Circles layer
Feather 2: Resize 40%
Mat 1
Butterfly 3: Resize 35%
Add your copyrights.
Add your name.
Crop your image.
You’ll have to pay close attention to the directions here.
If you take it a step at a time you shouldn’t have any trouble.
Highlight the circle of hearts and duplicate.
Close out the Original.
Close out your white canvas.
Merge Visible.
Duplicate.
Reopen your white canvas.
Merge Visible.
Duplicate.
Reopen your white canvas.
Highlight the merged layer.
Adjust/Blur/Gaussian Blur
Radius: 15
Apply Penta.com - Jeans
Amount: 62
Border Width: 4
OK
Arrange this layer in your pallet so that it’s just above your white canvas.
Reopen the circle of hearts.
Duplicate it twice for a total of 3 layers.
Rename each layer Hearts 1, Hearts 2, and Hearts 3.
We’ll come back to the hearts layers in just a minute.
For now, close the 3 hearts layers out.
Highlight the Copy of the Merged layer.
Use your erase tool and carefully erase the circle of hearts.
Use your erase tool and carefully erase the circle of hearts.
Reopen and Highlight Hearts 1.
Apply the DSB Flux - Bright Noise
Intensity: 45
Mix button checked
OK
Apply the DSB Flux - Bright Noise
Intensity: 45
Mix button checked
OK
Reopen and Highlight Hearts 2.
Apply the same Bright Noise accept hit the mix button twice.
Reopen and Highlight Hearts 3.
Apply the same Bright Noise accept hit the mix button three times.
Close out Heart layers 2 & 3.
Time to animate.
Copy Merge and carry into Animation Shop.
Edit/Paste/As New Animation.
Go back into PSP.
Close out Hearts 1 and open up Hearts 2.
Copy Merge and carry into AS.
Edit/Paste/After Current Frame
Go back into PSP.
Close out Hearts 2 and open up Hearts 3.
Copy Merge and carry into AS.
Edit/Paste/After Current Frame
View your animation.
If you’re happy then save.
Hugs,
Bev
No comments:
Post a Comment