

Clicking on the image will enlarge to full view.
The tag below will not enlarge, but shows the animation
Supplies Needed
1 tube of choice. I'm using the artwork of Gennadiy Kouffay which you can purchase here
Font of choice - I'm using Matura MT Script C – came with my pc
Vanderlee – Snowflakes here
Animation Shop
"At the Beach" PTU tagger kit by Bits ‘n Bobs which can be found here. You can visit Julie’s blog here where you can have a look at more of her talent.
This tutorial was written assuming you have working knowledge of PSP.
~♥~ Let’s get started ~♥~
The easiest way to complete this tut is if we assemble the entire tag first and then go back to duplicate layers, etc…getting it ready to carry into Animation Shop. I hope I didn’t scare ya off already. It really isn’t hard at all…promise:O)
Open up a blank 700 X 700 canvas. Flood fill white.
Copy and paste a Frame as a new layer. Use your magic wand and click inside of it. Selections/Modify/Expand by 6. Copy and paste Paper 5 as a new layer. Selections/Invert. Hit the delete button.
New Raster Layer. Effects/3D Effects/Cutout:
Vertical and Horizontal: 10
Opacity and Blur: 25
Color: Black
Repeat the above step accept change the vertical and horizontal number to -10.
Copy and paste your tube beneath the cutout layer.
Add your embellishments. I used:
Flower Clip 2
Deck Chair 2
Paper Fold 3: Resize 50%
Tag 4
Type out the words:
Sweet Summer Rain (or whatever you choose) and position them at the top of your canvas.
Highlight your white canvas. New Raster Layer. Selectioins/Select All. Copy and paste a paper of choice Into Selection. Deselect. Apply the mask. Resize 110%.
Add your copyrights.
Add your name. For the name I used:
Foreground: #705437
Background: Set to Pattern using Paper 5
Stroke: 2
Tip: Don’t drop shadow your name
Give it a slight inner bevel:
Bevel: 2
Width: 3
Smoothness: 35
Depth: 2
Ambience: -8
Shininess: 10
Color: white
Angle: 315
Intensity: 75
Elevation: 20
OK
~Now we’re going to start making layers for the animation~
Highlight your Frame Layer. Use your Magic Wand and click inside of it. Selections/Modify/Expand by 6.
Tip: If you already drop shadowed your frame the make your Expand number larger. You want the dotted lines on the frame, not inside the frame.
Highlight your tube layer. Now create 4 new Raster Layers renaming them Rain 1, 2, 3, 4.
Highlight Rain 1 and apply The Vanderlee Snowflakes with the following settings.
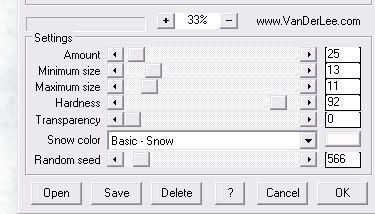
Repeat this with Rain layers 2, 3, and 4 but be sure that each time you apply it you move the random seed button to a different number! After you’ve done this step to all the rain layers then deselect.
Now go back to Rain Layer 1.
Adjust/Blur/Motion Blur:
Angle: 207
Strength: 35
OK
Adjust/Sharpness/Sharpen More
Repeat the above steps with Rain layers 2, 3, and 4.
Close out Rain Layers 2, 3, and 4.
Now for your name we’re going to do almost the same thing.
Duplicate your name 3x for a total of 4 layers. Rename them Name 1, 2, 3, and 4.
Highlight Name 1.
Select All/Float/Defloat
Modify/Contract by 2
New Raster Layer
Apply Vanderlee Snowflake – same settings as before.
Tip: Be sure the number is lowered near 0 again as we’re going to have to move the random seed with each name layer. The number don’t have to be the exact same as you used on the frame rain :O)
Apply the same Motion Blur as before
Deselect
Adjust/Sharpen/Sharpen More
Merge Down
Drop Shadow.
Close the layer out.
Repeat the above steps with Name Layers 2, 3, and 4.
Close out layers 2, 3, and 4.
We’re ready to animate!!
Close out all your layers. Only open up your white canvas layer, mask layer, paper background to the frame, your tube layer, and Rain Layer 1. Copy Merge and carry into Animation Shop.
Paste As New Animation.
Go back into PSP. Close out Rain Layer 1 and Open up Rain Layer 2. Copy Merge and carry into Animation Shop.
Edit/Paste/After Current Frame
Repeat the above with Rain layers 3 and 4.
Go back into PSP and close out all your layers again. Open up your Frame layer and all your embellishments. DO NOT OPEN UP ANY OF YOUR NAME LAYERS. Copy Merge and carry into AS.
Click on the Propogate Paste icon at the top of the screen (it looks like a film strip).
Highlight the working animation that we’ve already started. Ctl + A to highlight all the frames. Now press Ctl + E. Position the frame and then click your mouse. Go ahead, check out your animation! Lookin’ good?!
Now go back into PSP. Highlight Name Layer 1 and carry into AS.
Paste As New Animation.
Back into PSP. Copy Name Layer 2 and carry into AS.
Edit/Paste/After Current Frame.
Repeat this step with Name Layers 3 and 4.
Ctl + A to highlight all the name frames.
Highlight your animated tag. Highlight all the frames.
The Propogate Paste button should still be pressed.
Ctl + E and position your name.
Resize your animation:
Animation/Resize animation:
Percentage of Original checked
85%
Save your tag.
I’d love to see your results.
Email me!
Hugs,
Bev
1 tube of choice. I'm using the artwork of Gennadiy Kouffay which you can purchase here
Font of choice - I'm using Matura MT Script C – came with my pc
Vanderlee – Snowflakes here
Animation Shop
"At the Beach" PTU tagger kit by Bits ‘n Bobs which can be found here. You can visit Julie’s blog here where you can have a look at more of her talent.
This tutorial was written assuming you have working knowledge of PSP.
~♥~ Let’s get started ~♥~
The easiest way to complete this tut is if we assemble the entire tag first and then go back to duplicate layers, etc…getting it ready to carry into Animation Shop. I hope I didn’t scare ya off already. It really isn’t hard at all…promise:O)
Open up a blank 700 X 700 canvas. Flood fill white.
Copy and paste a Frame as a new layer. Use your magic wand and click inside of it. Selections/Modify/Expand by 6. Copy and paste Paper 5 as a new layer. Selections/Invert. Hit the delete button.
New Raster Layer. Effects/3D Effects/Cutout:
Vertical and Horizontal: 10
Opacity and Blur: 25
Color: Black
Repeat the above step accept change the vertical and horizontal number to -10.
Copy and paste your tube beneath the cutout layer.
Add your embellishments. I used:
Flower Clip 2
Deck Chair 2
Paper Fold 3: Resize 50%
Tag 4
Type out the words:
Sweet Summer Rain (or whatever you choose) and position them at the top of your canvas.
Highlight your white canvas. New Raster Layer. Selectioins/Select All. Copy and paste a paper of choice Into Selection. Deselect. Apply the mask. Resize 110%.
Add your copyrights.
Add your name. For the name I used:
Foreground: #705437
Background: Set to Pattern using Paper 5
Stroke: 2
Tip: Don’t drop shadow your name
Give it a slight inner bevel:
Bevel: 2
Width: 3
Smoothness: 35
Depth: 2
Ambience: -8
Shininess: 10
Color: white
Angle: 315
Intensity: 75
Elevation: 20
OK
~Now we’re going to start making layers for the animation~
Highlight your Frame Layer. Use your Magic Wand and click inside of it. Selections/Modify/Expand by 6.
Tip: If you already drop shadowed your frame the make your Expand number larger. You want the dotted lines on the frame, not inside the frame.
Highlight your tube layer. Now create 4 new Raster Layers renaming them Rain 1, 2, 3, 4.
Highlight Rain 1 and apply The Vanderlee Snowflakes with the following settings.
Repeat this with Rain layers 2, 3, and 4 but be sure that each time you apply it you move the random seed button to a different number! After you’ve done this step to all the rain layers then deselect.
Now go back to Rain Layer 1.
Adjust/Blur/Motion Blur:
Angle: 207
Strength: 35
OK
Adjust/Sharpness/Sharpen More
Repeat the above steps with Rain layers 2, 3, and 4.
Close out Rain Layers 2, 3, and 4.
Now for your name we’re going to do almost the same thing.
Duplicate your name 3x for a total of 4 layers. Rename them Name 1, 2, 3, and 4.
Highlight Name 1.
Select All/Float/Defloat
Modify/Contract by 2
New Raster Layer
Apply Vanderlee Snowflake – same settings as before.
Tip: Be sure the number is lowered near 0 again as we’re going to have to move the random seed with each name layer. The number don’t have to be the exact same as you used on the frame rain :O)
Apply the same Motion Blur as before
Deselect
Adjust/Sharpen/Sharpen More
Merge Down
Drop Shadow.
Close the layer out.
Repeat the above steps with Name Layers 2, 3, and 4.
Close out layers 2, 3, and 4.
We’re ready to animate!!
Close out all your layers. Only open up your white canvas layer, mask layer, paper background to the frame, your tube layer, and Rain Layer 1. Copy Merge and carry into Animation Shop.
Paste As New Animation.
Go back into PSP. Close out Rain Layer 1 and Open up Rain Layer 2. Copy Merge and carry into Animation Shop.
Edit/Paste/After Current Frame
Repeat the above with Rain layers 3 and 4.
Go back into PSP and close out all your layers again. Open up your Frame layer and all your embellishments. DO NOT OPEN UP ANY OF YOUR NAME LAYERS. Copy Merge and carry into AS.
Click on the Propogate Paste icon at the top of the screen (it looks like a film strip).
Highlight the working animation that we’ve already started. Ctl + A to highlight all the frames. Now press Ctl + E. Position the frame and then click your mouse. Go ahead, check out your animation! Lookin’ good?!
Now go back into PSP. Highlight Name Layer 1 and carry into AS.
Paste As New Animation.
Back into PSP. Copy Name Layer 2 and carry into AS.
Edit/Paste/After Current Frame.
Repeat this step with Name Layers 3 and 4.
Ctl + A to highlight all the name frames.
Highlight your animated tag. Highlight all the frames.
The Propogate Paste button should still be pressed.
Ctl + E and position your name.
Resize your animation:
Animation/Resize animation:
Percentage of Original checked
85%
Save your tag.
I’d love to see your results.
Email me!
Hugs,
Bev
No comments:
Post a Comment